
EagleFiler Manual
This manual is also available in EagleFiler’s Help menu, as a PDF (6.9 MB), and as multi-page online help. For other languages, please see Google Translate. There is also a screencast that covers EagleFiler basics.
Contents
- 1 Introduction
- 2 Installing and Updating
- 3 Using EagleFiler
- 3.1 Basics
- 3.2 Library Folders
- 3.3 What Can Be Imported
- 3.4 Ways to Import
- 3.4.1 Applications That Support Capture
- 3.4.2 Importing Existing Files
- 3.4.3 Importing Text Snippets
- 3.4.4 Importing From a Scanner
- 3.4.5 The To Import Folder
- 3.4.6 The Files Folder
- 3.4.7 Services
- 3.4.8 Save PDF to EagleFiler
- 3.4.9 Share Extension
- 3.4.10 Importing iMessages
- 3.4.11 Importing From iOS
- 3.4.12 Importing via a Quick Action
- 3.4.13 Importing via PopClip
- 3.5 Importing Web Pages and URLs
- 3.6 Importing Mail
- 3.6.1 Importing Mail From Apple Mail
- 3.6.1.1 Importing Attachments From Apple Mail
- 3.6.1.2 Missing Apple Mail Messages and Attachments
- 3.6.1.3 Importing Conversations From Apple Mail
- 3.6.1.4 Importing Gmail Messages From Apple Mail
- 3.6.1.5 Importing Whole Apple Mail Mailbox Hierarchies
- 3.6.1.6 Importing via Apple Mail’s File Menu
- 3.6.1.7 Importing Only Newer Apple Mail Messages
- 3.6.1.8 Importing Apple Mail “.mbox” Folders
- 3.6.1.9 Handling Duplicate Messages in Apple Mail
- 3.6.1.10 Differing Message Counts Importing From Apple Mail
- 3.6.2 Importing Mail From Airmail
- 3.6.3 Importing Mail From Entourage
- 3.6.4 Importing Mail From Eudora
- 3.6.5 Importing Mail From GyazMail
- 3.6.6 Importing Mail From MailMate
- 3.6.7 Importing Mail From MailMaven
- 3.6.8 Importing Mail From Mail Pilot
- 3.6.9 Importing Mail From Mailsmith
- 3.6.10 Importing Mail From Mbox Files
- 3.6.11 Importing Mail From Outlook
- 3.6.12 Importing Mail From Outspring Mail
- 3.6.13 Importing Mail From Postbox
- 3.6.14 Importing Mail From PowerMail
- 3.6.15 Importing Mail From Thunderbird and Eudora 8
- 3.6.16 Importing Mail From Webmail/Gmail
- 3.6.1 Importing Mail From Apple Mail
- 3.7 Drag and Drop
- 3.8 Shortcuts
- 4 Browser Windows
- 5 Menus
- 5.1 The EagleFiler Menu
- 5.2 The File Menu
- 5.2.1 New Library…
- 5.2.2 New Record ‣ Rich Text File
- 5.2.3 New Record ‣ Plain Text File
- 5.2.4 New Record ‣ From Clipboard
- 5.2.5 New Record ‣ Open Stationery Folder
- 5.2.6 New Folder…
- 5.2.7 New Tag
- 5.2.8 New Browser Window
- 5.2.9 New Tab
- 5.2.10 New Smart Folder…
- 5.2.11 Edit Smart Folder…
- 5.2.12 Open Library…
- 5.2.13 Close & Lock
- 5.2.14 Scan for New Files
- 5.2.15 Import Files…
- 5.2.16 Import URLs…
- 5.2.17 Import Bookmarks…
- 5.2.18 Import ENEX File…
- 5.2.19 Import from iPhone Camera
- 5.2.20 Export…
- 5.2.21 Backup Metadata
- 5.2.22 Empty Trash…
- 5.2.23 Print
- 5.3 The Edit Menu
- 5.4 The View Menu
- 5.4.1 Show Tab Bar
- 5.4.2 Show All Tabs
- 5.4.3 Message ‣ Raw Source
- 5.4.4 Message ‣ Plain Text
- 5.4.5 Message ‣ Rich Text
- 5.4.6 Message ‣ Use Quick Look
- 5.4.7 PDF ‣ Next/Previous Page
- 5.4.8 Show ‣ Source List
- 5.4.9 Show ‣ Record Viewer
- 5.4.10 Show ‣ Deleted Messages
- 5.4.11 Show ‣ Messages in Records Source
- 5.4.12 Show ‣ Messages in Tag Sources
- 5.4.13 Allow Editing in Record Viewer
- 5.4.14 Open in New Window
- 5.4.15 Enter Full Screen
- 5.5 The Go Menu
- 5.6 The Record Menu
- 5.6.1 Mark as Unread/Read
- 5.6.2 Mark as Flagged/Unflagged
- 5.6.3 Tag
- 5.6.4 Edit Notes
- 5.6.5 Set Label
- 5.6.6 Move To
- 5.6.7 Batch Change…
- 5.6.8 Convert for Editing
- 5.6.9 Verify
- 5.6.10 Update Checksum
- 5.6.11 Merge Mailboxes/Message Files
- 5.6.12 Reply to Message
- 5.6.13 Open With External Viewer
- 5.6.14 Open With
- 5.6.15 Open Source URL
- 5.6.16 Quick Look
- 5.6.17 Slideshow
- 5.6.18 Reveal in Finder
- 5.7 The Format Menu
- 5.8 The Window Menu
- 5.9 The Help Menu
- 5.10 The Dock Menu
- 6 Settings
- 6.1 Capture key
- 6.2 Capture with options
- 6.3 Quick entry
- 6.4 Web page format
- 6.5 Spotlight comments
- 6.6 Fonts
- 6.7 Search highlight color
- 6.8 Quoted Text Colors
- 6.9 Remember open libraries between launches
- 6.10 Copy tags to Spotlight comments
- 6.11 Allow duplicate files in library
- 6.12 Esoteric Preferences
- 7 Extending EagleFiler
- 8 Frequently Asked Questions (FAQ)
- 8.1 How can I access my library from multiple Macs?
- 8.2 How can I put my library on my iPhone?
- 8.3 How can I encrypt my files?
- 8.4 Where is my EagleFiler library?
- 8.5 How can I rebuild a library?
- 8.6 How can I run optical character recognition (OCR) on my PDFs?
- 8.7 How can I move messages between mailboxes?
- 8.8 How can I copy my tags to another library?
- 8.9 How do Finder tags work with EagleFiler?
- 8.10 How does indexing in EagleFiler work?
- 8.11 Why does EagleFiler import the wrong Web page when I press the capture key?
- 8.12 How can I speed up EagleFiler?
- 8.13 Why doesn’t my serial number work?
- 8.14 Should I download EagleFiler from this free site?
- 8.15 How can I open the Library folder?
- 8.16 How can I back up my EagleFiler data?
- 8.17 What information should I include when I report a problem?
- 9 Legal Stuff
- 10 Version History
1 Introduction
EagleFiler makes organizing and managing your information easy. It lets you archive and search Web pages, mail, PDF files, images, audio/video files, and more. Edit RTF, plain text, and Markdown files using a familiar three-pane interface. Organize files of all types into folders and annotate them with tags and notes, or leave everything in one folder and pin-point the information you need using the live search or a smart folder. Since EagleFiler stores its library in Finder format, you can use it in concert with the other tools in your Mac ecosystem.
EagleFiler in a nutshell:
- With a single keypress, import a Web page, mail messages, a scrap of text, or any file on your Mac.
- EagleFiler stores them in an open format: regular files and folders that are fully accessible to your other applications.
- Optionally: encrypt the files, add tags, notes, color-coded labels, and other metadata.
- Browse by folder or by tag, or use the live search to find the information you need (faster than Spotlight).
- View, edit, or create documents directly in EagleFiler’s streamlined interface, or double-click to edit using a more specialized application.
What can you do with EagleFiler? EagleFiler is a digital filing cabinet, an information organizer, and a note-taking app. You can use it to archive and search large amounts of e-mail, write a journal, track the files for a project, save local copies of Web pages, store financial statements, run a paperless office, or plan a trip. Use EagleFiler as a bookmark manager, a recipe database, a snippet collector, a document manager, or an issue tracker. Organize scientific research papers or legal records, assemble a scrapbook, or keep a notebook for a college course. It’s the most flexible tool on your Mac.
1.1 Importing Is a Snap
Getting your information into EagleFiler is easy. When you’re viewing a Web page in Safari or Chrome, looking at a mailbox in Mail, or browsing files in the Finder, just press the capture key (F1 by default, or Option-F1 to see the options below). EagleFiler will save the document into its library, and you can go right on working without interrupting your flow. (Of course, you can also use drag and drop or other methods if you prefer.) Once the document is in EagleFiler, you’ll always have a copy of the way it looked when you imported it. No more bookmarking a great article, only to find out later that the page is no longer available or that registration or even payment is now required. If you do research on the Web, you know that pages change—sometimes without notice—so it’s always good to keep a paper trail of exactly what you read. There’s no shame in being a digital pack rat when today’s Macs ship with tens or even hundreds of gigabytes of storage.
1.2 Familiar Mail-like Interface
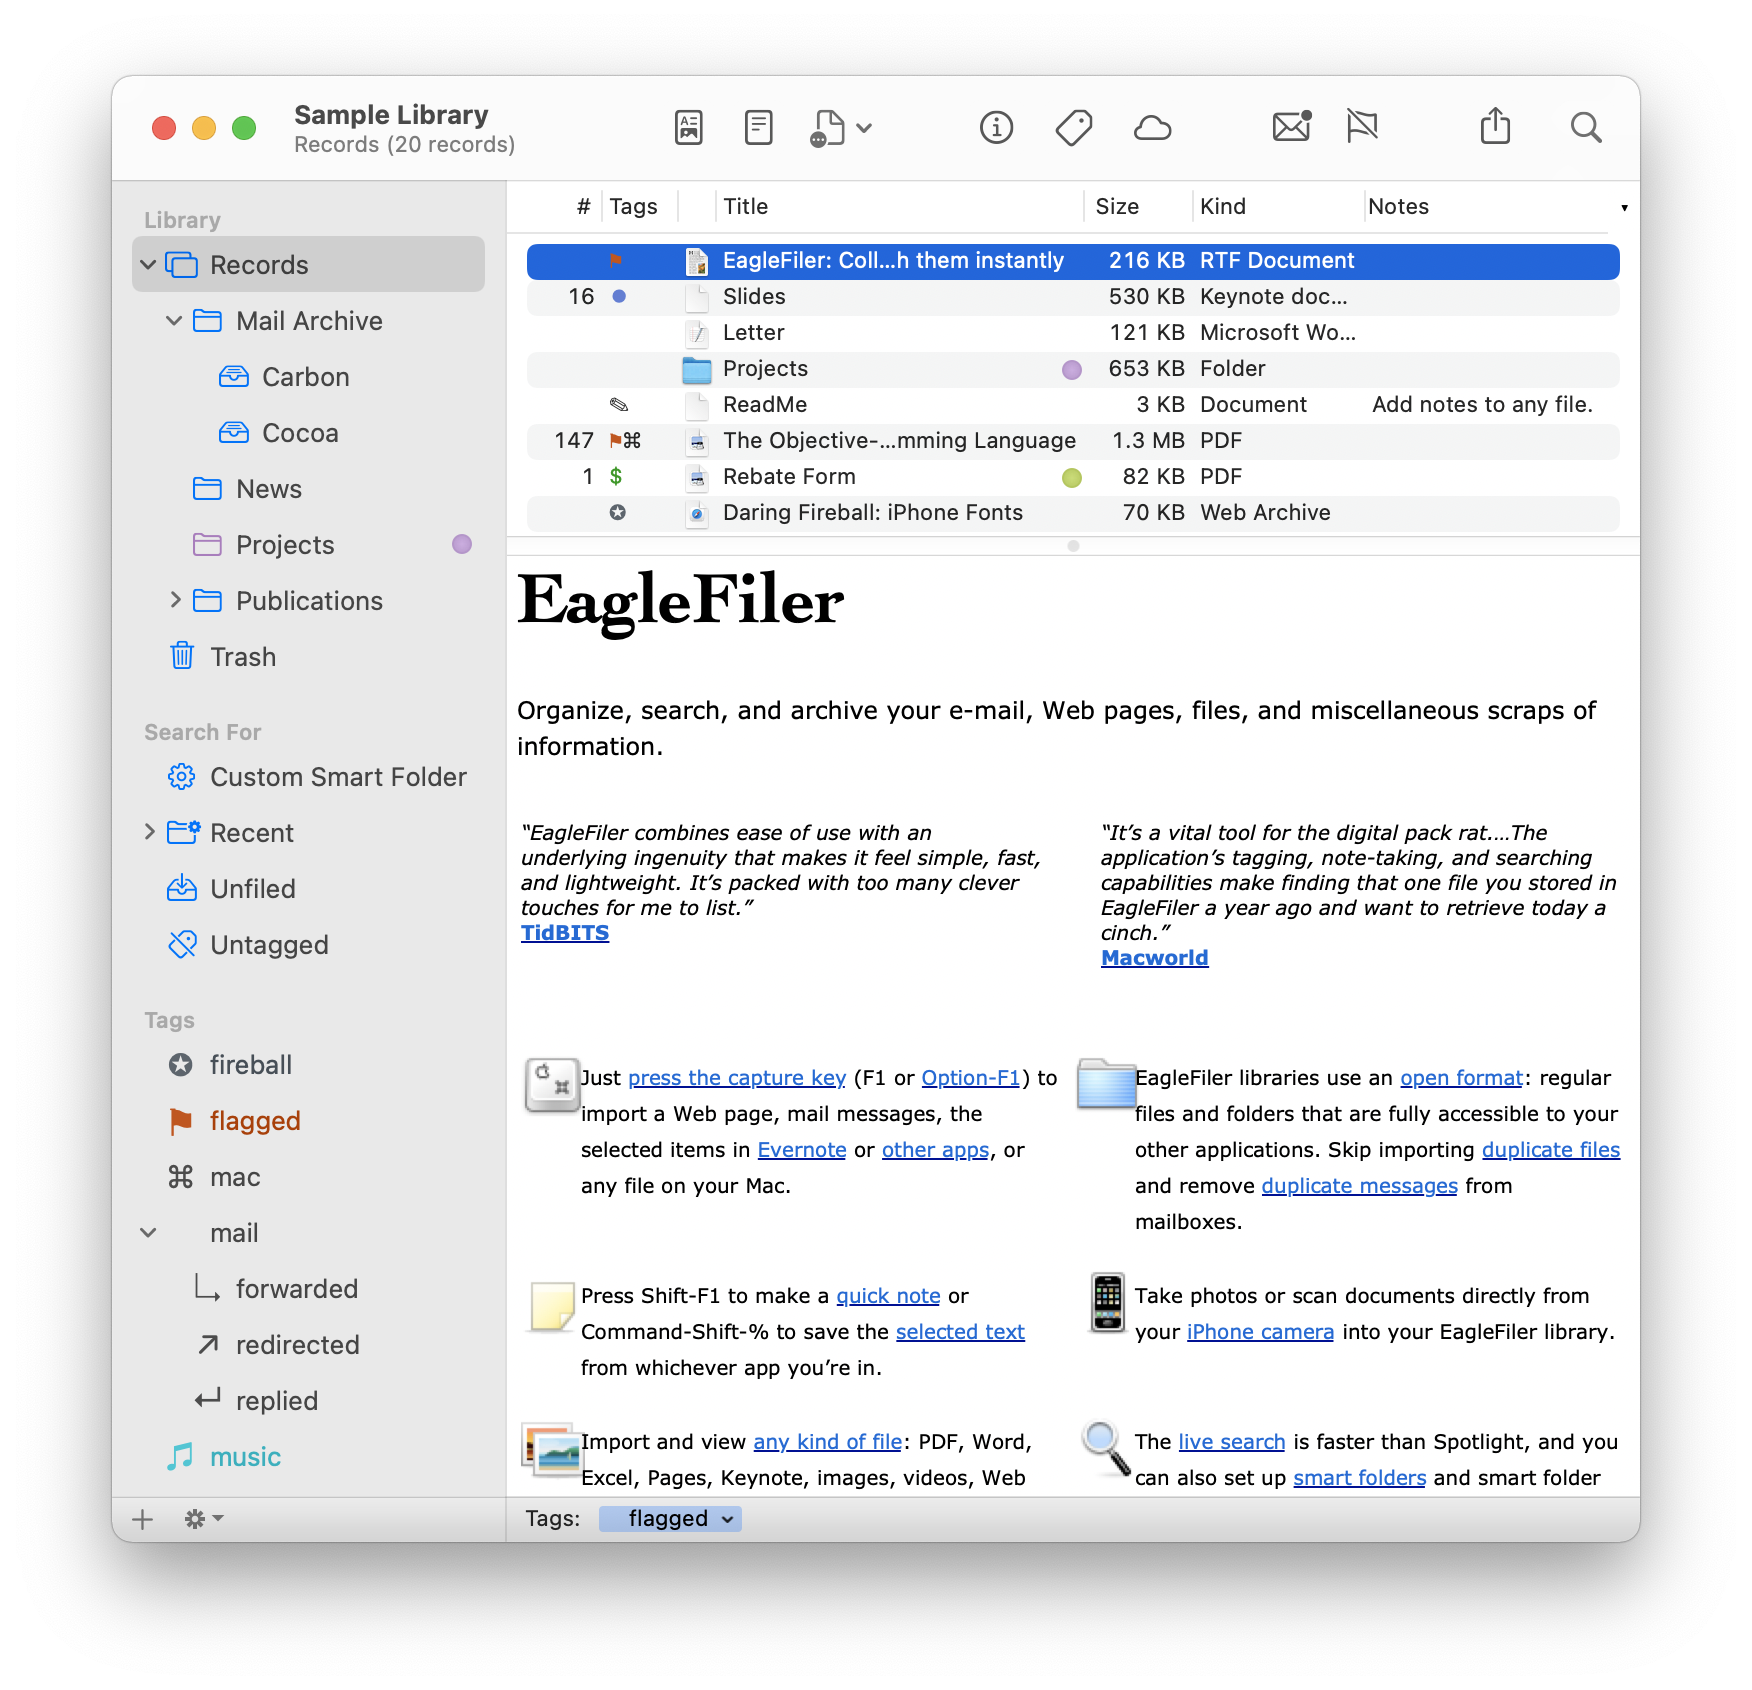
EagleFiler browser windows use a three-pane view that’s familiar to any Mail user. This is not a database front-end; it’s a real Mac application with a fully Aqua user interface. Click on one or more sources to view their contents. Enter some text in the search box to filter the record list. Click on a record to view it right there in the window. HTML mail messages can be viewed as rich text, or you can view e-mails as plain text, complete with color-coded quoted text and clickable links. You can open as many windows as you want to view different parts of the library.
1.3 Search Everything
It’s no good to store your information if you can’t find it when you need it. Fortunately, EagleFiler offers some powerful search options. If you know the title, author, or recipient you’re looking for, you can search by one of those fields. Or, use EagleFiler’s indexed search to look through the entire contents of your documents. Like Spotlight, EagleFiler can search different types of files at once—after all, what matters is what you’re looking for, not whether it’s in a PDF, an e-mail, or a chat.
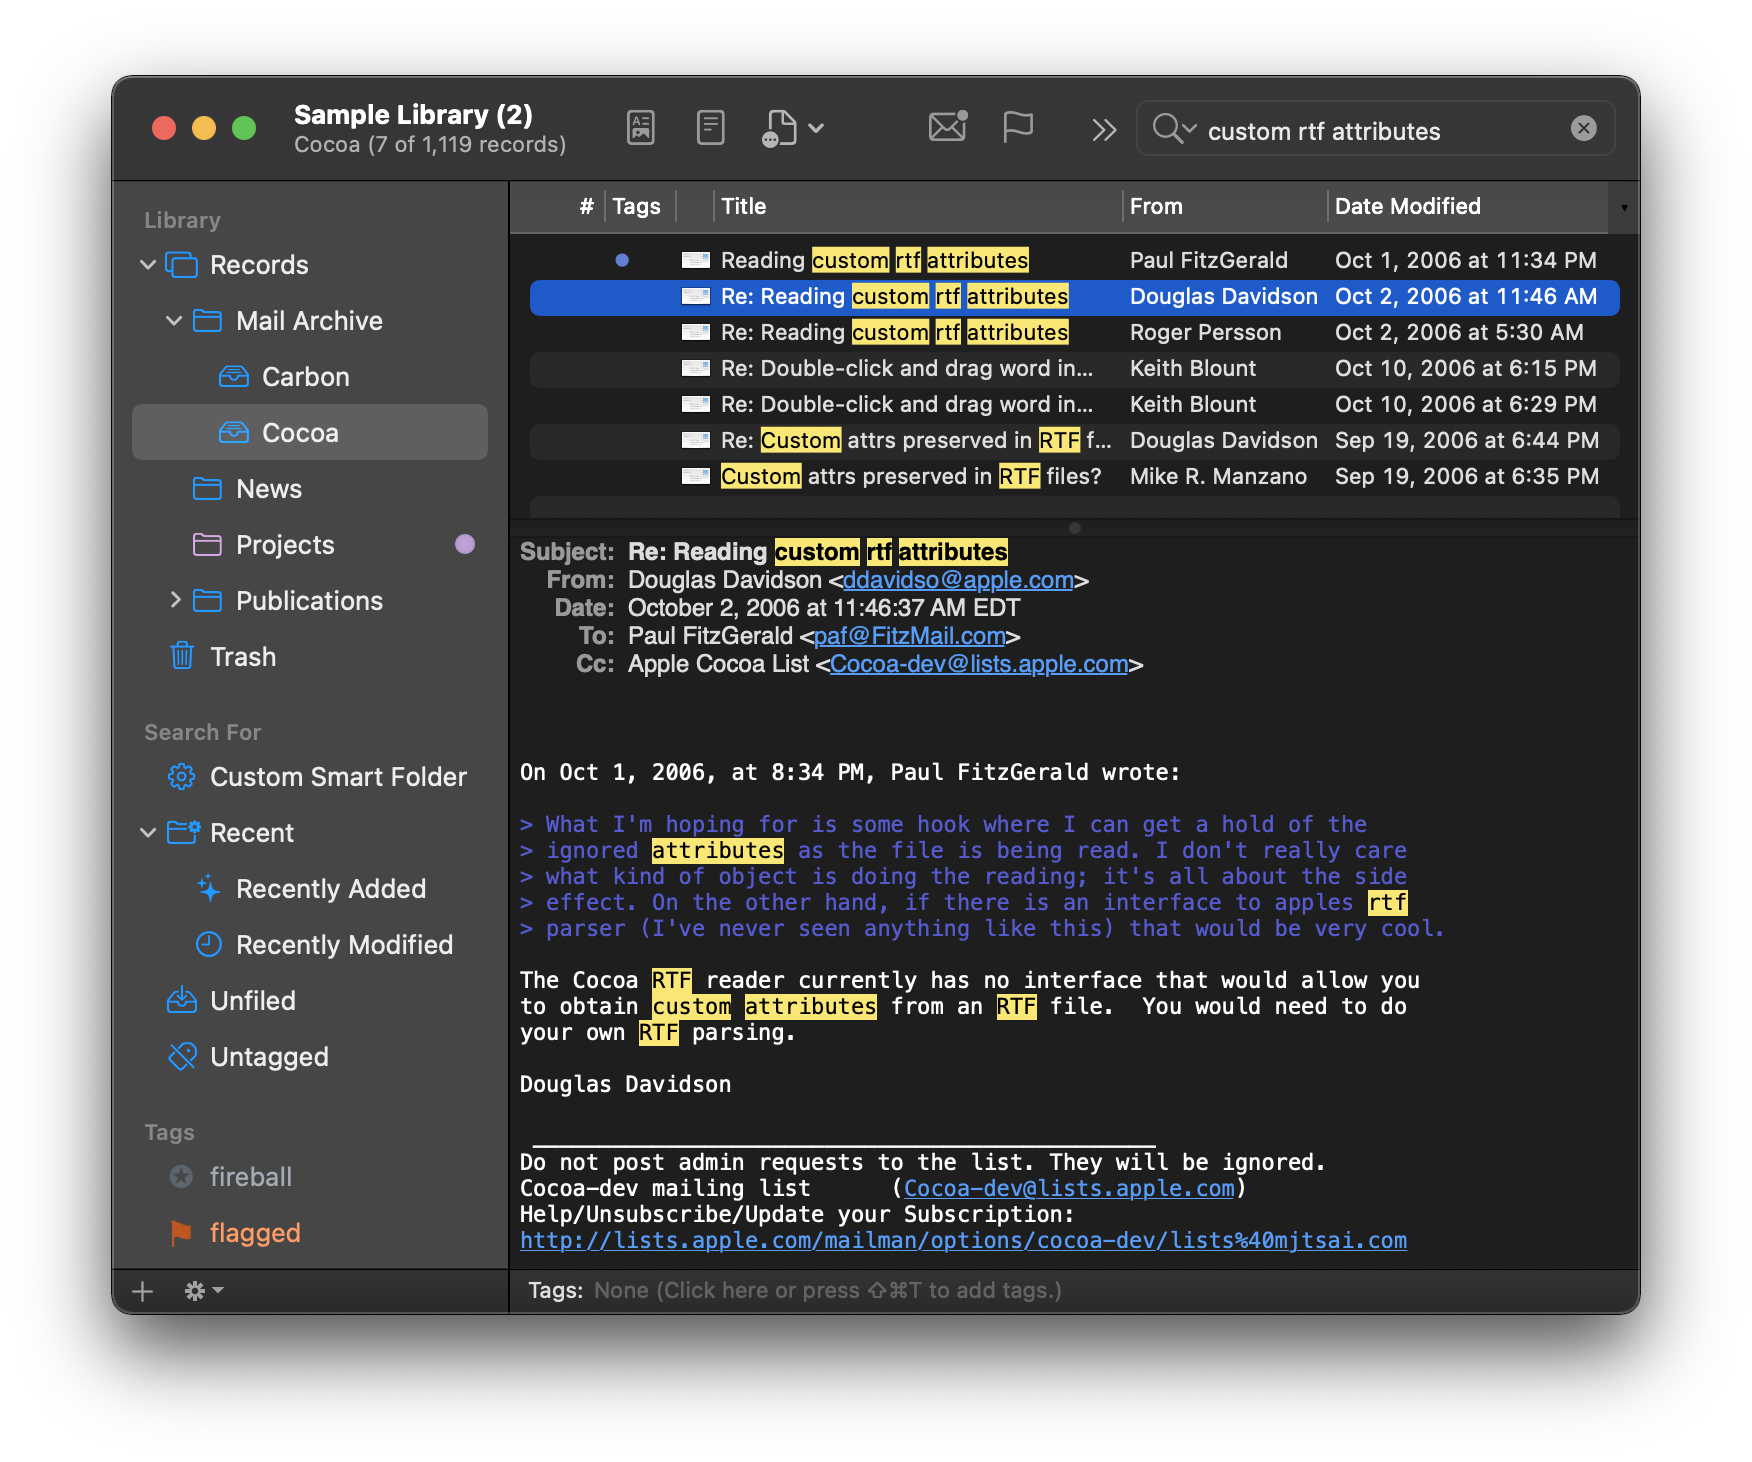
Unlike Spotlight, EagleFiler makes it easy to narrow down the results. You’re searching within the library, not all the files on your hard disk, so the search is fast. You can select one or more folders or mailboxes within the library to restrict the search—reducing the amount of data that EagleFiler has to look through, and number of results that you’ll have to comb through. You can even do Boolean, tag, and phrase-based searches to tell EagleFiler exactly what you’re looking for. Once you’ve narrowed the search results to a manageable number of documents, it’s easy to find the information you’re looking for because you can view the document contents right there in EagleFiler.
For more complex searches, or for quick access to your most common searches, you can create your own smart folders.
1.4 The Library Is Open
Like iTunes and Photos, EagleFiler keeps your data in a library. The library is just a special folder in the Finder that EagleFiler manages, so there’s no lock-in. You shouldn’t re-arrange the files and folders in the library except through EagleFiler, but other than that you can treat it just like a regular folder. Browse its contents in the Finder or Path Finder—the folder structure matches the folders in EagleFiler.

View and edit the files using your favorite applications. Drag key files to the Dock or make aliases of them on your desktop. Search the files using Spotlight. Back them up using Time Machine. Label files in EagleFiler, and the labels automatically show up in the Finder—and vice-versa. Files in the library will still show up in your application’s Open Recent menus, and Preview will still remember which page of the PDF you were reading. In short, you can capture, organize, and search your files using EagleFiler, without giving up the normal conveniences of the Mac experience.
1.5 Reliable Data Storage
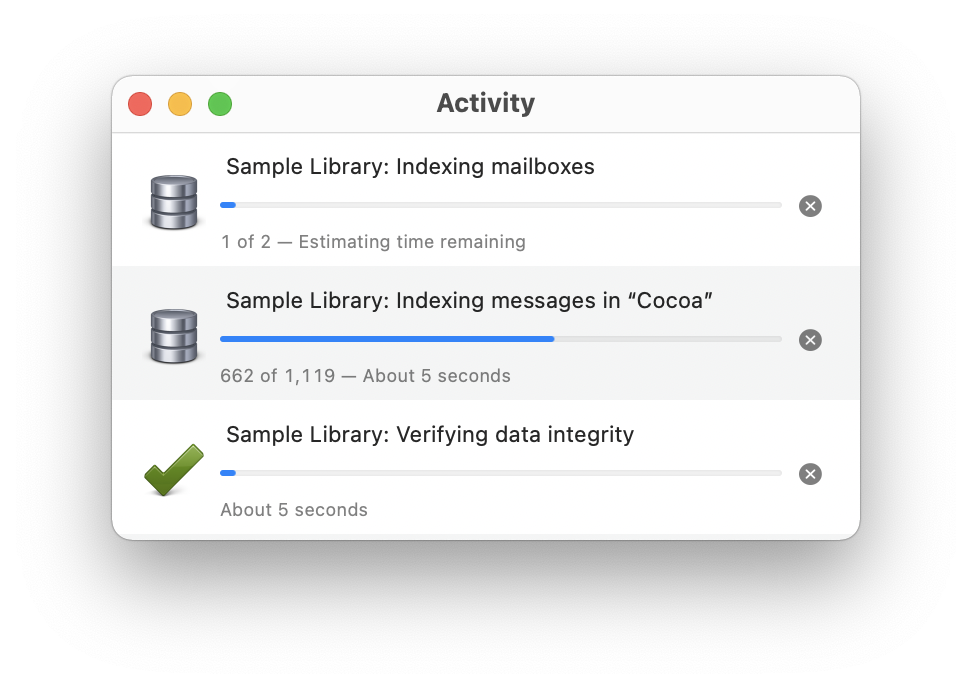
The library may look like just a folder full of files, but EagleFiler uses a Core Data SQL database (with an automatic XML backup) to keep track of the files and their metadata. This lets you put thousands of files in the library and access them reliably and quickly. Each time you open a library, EagleFiler checks to make sure that all the files are present. It can even verify the library (using MD5 checksums) to make sure that none of the files has been corrupted. It’s like a poor man’s ZFS. There’s no point in storing and backing up damaged files. When you archive your documents in EagleFiler, you can be sure that when you need to read them again they’ll be in pristine condition.
Plus, EagleFiler libraries go great with backups and archival. Your data is stored in individual files, so smart backup and synchronization programs won’t waste time and space copying the documents that haven’t changed. Since the files are in standard formats like PDF, RTF, and mbox, you’ll be able to read them years from now, even if—alas—you’re no longer using EagleFiler.
1.6 Add Tags and Notes
Tags
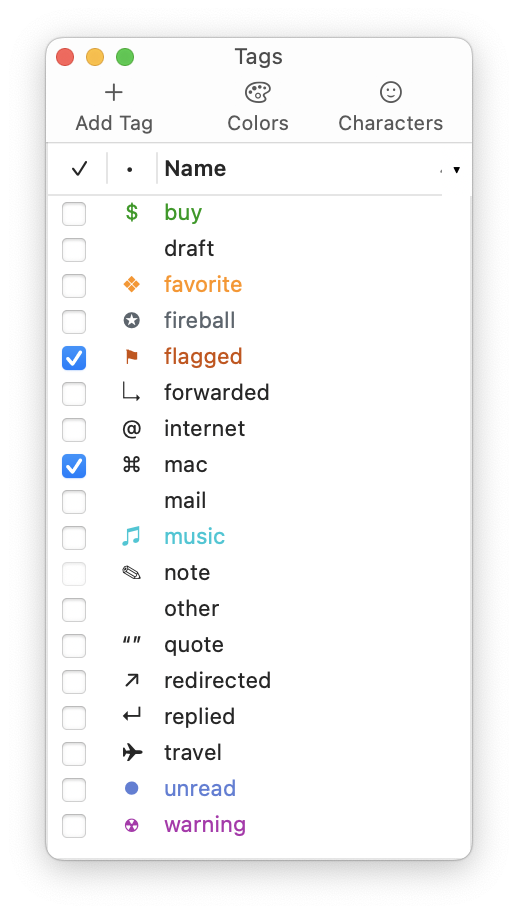
You can assign tags to each record in EagleFiler. Tags are keywords that also have an associated abbreviation symbol (optional) and color. For example, the “unread” tag is abbreviated by default with a blue circle. Each record can have as many tags as you want. EagleFiler has some tags such as “unread,” “flagged,” and “replied” built-in, and it will import these from Mail. If you’ve created additional tags in Mail using MailTags, EagleFiler will import those as well. You can also create your own tags in EagleFiler.
Tags are shown in the tags bar in the record viewer, in the records list, in the Info inspector, in the Tags inspector and in the Tag Cloud inspector. Each tag also appears as a source, which acts like a playlist in iTunes or an album in Photos, in the browser window.
If you import a file that already has tags assigned from the Finder, the tags are brought with it into EagleFiler. Tags also automatically sync between EagleFiler and Finder, so you can add or remove them in one app and have the changes show up in the other. EagleFiler’s tag storage is more robust than Finder’s, and if EagleFiler notices that a file’s tags have been stripped (e.g. because it was copied improperly), EagleFiler will restore them.
Notes
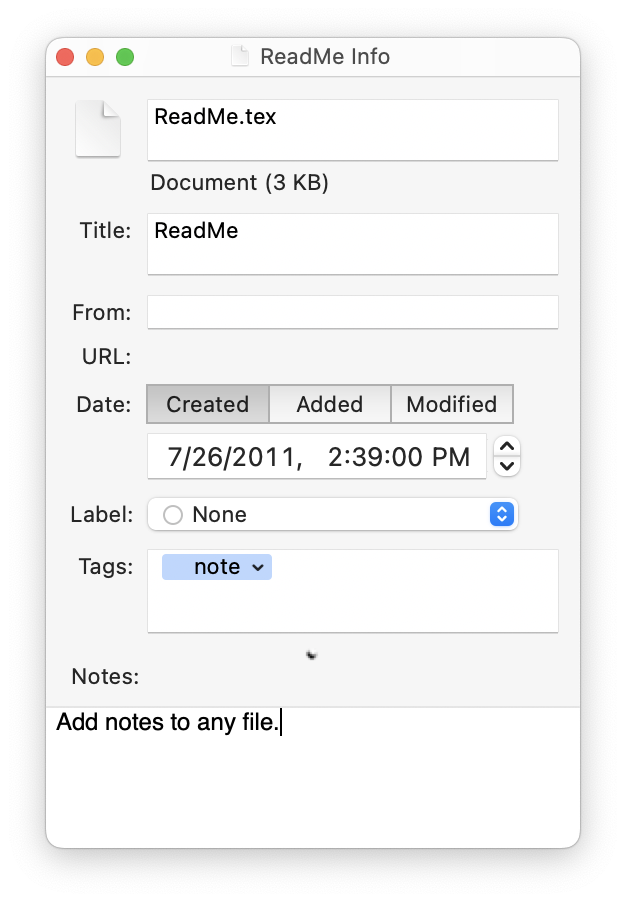
Each record in EagleFiler can optionally have notes associated with it. Use notes to write down information that goes with your documents, to excerpt key passages, to add your own comments or analysis, or to add links to related records in EagleFiler. Notes are shown in the Info inspector and optionally as a column in the records list.
Although, notes may look similar to Finder comments, they are different. Notes can be any size, and they support rich text (multiple fonts, styles, and sizes), clickable links, embedded graphics, attached files, lists, and tables, whereas Finder comments are limited to a small number of plain text characters. EagleFiler also supports notes on records that are not stored as individual files, such as e-mail messages within a mailbox. Because Finder comments cannot support all the features of EagleFiler notes, EagleFiler does not attempt to sync them. However, when you import a file that has Finder comments, EagleFiler will optionally import them as an EagleFiler note.
Finder comments are fragile and may not be preserved when moving, copying, or backing up a file, and they are not generally accessible from other applications. EagleFiler notes are stored as regular RTF/RTFD files in the Finder, so they can be opened in other applications such as TextEdit and backed up. Notes files are searchable via Spotlight and contain links back to the files that they’re attached to. EagleFiler also protects the data integrity of notes using checksums, just as it does for the records themselves.
EagleFiler automatically adds the “note” tag to records that have notes, and removes it from ones that don’t.
1.7 Speed Up and Simplify Your Other Applications
Most e-mail programs are designed for communicating with your mail server and letting you read and write messages—not for storing all your old mail. By cleaning out your mail program’s database, you can remove some clutter from its mailbox list and speed it up. EagleFiler preserves the entire message source, including headers and attachments, as well as MailTags. But cleaning it out doesn’t have to mean lots of time wasted trying to predict which messages you might need in the future. Disk space is plentiful—just archive all your old mail into EagleFiler. Later, you’ll be able to find what you need with a quick search. Meanwhile, the archived messages will no longer be slowing down Spotlight searches of your files and current messages. Nor will they slow down and fill up your Time Machine backups.
Likewise, your Web browser’s bookmarks feature is great for remembering sites that you’ll want to go back to frequently. But it isn’t ideal for remembering the information found on Web pages. Don’t bookmark news articles, recipes, reviews, and other documents—and then try to look through your overflowing bookmarks folder to recall the articles by title and URL. Instead, capture the Web pages into EagleFiler where you’ll be able to search their entire contents.
1.8 Multiple Libraries
Some people like to dump all their information into a single EagleFiler library, with minimal folder structure, and locate documents that they need using the search feature. But EagleFiler also supports multiple libraries, for those who like to separate their business and personal files, group them by project or client, or keep different kinds of files in different places. For example, you might keep some of your files on your iPhone or USB keychain drive, some in an encrypted library, and others in your Documents folder. Unlike with iTunes, you can have multiple EagleFiler libraries open at once. Each library can also have its own set of tags, so that you always see tags that are relevant to the task at hand. However you want to group your files, EagleFiler can accommodate.
1.9 Feature List
The following is a partial list of EagleFiler’s features, so that you can quickly see how it works and how it’s unique:
- General
- Easy to install: just drag and drop a single application file. There’s no need to install a database engine, plug-ins, or script files to integrate with your other applications.
- Easy to use, with a familiar three-pane interface—lots of power, without lots of cluttered options.
- Makes efficient use of RAM and disk space.
- AppleScript support, for automation and integration with other applications.
- Importing
- Can import any kind of file. EagleFiler has special support for displaying most common formats, and it can use Quick Look to display the others.
- Just press a hotkey while in another application, and EagleFiler will intelligently import the Web page, mailbox, or file that you’re currently viewing.
- Press the Quick entry hotkey to create a new file in EagleFiler from any application.
- Store Web pages in the following formats: bookmark, PDF, PDF (single page), plain text, rich text, rich text with images, Web archive. EagleFiler can also import Web pages from X/Twitter even though such pages normally don’t save or print properly.
- Import from any application by printing and choosing Save PDF to EagleFiler or by saving a file into EagleFiler’s To Import folder or directly into the library’s folder structure.
- Move or save new files directly into the library folder, and EagleFiler will auto-import them when it does a Scan for New Files.
- Import Web pages using bookmarklets.
- Automatically import scans by setting your scanner software (Fujitsu ScanSnap recommended) to save its files in the To Import folder.
- There are many other ways to import (e.g. drag and drop, services) so you can choose whatever’s easiest for the task at hand. Hold down the Option key when importing, and you can choose where to save the file and add tags, notes, attached files, and other metadata.
- Automatically detects duplicate files to save disk space and help you see what’s already been imported.
- Import from Evernote and convert its proprietary format to macOS’s standard rich text format that works with many applications.
- First-class support for archiving e-mail. EagleFiler understands the content of messages and treats them as mail rather than as text or RTF files.
- Import the selected mailboxes or messages simply by pressing a hotkey in Apple Mail, Entourage, Mailsmith, Outlook, or PowerMail.
- EagleFiler retains the full message data, including attachments, read/flagged/replied status, and MailTags, so nothing is lost when moving mail into EagleFiler.
- Speed up your mail program by moving older messages to EagleFiler.
- Messages are converted from proprietary formats and efficiently stored using the standard “mbox” format and can be imported back into any mail program if desired.
- You can also store messages as individual .eml files, for Spotlight searchability, and you can freely convert between the .eml and mbox formats.
- Can display messages as plain text (with colored quote levels and clickable links) or as HTML.
- Extract and convert your e-mail from Microsoft Outlook (or another proprietary mail client format) into standard mbox or .eml files.
- Remove duplicate e-mail messages.
- Organization
- EagleFiler supports multiple libraries, stored wherever you want (hard disk, Dropbox, iPhone, iPad, iPod, USB drive, etc.).
- You can open more than one library at a time, and more than one window per library.
- Files can be organized with folders and tags, both of which can be nested.
- Use the Go menu to quickly jump around to viewing different parts of your library.
- Select a record, choose Copy Record Link, and paste the link into another application; click it to open the record in EagleFiler.
- Editing
- Create a new file with a single button or keypress and immediately begin typing. There’s no need to open a new window or go through a Save dialog box.
- Use stationery (a.k.a. templates) to quickly create any type of new file. Stationery can automatically trigger AppleScripts to dynamically fill in the metadata for you.
- RTF, text, OpenDocument, and bookmark files can be edited from within EagleFiler. Powerful text editing features include find & replace, spelling and grammar checking, smart links/quotes/dashes, data detectors, automatic text replacement, and case transformations.
- For other types of files (e.g. Word, Pages), just double-click to open them in your favorite editor. The changes are automatically saved back into the EagleFiler library.
- Storage
- Your data and notes are stored in regular files using standard formats (RTF, PDF, Web archive, mbox, etc.), so there’s no lock-in or risk of database corruption, and it plays well with Time Machine.
- Uses MD5 checksums to verify the integrity of all files in the library, for safe long-term archival.
- Metadata (tags, titles, source URLs, etc.) goes into a Core Data SQL database for reliable storage and quick access.
- EagleFiler automatically backs up the metadata and notes to XML property list files. In the rare event that the database file becomes damaged, you can import the files into a new library, and EagleFiler will build a new database and reconstruct all the metadata.
- Tags are automatically synced with Finder tags and copied to OpenMeta and the Spotlight comments field to make them searchable and accessible to other applications.
- Encryption
- Libraries can be encrypted with AES-128 or AES-256 for secure, password-protected storage.
- Encrypted libraries are stored using Apple’s disk image technology, so their contents are accessible on any Mac, whether or not EagleFiler is installed.
- The entire library contents—including the metadata, indexes, and temporary files—are encrypted. Unencrypted data never touches the disk.
- In other respects, an encrypted library works just like a regular one. It’s still fully searchable, and the files are still accessible to other applications (once you’ve entered the passphrase).
- Unlike with FileVault, the contents of an encrypted EagleFiler library are protected from anyone who doesn’t know the passphrase, including other users on the same Mac.
- Search
- EagleFiler uses its own optimized indexes so that you can search the contents of your library faster than with Spotlight. Because EagleFiler doesn’t rely on Spotlight, you can search folders and volumes that are excluded from Spotlight, and you can still search even while your whole drive’s index is being rebuilt after restoring from a backup.
- You can do exact searches across individual fields (title, filename, notes, tags, from, any recipient) as well as searches across the entire file contents, including e-mail attachments.
- Searches can use phrases, wildcards, Boolean AND/OR/NOT, and grouping.
- Do quick tag searches by selecting one or more tags at once.
- Create your own smart folders and organize them into folders. Custom smart folders can contain an unlimited number of criteria, optionally using nested Any/All/None. You can define actions to occur when you create a new record in smart folder, or drag one there.
- Matching search terms are highlighted in the document contents and in the records list. Use the Find panel or its keyboard shortcuts to search within a document and to jump from one highlighted occurrence to the next.
- EagleFiler reads most files itself, so it can index text that Spotlight wouldn’t see (e.g. files attached to e-mail messages, invisible Web content, PDF annotations, Skim notes attached to PDF files). It automatically takes advantage of third-party Spotlight importer plug-ins to support custom file formats.
- Since the files and notes are stored out in the open, they’re also searchable with Spotlight (for when you want to search your entire Mac at once), without the need for stub files in the Caches/Metadata folder.
- EagleFiler’s search indexes are immediately available after syncing, restoring from a backup, or transferring your files to a new Mac; there’s no need to wait for it to reindex, as with Spotlight.
- Metadata
- For each file, EagleFiler records the document title, author/from, and source URL.
- You can assign tags (a.k.a. keywords). Tags can have abbreviation symbols and colors, and they can be nested. Quickly assign tags by typing (with auto-completion), drag-and-drop, or by clicking on them in the Tag Cloud.
- The Tags column in the records list compactly shows the abbreviation symbols for all the assigned tags.
- Each file or mail message can have notes, which can include rich text, clickable links, images, and tables.
- Each file and folder can have a colored label, which also shows up in the Finder.
- You can copy links to EagleFiler records and paste them into notes or RTF files, or into other applications.
- When importing via the capture key, EagleFiler can preserve metadata (e.g. tags, notes, titles, URLs) from the source application. This is often higher fidelity than using that application’s own export feature.
- When importing an existing file, EagleFiler can import tags and notes from the file’s Spotlight comments.
- EagleFiler can display and search Skim notes attached to PDF files.
2 Installing and Updating
2.1 Requirements
EagleFiler requires macOS 10.9 or later. For older versions of macOS, previous versions of EagleFiler are available.
2.2 Installing EagleFiler
- Drag the EagleFiler icon onto the Applications folder.
- Double-click the Applications folder to open it.
- Double-click the EagleFiler icon to launch it. (If macOS won’t launch the app because it says that it’s damaged, please see the Download Fixer page.)
- Eject the EagleFiler-1.9.20 icon.
Permission to Import From Other Apps
To enable certain EagleFiler importing features, please see the Granting Full Disk Access and Enabling JavaScript Access in Web Browsers sections of the manual.
System Services
Please see Enabling EagleFiler’s Services in the Services section of the manual.
PDF Service
Please see Installing the PDF Service in the Save PDF to EagleFiler section of the manual.
cd ~/Downloads/ && curl -LO 'https://c-command.com/downloads/EagleFiler-current.dmg'
2.3 Updating From a Previous Version
There are two ways to update to the latest version of EagleFiler:
Automatic Updating
- Launch your old version of EagleFiler.
- Normally, EagleFiler will automatically check for updates and detect
that a new version is available. If you have turned that feature off or
don’t want to wait for the automatic check:
- Choose Software Update… from the EagleFiler menu.
- Click the Check Now button.
- Click the Download & Install button and follow the on-screen instructions.
- You may be asked for an administrator password to ensure that incorrect file permissions on your Mac do not prevent the update from completing, leaving your Mac in an inconsistent state. The username and password for the automatic update are the ones for installers and logging into your Mac. They’re not related to EagleFiler. If you don’t know your password, you can reset it or update EagleFiler by following the “Manual Updating” instructions below.
Manual Updating
Go to the EagleFiler Web site and click the Download (Free Trial) button.
Quit EagleFiler.
Replace the old EagleFiler application file with the new one. That is, if EagleFiler is installed in the Applications folder, drag the new EagleFiler application icon into the Applications folder and click Replace when the Finder asks if you want to overwrite the old version. (If macOS won’t launch the app because it says that it’s damaged, please see the Download Fixer page.)
Note: If you get an error saying that the file is locked or you do not have sufficient privileges, drag the old EagleFiler to the trash and empty it, and then drag the new one into the Applications folder.
Launch EagleFiler.
Mac App Store
If you purchased via the Mac App Store, you should update EagleFiler using the App Store application.
2.4 Reinstalling a Fresh Copy
If your copy of EagleFiler is damaged, you may need to download and install a fresh copy.
- If you are able to launch EagleFiler, you can ask it to reinstall itself. To do this, follow the Automatic Updating instructions (in the Updating From a Previous Version section) but hold down the Option key when you click the Check Now button.
- If EagleFiler won’t launch, follow the Manual Updating instructions in the Updating From a Previous Version section.
- If you’ve uninstalled EagleFiler, you can always get it back by going to the EagleFiler Web site and clicking the Download (Free Trial) button. After installing it, you can enter your Serial Name and Serial Number into the Purchase… window to take it out of trial mode. If you can’t find your serial number, you can look it up online.
Mac App Store
If you purchased via the Mac App Store, to reinstall you can:
- Quit EagleFiler and drag it to the trash.
- Empty the trash.
- Go to the App Store application and download EagleFiler again. (You won’t have to pay again).
2.5 Uninstalling EagleFiler
Please Contact Us
If you are considering uninstalling EagleFiler because you’re having trouble using it or it doesn’t seem to meet your needs, please contact us at eaglefiler@c-command.com. We’re happy to help get you up and running and always looking for suggestions for how to improve EagleFiler.
Removing EagleFiler’s Application Files
To completely uninstall EagleFiler, delete:
The EagleFiler application file in your Applications folder.
The PDF Services file:
/Users/<username>/Library/PDF Services/Save PDF to EagleFiler
Although you will no longer be able to open your libraries with EagleFiler, the files in the libraries will remain accessible in the Finder. Next to each library is a folder called Files (which contains the files and folders in the library) and a folder called Notes (which contains any notes that you’ve added).
2.6 Security & Privacy Access
On macOS 10.14 and later, you need to tell the system if you want applications to be able to control other applications or access their data. For example:
- In order for the capture key to work with Apple Mail, EagleFiler needs to be able to control Mail to ask it which messages you’ve selected.
- In order to use the capture key with Safari, EagleFiler needs to be able to control Safari to ask it which Web site it’s currently showing.
- In order for EagleFiler to be able to read or copy the Spotlight comments when importing a file, it needs to be able to control the Finder.
- In order for EagleFiler to be able to import Mail or Messages data, you need to give it full disk access so that it can read those applications’ data.
2.6.1 Granting Full Disk Access
As discussed in the Security & Privacy Access section, EagleFiler needs Full Disk Access in order to fully function.
To Grant Full Disk Access on macOS 13 Ventura Through macOS Tahoe 26
Go to System Settings ‣ Privacy & Security ‣ Full Disk Access. (You can also click here to go directly to Full Disk Access.)
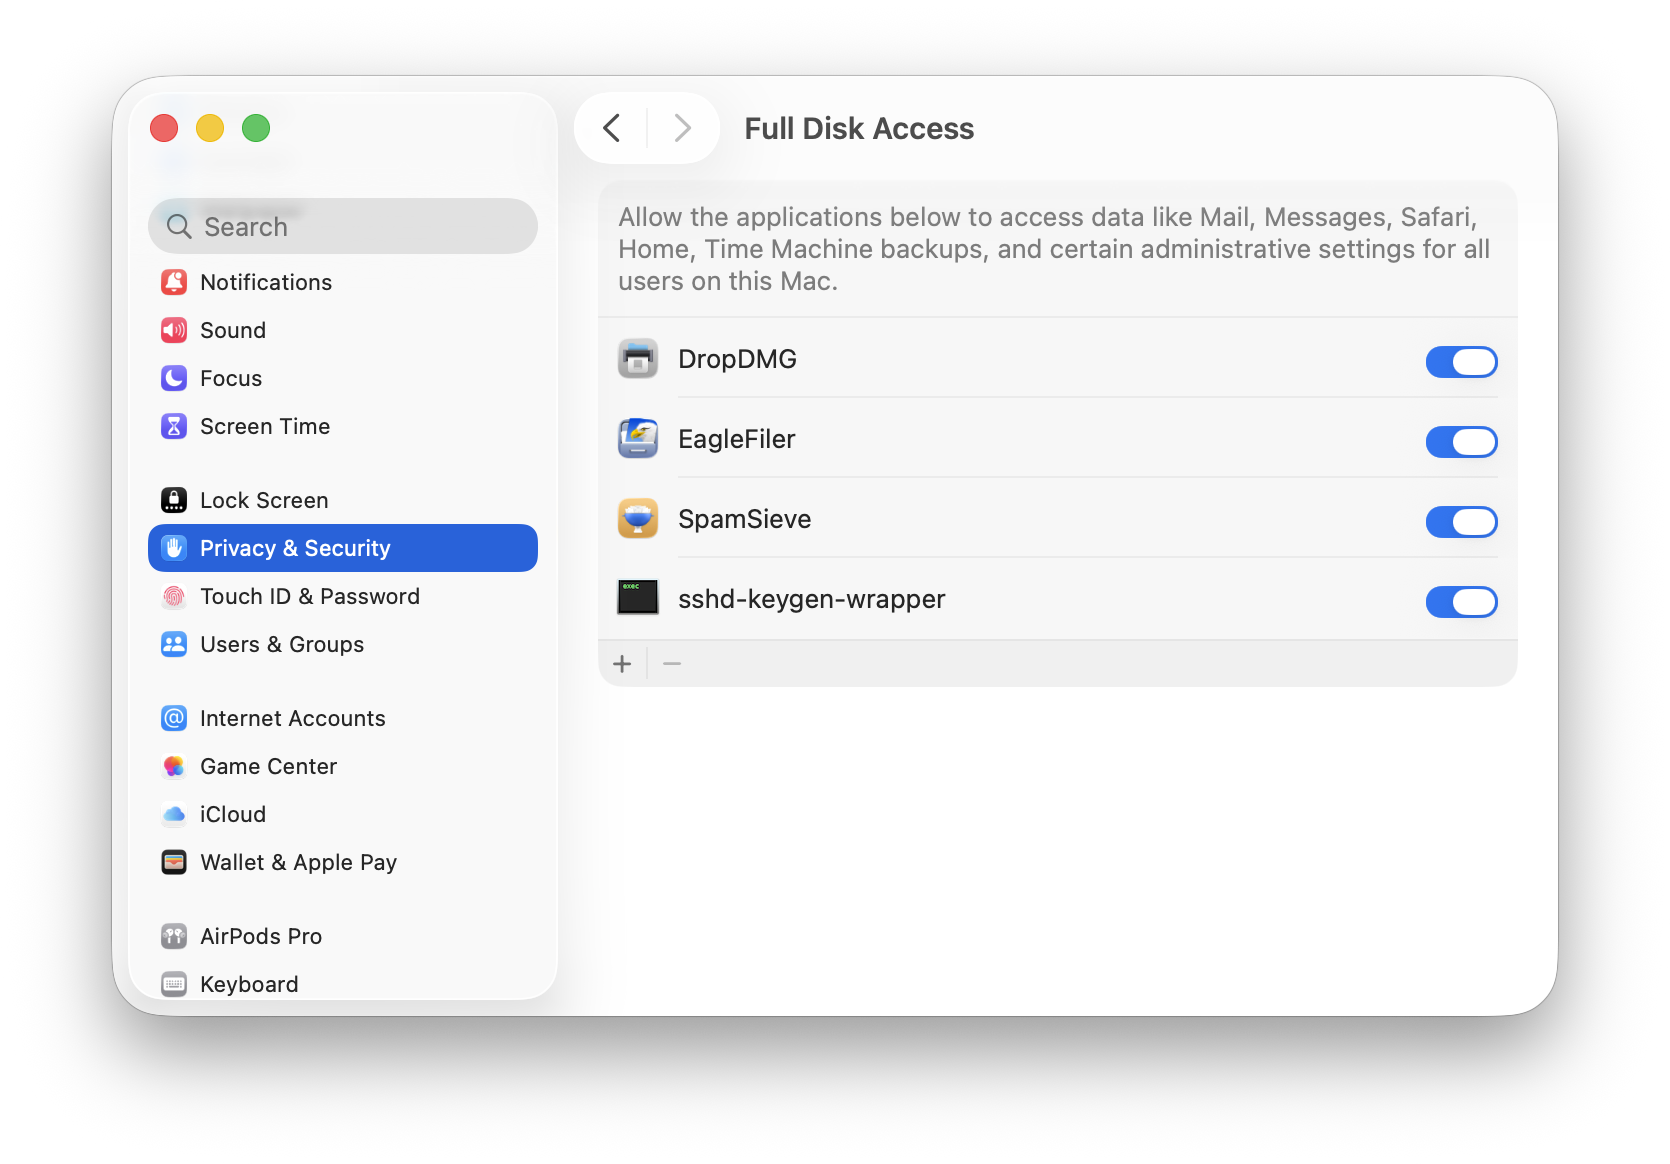
Click the + button indicated by the red arrow and choose EagleFiler from your Applications folder. Click Quit & Reopen if applicable. EagleFiler should now appear in the list as checked.
Double-click the EagleFiler icon to relaunch it if it is not already open.
To Grant Full Disk Access on macOS 10.14 Through macOS 12
Go to the Security & Privacy pane of System Preferences and click on the Privacy tab. Then scroll down and click on Full Disk Access. (You can also click here to go directly to Full Disk Access.)
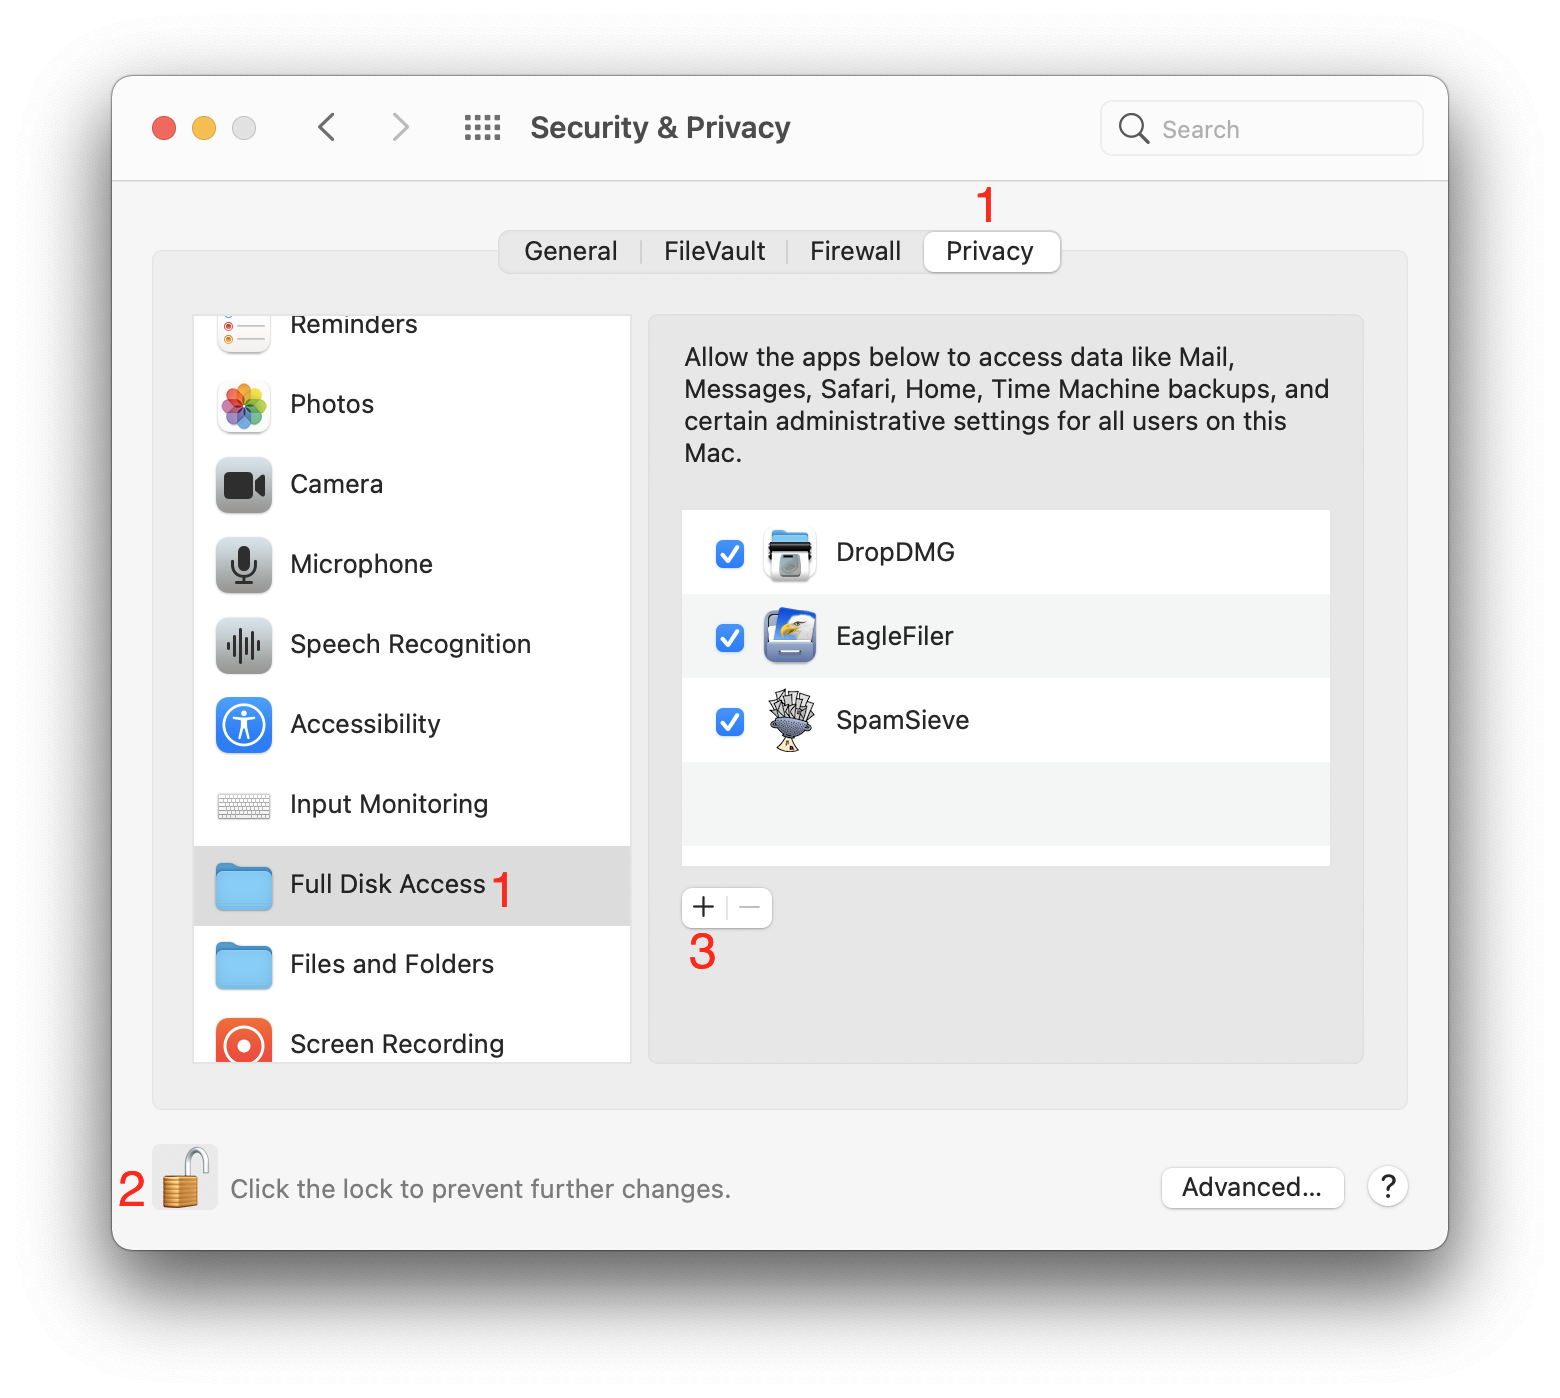
If the lock button in the lower left corner of the window is locked, click on it, enter your Mac’s login password, and click Unlock so that you are allowed to make changes.
Click the + button and choose EagleFiler from your Applications folder. Click Quit Now if applicable. EagleFiler should now appear in the list as checked.
Double-click the EagleFiler icon to relaunch it.
Troubleshooting Full Disk Access
In rare cases, EagleFiler may not appear in the Full Disk Access list after you add it. First, try restarting your Mac. You can also enter this command in Terminal:
tccutil reset SystemPolicyAllFiles
to reset the system’s database of Full Disk Access privileges and then try adding EagleFiler again.
If you still aren’t able to add EagleFiler, see the Troubleshooting Privacy Access section.
2.6.2 Granting Automation Access
As discussed in the Security & Privacy Access section, EagleFiler needs Automation access in order to fully function.
macOS will automatically ask you when EagleFiler needs to be able to control an application. It will show an alert, and you should click the OK button.
If you accidentally click Don’t Allow and deny EagleFiler access to control an application, macOS will remember this and may not ask you again. However, you can fix this by manually granting access.
To Grant Automation Access on macOS 13 Ventura Through macOS Tahoe 26
Go to System Settings ‣ Privacy & Security ‣ Automation. (You can also click here to go directly to Automation.)

Click the switch(es) under EagleFiler.
To Grant Automation Access on macOS 10.14 Through macOS 12
Go to System Settings ‣ Security & Privacy ‣ Privacy ‣ Automation. (You can also click here to go directly to Automation.)
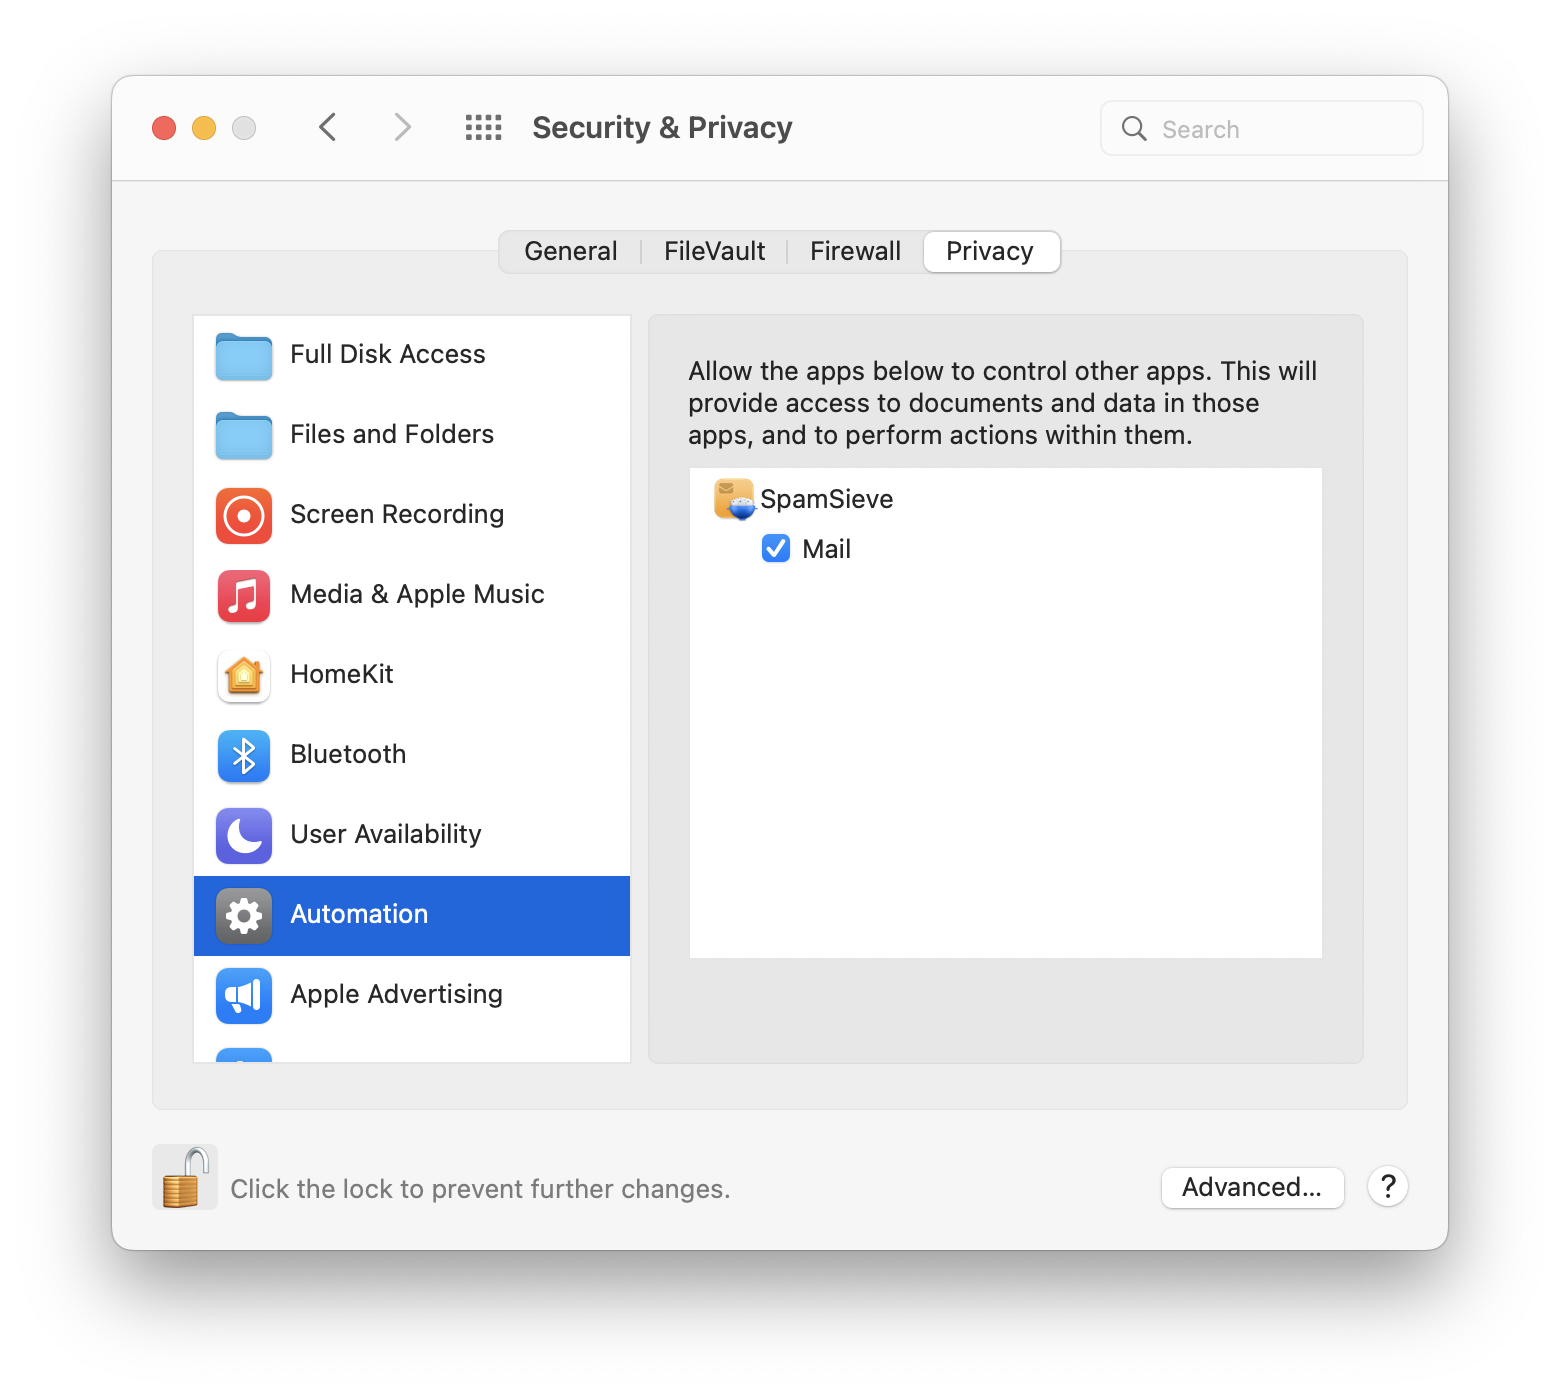
Checking the box(es) under EagleFiler.
Troubleshooting Automation Access
It may help just to restart your Mac.
You can enter this command in Terminal:
tccutil reset AppleEvents
to reset the system’s database of Automation privileges. Then macOS will ask you again the next time EagleFiler needs access, and you can click OK. If it still doesn’t ask you to grant access, it may help to restart your Mac again or use the maintenance feature of Onyx.
If it still doesn’t work, see the Troubleshooting Privacy Access section.
2.6.3 Troubleshooting Privacy Access
If macOS doesn’t remember the Security & Privacy Access that you granted:
Try Resetting the TCC Service
Try the tccutil reset commands as described in Granting Full Disk Access or Granting Automation Access.
Try Reinstalling the Application
Make sure that the application file is not damaged, e.g. by reinstalling a fresh copy. Also, make sure that you are not modifying the application package, e.g. editing its Info.plist file to try to hide the Dock icon.
Try Resetting the Privacy Database
If it still doesn’t work, you may need to reset the entire privacy database:
First, we will temporarily turn off System Integrity Protection so that we have access to delete the database. You may want to print these instructions or write them down so that you have access to them while rebooting your Mac.
Restart your Mac in Recovery Mode. The steps for doing this depend on which type of processor your Mac has:
- On an Intel-based Mac, click on the Apple menu and choose Restart…. Hold down the Command and R keys so that your Mac will reboot in Recovery Mode.
- On an Apple Silicon–based Mac, click on the Apple menu and choose Shut Down…. Press and hold the power button on your Mac until you see “Loading startup options.” Click Options, then click Continue, then click Continue again.
From the Utilities menu, choose Terminal.
Type csrutil disable and press Return.
Click on the Apple menu and choose Restart. This is necessary for the SIP change to take effect.
Drag the file:
/Users/<username>/Library/Application Support/com.apple.TCC/TCC.db
to the trash. (See How can I open the Library folder? if you have trouble finding it.)
You can then repeat Steps 2–5, typing csrutil enable instead, in order to turn SIP back on.
Try Reinstalling macOS
If it still doesn’t work, reinstalling macOS takes a while but always seems to fix the problem.
3 Using EagleFiler
3.1 Basics
Welcome to EagleFiler. Like the Photos app, EagleFiler stores its files in a library. After installing EagleFiler, to get started, choose New Library… from the File menu. You can save the library wherever you want, and you can create multiple libraries if desired. To add to your EagleFiler library, you can:
- Import existing files or Web pages
The easiest way to import is often to press the capture key or the capture with options key. EagleFiler will automatically figure out the current Web page or the selected mail messages and import them. There are also many other ways to import.
While EagleFiler is importing, it will show a green arrow in the Dock icon and a spinning progress indicator in the library’s browser window. To ensure a correct import, do not modify or delete the files being imported until you can see that EagleFiler has finished. Generally speaking, when you import an existing file, it’s copied into the EagleFiler library. When it’s done, you can delete the original if desired.
- Create new files using EagleFiler
In EagleFiler’s File menu, the New Record ‣ Rich Text File and New Record ‣ Plain Text File commands let you create new, empty files. The Quick entry hotkey lets you create new files from within any application.
You can also add your own stationery commands to the New Record submenu. This lets you create other types of files (e.g. Word or Pages documents) and create new files from templates. To do this, choose New Record ‣ Open Stationery Folder and copy your template files into this folder.
The contents of your libraries are stored in library folders. The files are visible in the Finder, and you can view and edit them via other applications. However, the files are managed by EagleFiler, so you should only move, rename, or delete them from within EagleFiler.
Each library that’s open in EagleFiler is displayed in one or more browser windows. Each browser window contains a source list, which lets you access the library’s records. The record is the basic unit of information in EagleFiler. Files, folders, and mail messages are all records. Each record has contents that can be displayed (and perhaps edited) in the record viewer. You can search for records and annotate them with tags and notes, which can include attached files.
3.2 Library Folders
Outside of EagleFiler, for example when you are browsing in the Finder, each EagleFiler library appears as a library folder with the following structure:
To find your library’s folder, see Where is my EagleFiler library?.
Structure of a Library Folder
- The .eflibrary file is the way that you open the library in EagleFiler. It also holds various information about the contents of the library, such as indexes that EagleFiler uses for searching, as well as tags and other metadata that you’ve added.
- The Files folder contains all the files and folders that have been imported into the library. The folder hierarchy within the Files folder matches that within EagleFiler, so you can easily browse and search the contents of your library from outside of EagleFiler.
- The Notes folder contains one RTF file for each record that has a note. You can edit a record’s notes using the Info inspector. The notes are searchable within EagleFiler and also from Spotlight.
- One way to import files into the library is to move or save them into To Import folder.
- If a file in the To Import folder cannot be imported, EagleFiler moves it to the Unable to Import folder. It is safe to delete files in this folder at any time, if you don’t want to keep them. If there have not been any such errors, this folder will not exist.
- The Smart Folders folder contains a .plist file for each smart folder in the library. You can copy a smart folder from one library to another by copying the associated .plist file. (Make sure that the libraries aren’t open in EagleFiler when you do this.)
Rules for Library Folders
The contents of the library folder are managed by EagleFiler. What this means is that the files and folders are fully accessible to other applications, but there are some limits to the kinds of changes you can make to the library from outside of EagleFiler. These restrictions ensure that the contents of the library folder stay in sync with the .eflibrary, so that EagleFiler knows where all the files are.
You can:
- view and search the contents of the library folder using the Finder, Spotlight, and other applications.
- open files using other applications.
- edit files using other applications and save your changes (without changing the filename).
- add files to the To Import folder.
- add files and folders to the Files folder; EagleFiler will detect them when it does a Scan for New Files.
- change the Finder tags, label, Spotlight comments, and extended attributes of files in the library folder.
- edit folder and file icons using the Finder’s Get Info window.
- store the library folder on a shared volume.
So long as you don’t do it while the library is open in EagleFiler, you can:
- move or rename the library folder in the Finder.
- rename the .eflibrary file in the Finder.
- backup and restore the entire library folder.
You should not:
- open the library in more than one copy of EagleFiler at a time.
- move, rename, or delete files inside the Files or Notes folders.
- modify the .eflibrary file.
- move or rename the library folder’s ancestor folders while the library is open in EagleFiler.
- edit the contents of mailbox files.
- store a library inside another library’s folder.
Recovering a Library
If you inadvertently break the above rules (i.e. move, rename, or delete files from outside of EagleFiler), EagleFiler will notice this when it verifies your library and report some errors. See the instructions in the Verify section of the manual for how to respond to the errors and repair the library. If the changes are difficult to undo, you can instead rebuild the library.
Moving a Library
To move a library, first close it in EagleFiler. Then you can use the Finder to move the entire library folder to the new location.
Renaming a Library
To rename a library, first close it in EagleFiler. Then you can use the Finder to rename the library folder, the .eflibrary file, and the To Import folder to have the new name.
Deleting a Library
If you no longer wish to use one of your libraries, first close it in EagleFiler. Then you can drag the entire library folder in the Finder to the trash in the Dock. This will delete all of the files, as well as EagleFiler’s metadata. To delete an encrypted library, drag the .sparsebundle or .sparseimage file to the trash.
Syncing a Library Locally
It’s fine to use software that copies folders quickly by only copying the files that have changed. An example of this is SuperDuper’s Smart Update feature. Such software works great with EagleFiler because it copies data in only one direction at a time. You end up with the same result as if you’d done a regular copy, but it doesn’t take as long. If you use ChronoSync, be sure that Don’t create empty folders and Ignore invisibles are unchecked.
You should not use software that synchronizes or merges by copying data in both directions at once. This is equivalent to adding/moving/renaming/deleting files, which would violate the above rules, so it would cause the Files and Notes folders to get out of sync with the .eflibrary file.
Sharing a Library
Please see the “Rules for Shared Libraries” in the How can I access my library from multiple Macs? section.
Aliases and Symlinks
You can replace the Files folder with an alias or symlink in order to store the files in your library separately from EagleFiler’s metadata. For example, you might want to store the raw files in Dropbox but not waste space and bandwidth uploading EagleFiler’s index and temporary files. To do this:
- Close the library in EagleFiler.
- Move the library folder to where you want to store EagleFiler’s files.
- Move the Files folder to where you want to store the raw files.
- Make an alias or symlink from the Files folder to its former location next to the .eflibrary file. Make sure that the alias or symlink is called Files.
You can also replace a subfolder of the Files folder with a symlink in order to store only that subfolder on Dropbox. For example, if the subfolder is called EagleFilerDropbox and your EagleFiler library is on the desktop and called EagleFilerLibrary:
In EagleFiler, create an empty folder called EagleFilerDropbox.
Close the library in EagleFiler.
In the Finder, move EagleFilerDropbox from the Files folder to your Dropbox folder.
In Terminal, enter the command:
ln -s ~/Dropbox/EagleFilerDropbox ~/Desktop/EagleFilerLibrary/Files/EagleFilerDropbox
3.3 What Can Be Imported
EagleFiler can import virtually any file on your Mac, as well as Web pages that are displayed in your browser (see Importing Web Pages and URLs) and e-mail messages that are displayed in your mail program (see Importing Mail). EagleFiler has specialized importing and viewing support for the following types of files:
Adobe Illustrator documents.
AudioNote documents.
Bean documents.
Bookmark (.webloc and .url) files and bookmarks dragged from Safari and OmniWeb.
Chat transcripts from Messages and iChat (see Importing iMessages).
Dragged text from other applications. In some cases, EagleFiler will be able to import more information if you drag the text onto one of its windows rather than its Dock icon. For example, when dragging text from Safari, EagleFiler will be able to store URL that goes with the text.
ENEX files exported from Evernote.
Folders. EagleFiler imports the contents of the folder (and any subfolders, preserving the hierarchy).
HTML files.
iCalendar (.ics) files.
Images (including animated GIFs).
Keynote presentations.
Mailboxes in mbox format, Apple Mail mailboxes (attachments included), and Apple Mail archive mailboxes. The Importing Mail section explains the recommended ways to import mail messages from each e-mail program.
Mail messages, stored as .eml files.
Microsoft Word files (.docx and .doc).
Movies.
Numbers spreadsheets.
OpenDocument Text files.
Pages documents.
PDF files. EagleFiler also understands PDFD bundles created by Skim and can display and index Skim notes that are attached to PDF or PDFD files.
PostScript and EPS files.
Property list files (XML and binary).
Rich Text (RTF and RTFD) files.
RSS mailbox folders from Apple Mail.
Sounds and music.
Text files (encoded with ASCII or UTF-8, or with a byte-order-mark) and text clippings. EagleFiler looks at a file’s contents to determine whether it looks like a text file and also excludes certain files based on their extension. You can use Terminal to force certain file types to never be treated as text files, for example:
defaults write com.c-command.EagleFiler NonTextExtensions -array oo3 skp t2d
This change will take effect for future imports or if you rebuild the library.
URLs, which will be downloaded and converted to Web archives.
vCard (.vcf) files from Contacts.
Web archives.
Documents that aren’t of any of the above types can also be imported into EagleFiler. EagleFiler can preview their contents using Quick Look, and it uses Spotlight’s importers to index them for searching. You can use the Open With External Viewer command to open the documents in other applications.
When importing files, EagleFiler automatically imports tags from the Spotlight comments and extended attributes.
3.4 Ways to Import
Many ways to get your files and data into EagleFiler are described in the sections below. If you’ve just installed EagleFiler, make sure that you enable the system service (for importing selected text) and the PDF service (for printing to EagleFiler). There’s also more information in the Importing Web Pages and URLs, Importing Mail, Import Bookmarks…, Import from iPhone Camera, and Import ENEX File… sections.
Capturing
Usually, the easiest way to import from another application is to press the capture key or the capture with options key. EagleFiler will automatically determine what you have selected or what you’re viewing in the current application, and it will import it into the library. For example, if you’re looking at a Web page in Safari, you can press the capture key to import it as a Web archive. Press the capture with options key if you want to import it and, at the same time, assign tags or choose which folder it will go into. The Applications That Support Capture section describes which applications you can capture from and what will be imported.
Asking for Options
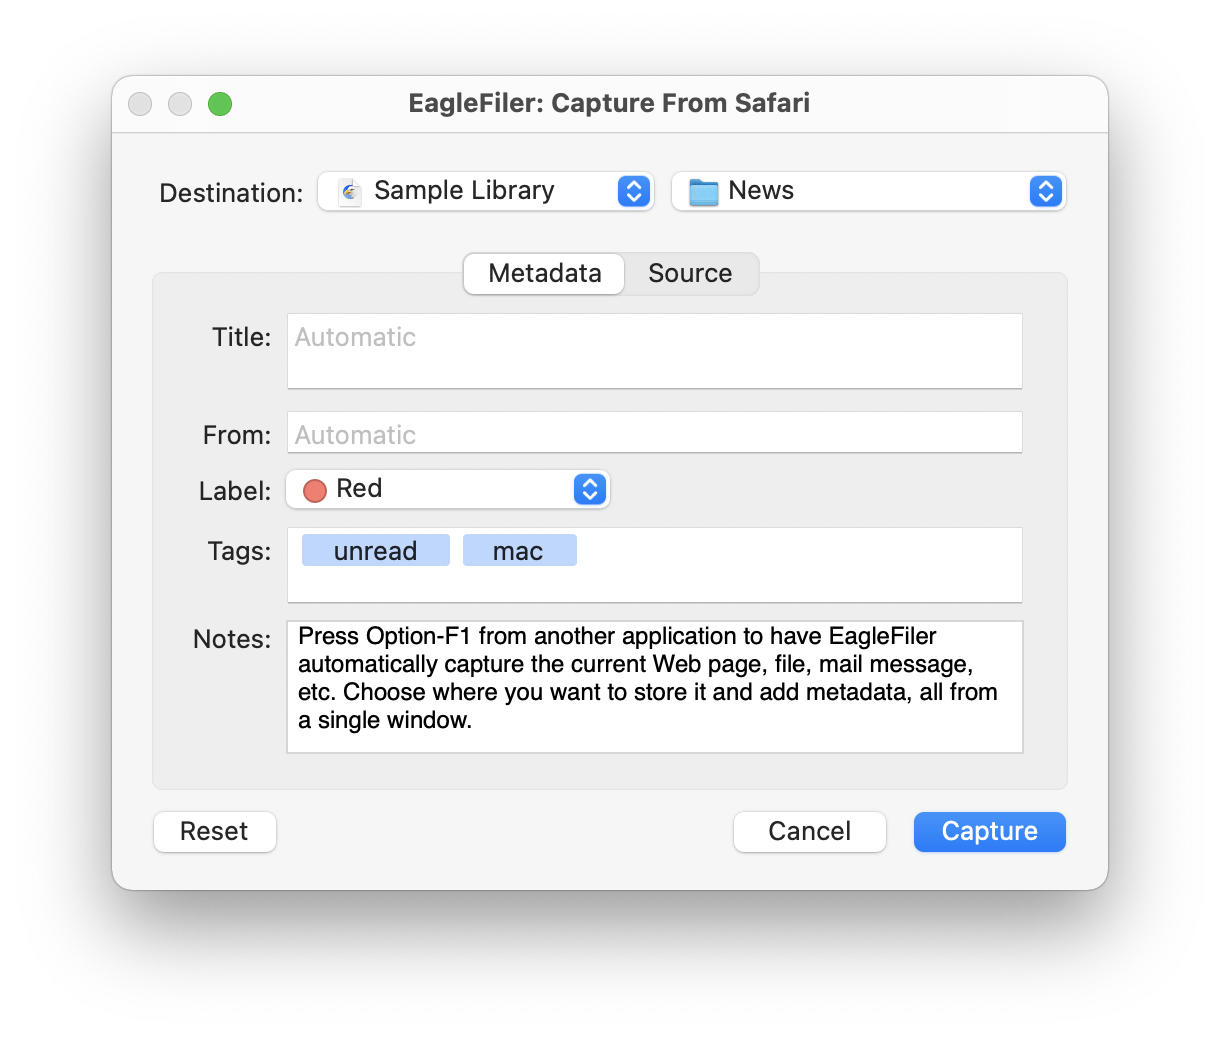
Normally, EagleFiler imports into the top level of the library (Unfiled) and assigns the “unread” tag. In general (with any of the import methods below), you can hold down the Option key when importing to have EagleFiler show you the options window. From there, you can choose which folder to import into, and you can change the tags, label, notes, and other metadata right at the time of import.
Multiple Libraries
If more than one library is open (and you didn’t drag into a specific library’s window), EagleFiler assumes that you meant to import into the current library (the one with the frontmost window). If no library is open, EagleFiler will show a dialog asking you to open one; then you can click the Import button to import the files into that library.
3.4.1 Applications That Support Capture
EagleFiler’s capture feature lets you import the current window or items from the frontmost application, just by pressing a key. The capture key and capture with options key work in these applications:
- Arc Browser
Captures the URL of the current tab. You can also use EagleFiler’s service to import the selected text.
- BBEdit
- Captures the file of the first document of the front window.
- Brave Browser
- Captures the URL of the current tab.
- Camino
- Captures the URL of the current tab of the front window.
- Cocoalicious
- Captures the URLs of the selected posts, preserving the tags, description, and extended description.
- Contacts
- Captures a vCard file for the selected contacts.
- Cruz
- Captures the URL of the current tab.
- Cyndicate
- Captures the URLs of the selected articles, preserving the label and flagged status.
- DEVONagent
- Captures the URL of the front browser window.
- DEVONthink
- Captures the selected items, preserving the comments, tags, rating, URL, and flagged/unread/locked state for the specific items that are selected. If a folder is selected, the files and subfolders it contains will be imported, but they will not retain this extra metadata.
- Endo
- Captures the selected news items as Web archives, preserving their tags and importing the excerpts as notes.
- Evernote
- Captures the selected notes and converts them to RTFD format, along with their tags, attachments, source URLs, and other metadata. You can also use the Import ENEX File… command to import notes previously exported from Evernote. (Evernote 10 no longer supports AppleScript, so you should use the Import ENEX File… command instead of the capture key.)
- Finder
- Captures the selected files in the front window.
- Firefox
- Firefox is no longer scriptable enough to support the capture key, but pressing it will show you some instructions for importing from Firefox to EagleFiler.
- Flock
- Captures the URL of the current tab.
- Google Chrome
Captures the URL of the current tab. You can also use EagleFiler’s service or the Auto Copy extension to import the selected text.
- Hibari
- Captures the URL of the selected tweet. (Direct messages are not supported.)
- iCab
- Captures the URL of the front window.
- Iron
Captures the URL of the current tab. You can also use EagleFiler’s service or the Auto Copy extension to import the selected text.
- Journler
- Captures the selected documents, preserving the tags, category, comments, and label.
- Keep It
- Captures the selected files, preserving the tags, comments, labels, favorite status, and source URL. (Notes remain in Keep It’s proprietary format.)
- Keynote
- Captures the file of the front window.
- Leaf
- Leaf is not scriptable enough to support the capture key, but you can enable the EagleFiler Import extension in its Sharing preferences.
- Captures the selected messages in the front viewer window. Tags, projects, and annotations from MailTags are preserved, as are the unread/flagged/replied/etc. flags from Mail itself. For more information, see the Importing Mail From Apple Mail section.
- MailMate
- Please see Importing Mail From MailMate.
- Mailsmith
- Captures the selected messages or mailboxes, preserving the message status, label, and notes. You may find it helpful to use Email Archiver to separate messages by age before importing them into EagleFiler.
- MarsEdit
- Captures the text of current post window or the selected posts, preserving the permalink and the published date.
- Microsoft Edge
- Captures the URL of the current tab.
- Microsoft Entourage
- Captures the selected messages or mailbox, preserving the message flags, categories, and projects. If you want EagleFiler to skip a message, you can assign it the category “OmitFromArchive”.
- Microsoft Excel (2004 and later)
- Captures the file of the front window (make sure that it’s saved to disk).
- Microsoft OneNote
- Unfortunately, the Mac version of OneNote does not make it easy to get your data out. You can either export one page at a time as a PDF or sync your data to a Windows PC and then use it to export everything at once.
- Microsoft Outlook
- Captures the selected messages or mailbox, preserving the message flags, read status, and categories. If you want EagleFiler to skip a message, you can assign it the category “OmitFromArchive”. For more information, see the Importing Mail From Outlook section.
- Microsoft PowerPoint (2016 and later)
- Captures the file of the front window.
- Microsoft Word (2004 and later)
- Captures the file of the front window (make sure that it’s saved to disk).
- MindManager
- Captures the file of the front window.
- News
- Apple News doesn’t support the capture key, but you can import to EagleFiler using the Share button.
- News Explorer
- News Explorer is not scriptable enough to support the capture key, but you can enable the EagleFiler Import service in its Sharing preferences and assign a keyboard shortcut to it.
- Netflix Freak
- Captures the URLs of the selected movies.
- NetNewsWire
- Captures the URL of the current tab, or the URL of the selected headline (if no tab is selected). If text is selected in a Web page, EagleFiler adds it as a note. If it’s starred, applies the flagged tag. You can also use the EagleFiler Import command from NetNewsWire’s Share button. (Capturing works in NetNewsWire 5 and NetNewsWire 3, but not in NetNewsWire 4.)
- NewsRack
- Captures the URL of the current tab and puts the selected text in a note.
- Nisus Writer Express
- Captures the file of the front window.
- Notes
- The Apple Notes application is not scriptable enough to support the capture key, but pressing it will show you some instructions for importing from Notes to EagleFiler. For example, you can select text in Notes and import it using one of EagleFiler’s Services. On macOS Tahoe 26 and later, there is a menu command to export notes in Markdown format.
- Numbers
- Captures the file of the front window.
- OmniFocus
- Captures the selected actions of the front window. The project, flagged state, and tags are imported as tags. The creation and modification dates are preserved. The URL in OmniFocus is preserved. The note is preserved as plain text, with any text styles or attached files discarded.
- OmniGraffle
- Captures the file of the front window. For best results, set OmniGraffle to save its documents with a Quick Look preview.
- OmniWeb
- Captures the URL of the current tab.
- Opera
- Captures the URL of the current tab.
- Orion
- Captures the URL of the current tab. This may not find the right URL if you are using multiple Orion profiles at the same time (due to the way Orion uses multiple processes).
- Pages
- Captures the file of the front window.
- Paperless
- The Paperless app from Mariner Software (formerly called ReceiptWallet) has been discontinued, but there is a script lets you migrate the files and metadata from your Paperless database into EagleFiler.
- Path Finder
- Captures the selected files in the front window.
- PDFView
- Captures the file of the front window.
- PowerMail
- Captures the selected messages or mailboxes, preserving the message status and label
- Preview
- Captures the frontmost document.
- Pukka
- Captures URL being added, along with the title, tags, and description.
- Reeder
- Reeder is not scriptable enough to support the capture key, but pressing it will show you some instructions for setting up a toolbar button or a separate hotkey for importing to EagleFiler.
- Safari and Safari Technology Preview
- Captures the URL of the current tab and puts the selected text in a note. For more information, see the Importing From Safari section.
- Skim
- Captures the file of the front window.
- SOHO Notes
- SOHO Notes does not work with EagleFiler’s capture key, but you can import from it via drag and drop. For example, dragging a folder of notes from the SOHO Notes window to EagleFiler’s Dock icon will export those notes from SOHO Notes and import them into EagleFiler.
- SubEthaEdit
- Captures the file of the front window.
- TextEdit
- Captures the file of the front window.
- TextMate
- Captures the file of the front window.
- TextWrangler
- Captures the file of the first document of the front window.
- Together
- Captures the selected files, preserving the tags, comments, labels, and ratings.
- Unread
- Unread doesn’t support the capture key, but you can import to EagleFiler using the Share button.
- Vesper
- From Vesper on iOS, you can export to iCloud Drive. Then select the Vesper Export ƒ folder in the Mac Finder and press the capture key.
- Vienna
- Captures the URL of the last selected post.
- Vivaldi
- Captures the URL of the current tab.
- WebKit Nightly
- See description for Safari.
- WebnoteHappy
- Captures the selected URLs as Web archives, preserving the tags and notes.
- Yojimbo
- Captures the selected items, preserving the tags, labels, flagged state, and comments.
For applications that are not listed here, there are many other ways to import. For applications that support AppleScript, you can add EagleFiler capture support by writing capture scripts.
3.4.2 Importing Existing Files
If your data is already saved as a file, there are several methods for moving or copying it into an EagleFiler library:
Moving Files Into the Library
In the Finder, you can drag and drop to move files into the To Import folder or the Files folder.
Copying Files Into the Library
Drag and drop onto the source list, records list, Drop Pad, or Dock icon. Hold down the Option key to have EagleFiler show you the options window.
Select files in another application and invoke one of EagleFiler’s Services via a menu or keyboard shortcut. Hold down the Option key to have EagleFiler show you the options window.
Choose Import Files… from the File menu.
In the Finder, Option-drag to copy into the the To Import folder or the Files folder.
Select the files in the Finder and press the capture key.
Drag and drop files from one EagleFiler library window to another.
Control-click on a file in the Finder and choose Open With ‣ EagleFiler. Hold down the Option key to have EagleFiler show you the options window.
Use the Share menu in any app, after enabling EagleFiler’s share extension.
Run an AppleScript such as:
tell application "EagleFiler"
    import files {POSIX file "/Users/mjt/Desktop/MyFile"}
end tell
EagleFiler uses APFS’s cloning feature so that files copied into the library do not use any additional disk space.
3.4.3 Importing Text Snippets
Press the Quick entry hotkey and paste or begin typing.
Select text in another application and invoke one of EagleFiler’s Services via a menu or keyboard shortcut. Hold down the Option key to have EagleFiler show you the options window.
Drag and drop text onto the source list, records list, Drop Pad, or Dock icon. Hold down the Option key to have EagleFiler show you the options window.
Put some text on the clipboard using Edit ‣ Copy and then choose Import Clipboard from EagleFiler’s Dock menu or New Record ‣ From Clipboard from the File menu.
Install some AppleScript files so that you can import directly from LaunchBar or Quicksilver.
Run an AppleScript such as:
tell application "EagleFiler"
    import text "Create an RTF file."
    import plain text "Create a plain text file."
end tell
3.4.4 Importing From a Scanner
If you use a scanner to digitize paper documents, you can set the scanner software to use the To Import folder or the Files folder as its output folder. Then EagleFiler will automatically import the scans into your library.
Which Folder to Use
- The To Import folder is generally easiest, because EagleFiler will automatically detect new files saved to that folder and import them into the library.
- With the Files folder, you need to choose Scan for New Files to make EagleFiler detect the new files. However, there are two advantages. First, you can save the files into a particular subfolder if you want, instead of having the new files appear at the top level. Second, some scanner apps will keep the PDF file open after they’re done writing to it (which, with the To Import folder, will keep EagleFiler waiting), and some scanner apps will close the PDF file after saving a page but before the entire scan has been written (causing EagleFiler to import it prematurely). Manually using the Scan for New Files command to tell EagleFiler when to import the new files will avoid both of these issues.
Configuring Image Capture
If macOS has built-in support for your scanner, you can access it from the Image Capture application:
- Click on your scanner under Devices or Shared.
- Set the Scan To folder to the To Import folder or the Files folder in your EagleFiler library.
- Click the Scan button.
With newer versions of macOS, you can also scan directly from the File menu in Preview.
Configuring ScanSnap Home
If you’re using a Fujitsu ScanSnap with the newer software:
- From the Scan window, click the icon with the pencil at the top right.
- Under Save Destination, click the Browse… button and choose your EagleFiler library’s To Import folder for the Save to folder.
- Click the Save button.
Note: ScanSnap Home and ABBYY FineReader for ScanSnap do not support folders with long paths. You can work around this by storing your EagleFiler library near the top of your home folder. If you need to store it in a deeper location, or in iCloud Drive (which always has a long path), you can redirect the To Import folder using a symlink so that the scanner software sees a folder at a shorter path.
Configuring ScanSnap Manager
If you’re using a Fujitsu ScanSnap with the older software:
- Open the Settings window for the ScanSnap Manager.
- Select your desired profile or add a new one for scanning to EagleFiler.
- In the Application tab, choose None (Scan To File) for the application.
- In the Save tab, click the Browse… button and choose your EagleFiler library’s To Import folder for the Image saving folder.
- In the File option tab, choose PDF for the File format. Check Convert to Searchable PDF if you would like the ScanSnap software to perform optical character recognition (OCR).
- Documents that you scan will now go into your EagleFiler library (whether or not EagleFiler is running at the time).
Configuring VueScan
If you’re using VueScan:
- In the Input tab, click the @ button next to Default folder.
- Choose your EagleFiler library’s To Import folder.
See Also
- The How can I run optical character recognition (OCR) on my PDFs? section.
- The Import from iPhone Camera section.
- The Import From Scanner script.
- The OCR With PDFpen script.
- The Tag PDFs that Need OCR script.
3.4.5 The To Import Folder
An easy way to import into your EagleFiler library is to add files to the To Import from the Finder or other applications. You can add files to the To Import folder even if EagleFiler is not currently running. For example, you can save new files into this folder and add tags directly from the system’s Save panel.
The To Import folder is located in the library folder, next to the .eflibrary file in the Finder. You may wish to drag the To Import folder to your Dock or to the Finder’s sidebar so that it’s easy to find.
Files added to the To Import folder are imported as top-level records in EagleFiler. You can view them in the source list under Records or Unfiled.
See also: The Files Folder.
When Imports Happen
EagleFiler checks the To Import folder when the library is first opened, whenever you bring its window to the front, and also periodically while the library remains open. EagleFiler imports any new files into the library and then deletes them from the To Import folder.
Duplicate Files
If Allow duplicate files in library is unchecked, EagleFiler will move any duplicate files in the To Import folder into the Unable to Import folder, rather than importing them into the library.
Don’t Copy Folders
It is recommended that you only copy files, not folders, into the To Import folder. Copying a folder may take a while, and EagleFiler has no way of known when it’s completed. Thus, EagleFiler may start importing before the copy is complete. It is better to use one of the other ways to import if you need to import a folder.
Files That Don’t Import
Sometimes you may see files that stay in the To Import folder, as if EagleFiler hasn’t noticed them yet.
EagleFiler tries to protect you from importing files that have not been completely written to disk yet. This is because, if EagleFiler tried to copy a file that was in the process of being written, you could end up with an incomplete version of the file in your library. Some data would be lost, and the file might not even open.
There is no sure way to know whether a file is complete, so EagleFiler assumes that it’s incomplete that if the file is marked as busy or if another application still has it open. EagleFiler will wait until the file is closed before importing it into the library.
Some applications may incorrectly leave files open, even after they have finished writing to them. EagleFiler will leave these files in the To Import folder until they are closed. You can see which files are open by using the lsof command in Terminal. If you need to import one of these files right away, you can use one of the other ways to import, such as the Files folder. Restarting your Mac will also close any open files. EagleFiler will then import them the next time you open the library.
EagleFiler only checks whether a file is open when importing using the To Import folder. This is because EagleFiler checks the To Import folder for new files on its own schedule, which might not coincide with the files being completely saved to disk. For other types of imports, you are specifically telling EagleFiler to import the files right then, so EagleFiler assumes that you know the files have been completely written to disk.
3.4.6 The Files Folder
The Files folder is in the library folder, next to the .eflibrary file in the Finder. As with the The To Import Folder, you can import files by moving or saving them directly into the Files folder. There are a few differences, however:
- You can save into any subfolder of the Files folder.
- You can put new folders into the Files folder.
- EagleFiler ignores the Allow duplicate files in library setting. When you add to the Files folder, you are specifically adding to the library’s hierarchy, so EagleFiler does not check for duplicates.
- The files appear in the EagleFiler window when EagleFiler does a Scan for New Files.
3.4.7 Services
Enabling EagleFiler’s System Services
After installing EagleFiler, you may have to log out and log in again in order for the services to work. To make sure the services are enabled, open System Settings, click on Keyboard, then click on Keyboard Shortcuts…. Click on Services in the list at the left, then look under the Text section at the right and make sure there are checkmarks next to the EagleFiler items.
Using EagleFiler’s Services
You can use EagleFiler’s import services to import text that’s selected in other applications:
- The EagleFiler: Import service lets you import the selected file, URL, or text into the current EagleFiler library.
- The EagleFiler: Import With Options service is similar except that it lets you choose the destination library and folder and assign tags and other metadata.
First, select the text that you want to import. You can then invoke an import service:
- By Control-clicking on the selected text to access the contextual menu.
- By pressing the appropriate keyboard shortcut. By default, the keyboard shortcut for EagleFiler: Import is ⌘! (Command-Shift-1), and the keyboard shortcut for EagleFiler: Import With Options is Command-Option-! (Command-Shift-Option-1). You can customize the keyboard shortcuts from the Keyboard pane of System Settings.
- By going to the Services submenu in the application menu.
The import services normally import text from Safari in Web archive format. The ImportTextAsWebArchive esoteric preference can be used to change this to RTF if desired.
Keyboard Shortcuts in Safari
If you are using the profiles feature in Safari, the Safari keyboard shortcut for opening a new window with the second profile (Command-Shift-Option-1) conflicts with the keyboard shortcut for EagleFiler: Import With Options. You can avoid this by changing one of these shortcuts in the Keyboard pane of System Settings to something else. Or, you can use the contextual menu or Services menu in Safari to access the EagleFiler: Import With Options command.
3.4.8 Save PDF to EagleFiler
Choose File ‣ Print any application and then choose Save PDF to EagleFiler from the PDF button menu. This will convert the document to PDF format and import it into EagleFiler. Hold down the Option key to have EagleFiler show you the options window.
Unlike the other methods of Importing Web Pages and URLs, in this case EagleFiler is not generating the PDF, so the source URL metadata is not saved.
You can also use a custom AppleScript as a save-to-PDF action.
Installing the PDF Service
If you purchased via the Mac App Store, due to Apple’s guidelines, EagleFiler cannot automatically install the PDF service that adds the Save PDF to EagleFiler command to the Print dialog. To install the PDF service yourself:
Open the folder:
/Users/<username>/Library/PDF Services/
(See How can I open the Library folder?.) If there is no PDF Services folder inside the Library folder, create a new folder named PDF Services.
Select the EagleFiler application in the Finder.
Choose File ‣ Make Alias.
Drag the new alias into the PDF Services folder and rename the alias to Save PDF to EagleFiler.
3.4.9 Share Extension
To enable EagleFiler’s system share extension, go to the Extensions pane of System Settings. In the Share Menu section, make sure that EagleFiler Import is checked.
Now, the EagleFiler Import command will be available from the Share menu and Share button in any app that supports sharing (e.g. Safari, News, Finder). You can choose EagleFiler Import to import the current Web page from Safari, the current file from Preview, etc. You can hold down the Option key to have EagleFiler bring up its options window before importing.
3.4.10 Importing iMessages
EagleFiler can display and search .ichat and .chat files created by Messages and iChat. Messages automatically archives iMessage conversations in dated folders at:
/Users/<username>/Library/Containers/com.apple.iChat/Data/Library/Messages/Archive/
To import these archives, just drag and drop the folders or individual files into EagleFiler.
Note: The Messages app does not save all attached files to the conversations archive. Attachments that are not archived there will not be imported into EagleFiler. Also, the macOS 11 version of Messages does not seem to save chat transcript files to disk.
You can also use the iMazing app to directly copy messages from an iOS device to your Mac and then import them into EagleFiler.
3.4.11 Importing From iOS
There are a variety of ways to import from your iPhone or iPad into the EagleFiler library on your Mac.
Importing URLs
When you’re viewing a Web page or app content that has a link, you can save the link to a cloud service:
When you get back to your Mac, you can then open the saved links and import them into EagleFiler in the usual manner or via script.
If your EagleFiler library is stored in iCloud Drive or another cloud service, you can directly save a Safari Web page into your library in Web archive or PDF format. Tap the Share button in Safari, then tap Options to select the desired format (PDF or Web archive), then tap Save to Files and choose the To Import folder or the Files folder for your library. Alternatively, you can save a bookmark file using this app.
For apps such as Ivory that can share links but don’t know how to create PDFs or Web archives, you can share and then tap Open Link to Post to open the URL in Safari and then use Safari’s share sheet as described above.
Bulk Importing URLs
Drafts can append URLs (using a Web Capture Template of [[url]]) to a text file in Dropbox or iCloud Drive. You can then import all the links at once by pasting the file’s contents into EagleFiler’s Import URLs… window.
Importing Files
If your EagleFiler library is not stored in the cloud, you can use your iOS device to save files to a folder in iCloud Drive and then import those files either manually or via a script.
If your EagleFiler library is stored in the cloud, there are a variety of apps you can use to create new files. If you save them in your library’s Files folder or To Import folder, they will be automatically imported to the library back on your Mac.
- You can use an app such as Editorial to create new text files containing whatever content you want, either typed directly or pasted from another app.
- Any printable content can be saved as a PDF file:
- You can tap the Share button and then Save PDF to iBooks.
- You can tap the Share button, then Print, then 3D Touch the print preview (or pinch to zoom out), then Share, then Copy to iBooks.
- The Dropbox app has adds a Save to Dropbox action to the Share button that creates PDFs with screen-sized pages.
- The iOS Mail app does not have a Share button, but you can import mail messages by using the Print command to save them as PDF files or (on iPad) by dragging ang dropping the message to the Files app to save them in one of EagleFiler’s folders.
- Any app content can be saved as a screenshot.
Importing Photos and Scans
See the Import from iPhone Camera section of the manual.
3.4.12 Importing via a Quick Action
On macOS 10.14 and later, you can create Quick Actions that appear as buttons in Finder’s preview pane and on the Touch Bar. To make a Quick Action that imports the selected files into EagleFiler:
Open the Automator application.
Create a new workflow with Quick Action as the document type.
Drag an Open Finder Items action into the right portion of the window.
Choose EagleFiler from the Open with pop-up menu. The Automator window should now look like:
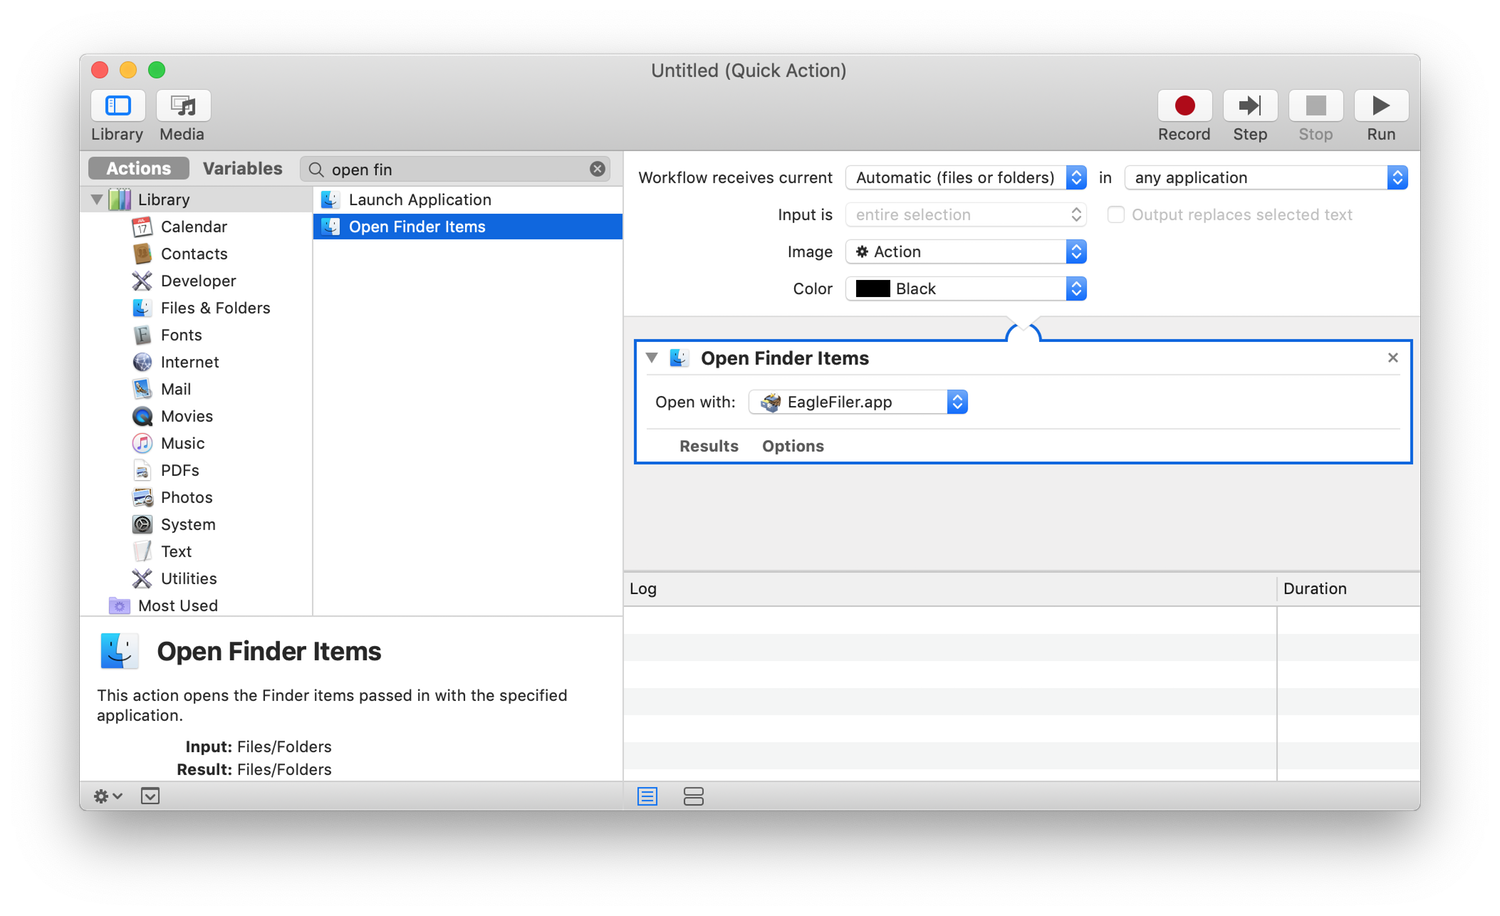
Choose File ‣ Save and enter a name for your Quick Action such as EagleFiler Import.
The Extensions pane of System Settings lets you control whether your Quick Action is enabled.
3.4.13 Importing via PopClip
EagleFiler has an extension that lets you import using the PopClip utility. To install, download the file and then double-click it. Later, when you select some text in an app, PopClip will show the EagleFiler icon in its floating window, and you can click it to import the selected text into EagleFiler.
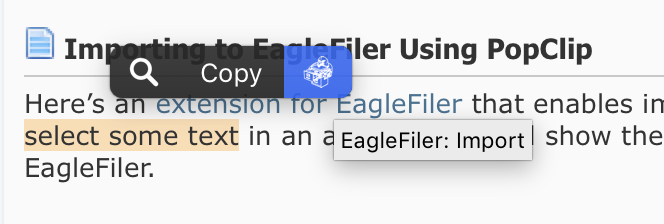
3.5 Importing Web Pages and URLs
Importing Whole Web Pages
While in your Web browser, press a capture hotkey, as described in the Ways to Import section. There is also special handling when Importing From Safari.
While in your Web browser, click on one of the EagleFiler bookmarklets in the browser’s toolbar.
Drag and drop URLs onto the source list, records list, Drop Pad, or Dock icon. Hold down the Option key to have EagleFiler show you the options window.
From any application’s Share menu or toolbar button, choose EagleFiler Import. Hold down the Option key to have EagleFiler show you the options window. You can configure a keyboard shortcut in System Settings.
Choose Import URLs… from the File menu and enter the URL of the page.
Choose Import Bookmarks… from the File menu to import all the pages in a bookmarks file (e.g. exported from a browser).
Select a URL in another application and invoke one of EagleFiler’s Services via a menu or keyboard shortcut. Hold down the Option key to have EagleFiler show you the options window.
Run an AppleScript such as:
tell application "EagleFiler"
    import URLs {"http://www.apple.com", "http://c-command.com"}
end tell
The Web page format preference lets you choose whether EagleFiler saves URLs as Web archives, PDF files, bookmarks, etc.
Importing Only Part of a Web Page
- While in your Web browser, select some or all of the page’s text and invoke one of EagleFiler’s services via the menu or keyboard shortcut. Hold down the Option key to have EagleFiler show you the options window. In Safari, this will import a Web archive that preserves all the formatting and images. Other browsers will import just the text.
- Select some text in your Web browser and drag and drop it onto the source list, records list, Drop Pad, or Dock icon. Hold down the Option key to have EagleFiler show you the options window.
Saving Selected Text
You can have EagleFiler import the page and also store the selected text in the note. This can be useful for recording that a certain part of the page is important but also storing the full context in which it appears. To do this, just select the text before you press the capture key. In order for this to work, you may need to enable some extra permissions, as described in Enabling JavaScript Access in Web Browsers.
Accessing the Source URL
Once you’ve imported a Web page, you can see its original URL:
- In the Info window in EagleFiler or (for PDFs) in Preview.
- By showing the Source URL column in the Source List.
- Using the Copy Source URL command in the Edit menu.
- In the tooltip if you hover the cursor over an item in the Records List.
The source URL can be edited via script.
3.5.1 Importing Private Web Pages
Some Web pages, such as order confirmation pages or account information screens, can only be loaded when you’re logged into the site. EagleFiler cannot share the login session with your browser, so there are other ways to import these pages:
- Choose File ‣ Save As in Safari and then choose the Web Archive format and save the file into your library’s the To Import folder or the Files folder.
- Use the Save PDF to EagleFiler command.
- Select some or all of the page’s text and invoke one of EagleFiler’s Services. With Safari, this will preserve all the formatting and images using the Web archive format.
- EagleFiler has special support for Importing From X/Twitter using the capture key.
3.5.2 Importing From X/Twitter
Accessing X/Twitter now requires logging in. EagleFiler doesn’t know your account information, so unlike with most Web pages, it can’t just fetch the page’s URL itself in order to import it. The Importing Private Web Pages section of the manual describes several other ways that you can import from logged in pages, however EagleFiler also has special support for X/Twitter.
If you press the capture key in Safari, Google Chrome, Brave Browser, Microsoft Edge, or Orion, EagleFiler will read the information directly from the browser and create an HTML file with the text content of the tweet and links to the images.
In order for this to work, you may need to enable some extra permissions, as described in Enabling JavaScript Access in Web Browsers.
3.5.3 Importing Videos
EagleFiler is designed to import Web pages and other directly downloadable URLs. If you already have a video file, you can import it as described in the Importing Existing Files section. Otherwise, there are a variety of tools that you can use to help save the video from YouTube or another site to disk so that you can import it into EagleFiler:
3.5.4 Processing Web Pages Before Importing
Before saving from a Web browser into the To Import folder or the Files folder, you can reformat the page using a JavaScript bookmarklet such as Readability.
You can also set EagleFiler to automatically process every Web page that it downloads. For example, to process every page using the discontinued Instapaper text processor, you could have entered this command in Terminal:
defaults write com.c-command.EagleFiler WebToolURLProcessingPrefix 'https://www.instapaper.com/text?u='
To turn off processing, enter this command in Terminal:
defaults delete com.c-command.EagleFiler WebToolURLProcessingPrefix
3.5.5 Importing From Safari
For the basic information about importing Web pages from any browser, see the Importing Web Pages and URLs section. The most common way to import from Safari is to press the capture key so that EagleFiler imports the entire page that you’re viewing using the selected Web page format (e.g. it creates a Web archive).
Selected Text
Safari is special in that it can also import just part of a Web page using the Web archive format. You can do this by selecting part of the page and using drag and drop or one of EagleFiler’s system services. See also: Enabling JavaScript Access in Web Browsers.
Private Web Pages
Some Web pages (e.g. sites that require logging in) cannot be captured by having EagleFiler load the URL shown in Safari’s location bar. There are other ways to import these pages, as described in the Importing Private Web Pages and Importing From X/Twitter sections of the manual.
3.5.6 Enabling JavaScript Access in Web Browsers
When pressing the capture key to import from a Web browser, EagleFiler can:
- Save the selected text in a note attached to the record.
- Import the content of X/Twitter pages (which would normally not be possible because they are private).
- Prevent the current Safari profile’s name from being saved as part of the page’s title.
In order for this to work, you need to configure your browser to grant JavaScript access:
- In Safari, go to the Advanced settings, check Show features for web developers. In Safari’s Developer settings, check Allow JavaScript From Apple Events.
- In Google Chrome, go to the View ‣ Developer menu and make sure that Allow JavaScript from Apple Events is checked.
- In Brave Browser, go to the View ‣ Developer menu and make sure that Allow JavaScript from Apple Events is checked.
- In Microsoft Edge, go to the Tools ‣ Developer menu and make sure that Allow JavaScript from Apple Events is checked.
- The Arc browser has a similar setting, but bugs in the JavaScript support prevent EagleFiler from enabling these features.
The Allow JavaScript From Apple Events setting only applies to apps, such as EagleFiler, for which you’ve already granted Automation access. They already have access to the page source via AppleScript, and this setting lets them access it via JavaScript as well. There is more information about these settings here.
3.5.7 Importing Web Pages Without JavaScript
EagleFiler normally enables JavaScript when importing Web pages so that it archives the page as it would be displayed in your browser. However, some sites use JavaScript in a way that makes the page content not fully load if there is no user interaction. Others use it to display advertisements that can make your archived pages much larger than their actual content. And sometimes JavaScript triggers an OS bug that makes the import hang.
EagleFiler has an advanced setting that lets you disable JavaScript for certain domains where you find it to be a problem. To set the non-JavaScript domains, enter a command like this in Terminal:
defaults write com.c-command.EagleFiler WebToolNonJavaScriptDomains -array discourse.omnigroup.com meta.discourse.org forums.swift.org
Note that disabling JavaScript will also prevent some non-advertisement content from loading, such as comments from Disqus. You may or may not find this desirable.
To re-enable JavaScript for all domains, enter this command in Terminal:
defaults delete com.c-command.EagleFiler WebToolNonJavaScriptDomains
To disable JavaScript for all domains, see EnableJavaScriptForWebTool in the esoteric preferences.
3.6 Importing Mail
Importing mail into EagleFiler speeds up your mail program and backups, creates an efficient and secure archive of your mail, and lets you organize and search mail messages alongside related files. The recommended way to import mail varies depending on which mail program you’re using. Please find the section below that corresponds to your mail program.
As described in the Basics section, you should not modify or delete the mail while EagleFiler is in the midst of importing it.
What’s Imported
EagleFiler imports the entire raw source of the message, including the attachments and headers. In other words, all the information is preserved; if desired, the messages can be imported back into the mail program with full fidelity. (Exceptions: see the Importing Mail From Eudora and Importing Mail From PowerMail sections.)
Viewing Messages
EagleFiler has native support for viewing e-mail messages.
- There are two options in the The View Menu for controlling how messages are displayed: Message ‣ Plain Text and Message ‣ Raw Source.
- The plain text font and size can be set in the Settings.
- You can use the Message ‣ Use Quick Look command in the View menu or the Quick Look command in the the Record menu to preview attached images.
- The Reply to Message command lets you resume a conversation by opening a new message in your e-mail program.
- You can double-click a message to open it in your e-mail program. EagleFiler opens messages using macOS’s default viewer for .eml files, which is normally Apple Mail. To change the default viewer, use the Open With command.
- The # column in the records list shows the number of attachments for each message. The record viewer shows the names of the attached files. To view or extract the attachments, double-click the message to open it in your mail program.
Mailbox (mbox) vs. Individual Message (.eml) Files
EagleFiler prefers to store messages in mailbox (“mbox”) files. A mailbox is a single file that contains lots of e-mail messages. This is both for efficiency (one file rather than thousands for a mailbox containing thousands of messages) and for compatibility with other software that can read the standard mbox format. When you capture multiple e-mails at once, EagleFiler stores them in a mailbox file automatically. You cannot drag message in mailbox files around to different mailboxes, though you can drag them to tags and organize them that way.
EagleFiler can also store messages as individual .eml message files, one per message. This is less efficient (for EagleFiler, Spotlight, Time Machine, etc.) but is more flexible because you can drag and drop the messages to different folders to rearrange them. Message files can also be mixed in the same folder with other files of different types, e.g. PDF or Word documents that are related to those messages. You can double-click a message file to open it in Apple Mail.
You can extract individual messages out of a mailbox file by dragging and dropping them to a folder. You can combine multiple message files into a mailbox using the Merge Message Files command.
Workflow for Importing Mail
Here are some tips for importing e-mails into EagleFiler:
- Imports are manually initiated. You choose when the import will happen, which messages to import, and which EagleFiler library they will go to. Some people like to import old mail once a week, others once a month or once a year.
- You can import entire mailboxes from your mail program or use smart mailboxes to help select just the older messages for importing into EagleFiler.
- Although messages can be rearranged in EagleFiler, it is easier if you organize them into the mailboxes/folders that you want before importing them into EagleFiler.
- As with other types of imports, EagleFiler copies the messages into its library. When it’s done, you can delete the messages from your mail program. It’s simpler to have each message stored in only one place (the mail program or EagleFiler), and this way you won’t accidentally import multiple copies of the same messages into EagleFiler.
- If you do end up with duplicate messages in EagleFiler, it is possible to remove them as described in the Allow duplicate files in library section.
- Each time you import, a new mailbox file is created in EagleFiler, using
the same name as the mailbox in your mail program. If you had previously
imported from that mailbox, you may already have a mailbox file in
EagleFiler with that name.
- Some people like to leave each import as a separate mailbox, e.g. so that for each mailbox there’s one file per month or per year.
- Others prefer to have a single file that holds all the messages imported from that mailbox over time. To do this, select the Records source and sort by title. This will group the related mailboxes together. You can then select the related mailboxes and use the Merge Mailboxes command to combine them into a single mailbox. The combined mailbox will be stored in the folder that contained the oldest of the selected mailboxes, so your organizational structure is preserved even though the newly imported mailbox might have been imported at the top level.
Deleting Messages in Mailboxes
Each mailbox file stores multiple messages, and for speed and data integrity reasons, EagleFiler does not modify mailbox files. Instead, when you delete a message EagleFiler hides it from view (unless you have Show ‣ Deleted Messages checked). Most e-mail messages are small enough that there’s little benefit to physically removing the data for deleted messages. If you need to reclaim the disk space used by deleted messages, you can do this by deleting the mailbox file. First, drag the non-deleted messages to a folder so that EagleFiler extracts them as individual .eml files. Then delete the mailbox. You can optionally use the Merge Message Files command to recombine the .eml files into a new mailbox.
3.6.1 Importing Mail From Apple Mail
Archiving messages from Apple Mail to EagleFiler can speed up Mail and also create a safe offline backup of your messages, as Time Machine backups normally don’t include the full contents of all your messages in Mail.
The recommended way to import from Apple Mail is to select some messages or mailboxes and press the capture key. (By default this is the F1 key, but depending on your Mac’s keyboard settings you may need to press fn-F1.) EagleFiler will copy the entire message (including attachments) to its library, along with the message status and flagged indicators from Mail and any keywords, projects, and notes from MailTags.
- If one or more messages are selected, EagleFiler imports only those messages.
- If no messages are selected, EagleFiler imports every message in the selected mailboxes as well as all of their submailboxes. In order to capture from Gmail mailboxes or special mailboxes (e.g. smart mailboxes or the special Inbox that contains the other inboxes), you will need to select the messages within them (e.g. using Edit ‣ Select All).
Note: On macOS 10.14 and later, the first time you press the capture key you will need to grant EagleFiler Full Disk Access so that EagleFiler can read Mail’s files.
In order to safely read Apple Mail’s message data, Mail should not be in the process of downloading or moving the messages that you’ve asked it to import when you press the capture key. In other words, if you have some messages selected when you capture, wait until the import has finished before doing anything else in Mail. If you want to capture a mailbox, wait until Mail has finished any operations that you started (moving messages into or out of that mailbox) before pressing the capture key and then don’t do anything else in Mail until after the import has completed.
Importing Multiple Mailboxes
To import multiple whole mailboxes at once, first select the mailboxes in Mail’s sidebar. You can either Command-click to select individual mailboxes or select a whole range of mailboxes by clicking on the first one and then Shift-clicking on the last one. Once the mailboxes are selected, use the Edit ‣ Select All command to select all the messages. Then press EagleFiler’s capture key. To import a large amount of mail or a mailbox and all of its submailboxes, see Importing Whole Apple Mail Mailbox Hierarchies.
Importing as Message Files
By default, EagleFiler imports a single selected message as a .eml message file and multiple selected messages as a mailbox file. Please see the Importing Mail section for more information about these formats.
To import multiple messages as individual .eml files instead of as mailbox files, you can:
- Use the capture key on one message at a time.
- Select a group of messages and run the Import From Apple Mail script.
- Drag and drop individual messages from Mail to EagleFiler. Unlike using the capture key, this will not import message metadata or MailTags into EagleFiler. It is not recommended to drag multiple messages at once, as on some versions of macOS EagleFiler might not receive all of the messages.
3.6.1.1 Importing Attachments From Apple Mail
When importing mail from Apple Mail, EagleFiler tries to import complete messages, including any attached files. For messages downloaded from POP mail servers or stored in local (On My Mac) mailboxes, this should always succeed because Mail stores the attachment data with the message. For messages from IMAP and Exchange mail servers, the attachment data may or may not have been downloaded to your Mac.
You can tell Mail that you want it to download the attachments to your Mac:
- Go to the Accounts pane of Mail’s settings and (for each account), on the Account Information tab, for Download Attachments choose All.
- Do not use the Optimize Storage OS feature to automatically remove e-mail attachments.
Note that this is advisory, and Mail may not always store all the attachments on your Mac, especially if disk space is running low.
If you try to import a message whose attachments have not been downloaded, EagleFiler will report a Missing Apple Mail Attachment error and import only the non-attachment parts of the message. This is good because it alerts you to messages that need to be fully downloaded. The messages will also be tagged missing_attachments in EagleFiler. You can click on this tag to review the messages and see whether you care about them having attachments. If you do, follow the Missing Apple Mail Messages and Attachments instructions to download the messages, then try the import again. Then you’ll end up with a complete offline copy of the messages, whereas a Time Machine backup would only contain the parts of the messages that Mail was currently caching.
3.6.1.2 Missing Apple Mail Messages and Attachments
When importing mail from Apple Mail, EagleFiler may report a Missing Apple Mail Messages or Missing Apple Mail Attachment error. This indicates that the message had not been fully downloaded to your Mac. You should tell Mail to download the messages and then try the import again. There are several ways to do this:
For a small number of messages that are missing attachments, it’s easiest to open the messages for viewing in Mail. This will trigger Mail to fully download them. You can select the error(s) in EagleFiler’s Errors window and Option-click the Reveal button. This opens the message files in Mail. Once the attachments have loaded in the message windows, you can close the windows and then try the import again.
For a larger number of messages, you can select all the messages to import in Mail and run the Download Apple Mail Messages script. Once this has completed, press the capture key with the same messages selected to import them.
For very large numbers of messages, the script can take a while. A faster option is to Option-drag and drop the entire mailbox to the On My Mac section of Mail’s mailbox list. This will create a local copy of the mailbox with all the messages fully downloaded.
Please note that moving or copying an IMAP message to an On My Mac mailbox will not cause Mail to download the attachments. It may, in fact, mark the attachments as downloaded even though they are missing. And if you then open the message it will be disassociated from the IMAP server so Mail will not be able to fetch the attachments. Thus, it’s best to import the IMAP messages directly from their original mailbox so that EagleFiler can warn you if any attachments are missing and Mail can download them if necessary.
Note: Mail does not allow you to copy special mailboxes such as Sent. However, you can temporarily create a Sent2 mailbox and assign that as the special Sent mailbox in the Mailbox Behaviors settings. Then Mail will let you copy the original Sent mailbox, which now appears with a regular icon. This workaround unfortunately does not work for the inbox.
See also: Importing Attachments From Apple Mail.
3.6.1.3 Importing Conversations From Apple Mail
When importing mail from Apple Mail, if you have View ‣ Organize by Conversation checked, Mail behaves differently depending on whether you have Use classic layout checked in the Viewing settings.
- With the classic layout, if you select a message with a blue triangle and the triangle is collapsed, EagleFiler captures all the messages in the conversation from the selected mailbox(es). If the triangle is expanded, EagleFiler captures only the messages that are selected in the message list, even though more messages may be displayed in the message viewer.
- With the widescreen layout, if you select a message with a triangle, EagleFiler captures all the messages in the conversation from the selected mailbox(es), regardless of whether the triangle is expanded. (As with the classic layout, you can select individual messages indented below the triangle if you only want to capture those.)
To import both sides of a conversation, Command-click in the mailbox list to select the Sent mailbox as well as the mailbox containing the received messages. Then Mail’s conversation view will show both types of messages in the list. You may also find it helpful to use a smart mailbox to display related messages from different mailboxes, and then capture from the smart mailbox.
Importing an entire mailbox is much simpler. You can always use Edit ‣ Select All to select all the messages, regardless of whether Mail is in conversation mode or which triangles are expanded.
3.6.1.4 Importing Gmail Messages From Apple Mail
When importing from a Gmail account in Apple Mail, it is best to select the messages to import, rather than selecting the mailboxes. This ensures that EagleFiler will be able to find the message data on disk.
The messages may end up in an EagleFiler mailbox called All Mail or Archive, even if you had selected the messages in a mailbox of a different name. This happens because the message exists in both mailboxes on the Gmail server, and Apple Mail sometimes saves space by only storing a single copy of the message. It tells EagleFiler that the message is in All Mail, since that’s where it’s storing the message, so that’s the mailbox name EagleFiler uses. You can prevent this from happening by configuring Gmail not to show the All Mail mailbox in Apple Mail:
- In Gmail, click on the gear menu at the top right and select Settings.
- Click on Labels (which is next to General at the top of the screen).
- In the System labels section, uncheck Show in IMAP on the line for All Mail.
When capturing a Gmail message, you may get an error saying that EagleFiler couldn’t find the All Mail mailbox on disk. This happens for a related reason, that Mail is choosing to only store the message in the non-archive mailbox. Hiding All Mail from IMAP will also fix this problem. Or, you can copy the messages to an On My Mac Apple Mail mailbox before capturing them or choose Mailbox ‣ Export Mailbox… and then import the exported file into EagleFiler.
3.6.1.5 Importing Whole Apple Mail Mailbox Hierarchies
Another way to import from Apple Mail is to drag and drop folders or mailboxes from the Finder. This makes it possible to import whole hierarchies of mail. The mailboxes are stored in the folder:
/Users/<username>/Library/Mail
(See How can I open the Library folder?.) Inside the V10 (or other V# folder for previous versions of macOS) is a folder for each account (named with a UUID or your e-mail address, and inside the account folder a folder for each mailbox.
When importing .mbox folders from Mail, you generally do not want to import via the To Import folder or the Files folder, as this would prevent EagleFiler from converting the mail to the standard mbox format. It is better to drag and drop to the Dock icon or into EagleFiler’s window, or to use the capture key from the Finder.
On macOS 10.14 and later, the first time you import from Mail’s folder you will need to grant EagleFiler Full Disk Access.
3.6.1.6 Importing via Apple Mail’s File Menu
Yet another way to import from Apple Mail is to use Mail’s File ‣ Save As… menu command. This works even if EagleFiler is not running, and you can select anywhere in The Files Folder or the The To Import Folder to save the file. Be sure to choose Raw Message Source from the Format pop-up menu.
- If a single message is selected, Mail will save it in .eml format.
- If multiple messages are selected, Mail will save them in mbox format. For larger mailboxes, it may initially look like the save didn’t happen, but Mail will eventually create the file. (Unlike when using the capture key this does not check for Missing Apple Mail Messages and Attachments.)
3.6.1.7 Importing Only Newer Apple Mail Messages
If you’ve previously imported some messages from Mail and now want to do a new import without creating additional copies of the old messages, there are several options:
- The simplest solution is to make sure that each message is only stored in one place: Mail or EagleFiler. If you import using the capture key, the imported messages will be selected in Mail. After the import has completed, you can press the Delete key to move them to the trash. Then you won’t have to worry about importing them again the next time.
- You can use a smart mailbox in Mail to find all the messages newer than a certain date, i.e. the last time you imported into EagleFiler. Each time you do an import, update the smart mailbox to the latest date.
Importing New Messages Automatically
It’s most efficient to import messages in bulk from Apple Mail, as described above. However, you can also set up a rule in Mail that uses the Import From Apple Mail script to automatically import each new message into EagleFiler as soon as Mail receives it.
3.6.1.8 Importing Apple Mail “.mbox” Folders
Apple Mail stores its mail in two types of folders whose names end with .mbox, however neither of these uses the actual mbox format:
- “Live” .mbox folders contain .emlx files. EagleFiler can import these folders via drag and drop—for best results, drag the whole folder, not the individual files—or by using the capture key from within Mail.
- “Archive” .mbox folders can be saved from Apple Mail using the Export Mailbox… command. These contain a single file called mbox. EagleFiler can import these folders via drag and drop, however this is not recommended because Mail does not properly generate the mbox format, attachments may be missing, and the mbox file does not include the message metadata. For better data fidelity it is recommended that you import the mailbox back into Mail and then capture the messages from Mail to EagleFiler, rather than importing archive mailbox to EagleFiler directly.
3.6.1.9 Handling Duplicate Messages in Apple Mail
When importing from Apple Mail, EagleFiler automatically skips a message if it is an exact duplicate of another message in the same mailbox that is currently being imported. Thus, it can be normal for the mailbox in EagleFiler to show fewer messages than the mailbox in Apple Mail. When EagleFiler skips a message, it includes a line in the note of the imported mailbox to tell you this.
- You can click here to have EagleFiler log to Console when it is skipping a duplicate message, or click here to turn off the logging.
- You can click here to have EagleFiler not skip duplicate messages, e.g. to more easily verify that the proper number of messages were imported, or click here to skip them again.
For more information about duplicates handling, see Allow duplicate files in library.
3.6.1.10 Differing Message Counts Importing From Apple Mail
When Importing Mail From Apple Mail, you may find that the number of messages shown in EagleFiler is not the same as the number show in Mail. Although it’s understandable that this could cause concern, it’s usually not an indication that anything went wrong. Here are some reasons the counts could differ:
EagleFiler may show fewer messages than Mail because EagleFiler automatically skips messages that are exact duplicates. This is described more in the Handling Duplicate Messages in Apple Mail section of the manual. You can see whether this has happened because it’s reported in the mailbox’s note.
EagleFiler may show more messages than Mail because Mail sometimes hides messages that are approximate duplicates (e.g. the same message received twice in different accounts), but EagleFiler doesn’t skip them because they’re not exact duplicates. In order to investigate this, you can set Mail to show duplicate messages by entering this command in Terminal:
defaults write com.apple.mail _AlwaysShowDuplicates -bool true
and restarting Mail. You may need to first give the Terminal app Full Disk Access in System Settings ‣ Privacy Security.
Another possibility depends on how you imported. If you select specific messages and press the capture key, EagleFiler finds those particular messages and imports them. If you select just a mailbox and press the capture key, it reads all the messages in that folder on disk. Sometimes Mail’s disk storage gets out of sync with its database, so there may be messages still there that Mail thinks it has moved or deleted. These could show up as “extras” in EagleFiler if you import in this way.
It’s also possible, though unlikely, that something in the message data is confusing EagleFiler such that it wrote the right number of messages to disk but didn’t read them back properly. You could test that theory by importing the EagleFiler mailbox file into another mail app and checking how many messages that app finds.
3.6.2 Importing Mail From Airmail
Importing Individual Messages
There are two ways to import a single message from Airmail to EagleFiler. Both will import the message as a .eml file:
- Select the message, choose File ‣ Export to EML, and save the file in the To Import folder or the Files folder.
- Drag and drop the message into an EagleFiler window (not its Dock icon). With the current version of Airmail, this does not work on macOS 10.14. On macOS 10.15 and later, it works when dragging a single message; if you drag multiple message, only one will be given to EagleFiler.
Importing Multiple Messages
- Create a new folder in Airmail, e.g. called To Export.
- Drag into it the messages that you wish to export.
- Go to Airmail ‣ Settings… ‣ Rules.
- Click + and choose Add Rule. Enter Export as the name and click Done. The rule should have Enable unchecked.
- From the All Inboxes pop-up menu, select the To Export folder that you just created.
- Change the Then of the rule to Export and select the destination folder from the next pop-up menu.
- Select the Action checkbox and click Record Shortcut. Enter a keyboard shortcut (e.g. Control-Option-Command-E). Click Save.
- You can now type the keyboard shortcut to export whatever messages are in the To Export folder. In the future, you can just add new messages to that folder and press the keyboard shortcut to export them; it’s not necessary to create additional folders or rules.
3.6.3 Importing Mail From Entourage
To import from Entourage, select some messages (or a folder) and press the capture key (F1 or fn-F1). EagleFiler will preserve the message flags, categories, and projects. EagleFiler skips messages that have been assigned the “OmitFromArchive” category in Entourage.
To import from multiple folders at a time, use a saved search (a.k.a. custom view) to show messages from multiple folders at once (for example, use “From Contains @” to show all messages), select all the messages, and press the capture key.
Dragging individual mailboxes or messages from Entourage to EagleFiler may work, but using the capture key is recommended because it is more reliable.
3.6.4 Importing Mail From Eudora
Mailboxes for Eudora 6 are stored in the Mail Folder folder inside the Eudora Folder folder, and they can be dragged from the Finder into EagleFiler. They are not actually in mbox format (for example, the attachments are removed), but the format is close enough that EagleFiler will be able to read most of the messages. Running the mailboxes through Eudora Mailbox Cleaner or Emailchemy before importing them into EagleFiler may produce better results. The .toc files are not mailboxes and should not be imported.
3.6.5 Importing Mail From GyazMail
Select some mailboxes and choose File ‣ Export ‣ Unix mbox…. Then drag the exported files into EagleFiler.
3.6.6 Importing Mail From MailMate
Importing the Selected Messages as Message Files
There is a built-in bundle for importing from EagleFiler. First, go to the Bundles tab of MailMate’s settings window and make sure that EagleFiler is checked. Then you can select messages in MailMate and choose Command ‣ EagleFiler ‣ Add to import them into EagleFiler. This will preserve any IMAP keywords from MailMate as tags in EagleFiler.
Importing the Selected Messages as Mailbox Files
MailMate also includes a bundle that adds the Command ‣ Export ‣ Copy to mbox command, which exports the messages in mbox format. You can then import the mbox into EagleFiler. This is the most efficient way of importing from MailMate.
Manually Importing Message Files
You can import individual messages from MailMate by dragging and dropping them or by using the File ‣ Export… command to create a .eml or .pdf file.
To import a whole mailbox, use the File ‣ Export… command to create a folder of .eml files. (If you have lots of .eml files in EagleFiler, you may want to merge them.)
Automatically Importing Messages
You can set MailMate to automatically import all messages added to a particular mailbox (even the inbox) to EagleFiler:
- Select the mailbox and choose Mailbox ‣ Edit Mailbox….
- Click on the Rules tab.
- Click + to create a new rule.
- Set the Description to EagleFiler Import.
- Click the + button at the bottom of the window to create an action.
- Click on Move to Mailbox and change it to Run Command.
- Click on No script selected and change it to EagleFiler ‣ Add.
- Click OK to save the rule.
Opening Messages in MailMate
You can use Open With or Always Open With to open EagleFiler’s copy of a message in MailMate.
3.6.7 Importing Mail From MailMaven
To import mail from MailMaven to EagleFiler, you can:
- Drag and drop individual messages to EagleFiler to import them in .eml format. (If you have many such messages in EagleFiler, it is more efficient to merge them.)
- Choose File ‣ Export to save multiple messages in .eml format that can be imported into EagleFiler. (If you have lots of .eml files, it is more efficient to instead export a mailbox, as described below.)
- Choose Mailbox ‣ Export Mailbox… to create new mbox file that can be imported into EagleFiler. Note that this will export the entire selected mailbox (or potentially multiple mailboxes if multiple messages in different mailboxes are selected), not just the messages that are selected. If you only want to export the selected messages, you could first copy them to a new mailbox and then export that.
As of version 1.0.1, MailMaven does not export metadata such as tags, keywords, projects, colors, flags, or notes, so these will not be imported into EagleFiler. However, you can group messages by metadata before exporting and then re-apply the metadata in EagleFiler after importing.
3.6.8 Importing Mail From Mail Pilot
You can import individual messages from Mail Pilot 1.1 or later by dragging and dropping them.
3.6.9 Importing Mail From Mailsmith
Select some messages and press the capture key. EagleFiler will preserve the notes (as EagleFiler notes) and message status and label (as EagleFiler tags).
Please note that Mailsmith only reports to EagleFiler which messages are selected, not which mailboxes are. So if you select a mailbox and no messages, EagleFiler will report an error.
Note: If you want to separate messages by age before importing them into EagleFiler, you may find it helpful to use Email Archiver.
3.6.10 Importing Mail From Mbox Files
EagleFiler supports mbox, the standard format for importing and exporting e-mail messages. Each mailbox is stored in a separate text-like file, and the mailbox files can be organized into folders.
Most e-mail apps have a command to export messages in mbox format. You can also export from Gmail to mbox format using Google Takeout.
To import mbox files into EagleFiler, just follow the regular Importing Existing Files instructions.
3.6.11 Importing Mail From Outlook
The recommended way to import from Microsoft Outlook 365, Outlook 2016, or Outlook 2011 is to select some messages (or a folder and no messages) and press the capture key (F1 or fn-F1). EagleFiler will preserve the message flags, read status, and categories. EagleFiler skips messages that have been assigned the “OmitFromArchive” category in Outlook.
Note: Dragging individual mailboxes or messages from Outlook to EagleFiler may also work, but using the capture key is recommended because it is more reliable.
New Outlook and Legacy Outlook
Recent versions of Microsoft Outlook can run in either “New” or “Legacy” mode. The new mode does not yet have all the features implemented. In particular, it’s missing AppleScript support, which is necessary for EagleFiler’s capture key to work. It also doesn’t have a functioning Export feature. You can turn off New Outlook to restore AppleScript support and use EagleFiler’s capture key.
Importing Message Files
To import messages as individual .eml files instead of as mailbox files, capture one message at a time or use the Import From Outlook script.
Importing All Your Mail
To import all your mail at once, use a smart folder to show all the messages:
- In the upper-right corner of the Outlook window, click in the search box. This will make the Search tab active.
- In the Search tab, select All Mailboxes.
- Then click the Advanced button.
- Click on the Item Contains pop-up menu and change it to say Date Created. The pop-up menu next to it should now say Any Date.
- You can now use Edit ‣ Select All to select all of your messages at once and import them by pressing the capture key.

EagleFiler creates a mailbox file for each folder that you imported messages from. The folders are preserved, but their hierarchy is not. That is, all the mailboxes are created at the same level; if desired, you can create folders in EagleFiler and drag and drop the mailboxes organize them.
Importing a Folder and Its Subfolders
To import from multiple folders at a time, use a smart folder to show messages from multiple folders at once:
- Select the folder in Outlook.
- In the upper-right corner of the Outlook window, click in the search box. This will make the Search tab active.
- In the Search tab, select Subfolders.
- Then click the Advanced button.
- Click on the Item Contains pop-up menu and change it to say Date Created. The pop-up menu next to it should now say Any Date.
- You can now use Edit ‣ Select All to select all of the messages at once and import them by pressing the capture key.
As with “Importing All Your Mail” above, folders are preserved but their hierarchy is not.
Importing PST Files From Outlook for Windows
There are several ways to import .pst files from the Windows version of Outlook to EagleFiler:
If you have Microsoft Office for Mac, you can import the PST file into the Mac version of Outlook. Then select the messages and press the capture key.
Note: The Mac version of Outlook has a bug that can prevent it from exporting some messages imported from Windows Outlook. This can prevent the message bodies from transferring to EagleFiler, making the messages appear blank (aside from the headers). To work around this bug, instead of importing via the capture key, import by dragging the mail folder (or individual messages) from Outlook to a folder in the Finder; this will export the messages (but not the message flags, read status, or categories). You can then drag the files from the Finder into EagleFiler to import them. Sometimes this won’t work, either, as the message files exported by Outlook are also flawed.
You can import the messages into EagleFiler with the help of another mail client, such as Apple Mail. Make sure that both Windows Outlook and Apple Mail are set to connect to the same IMAP server. In Outlook, drag the messages to a folder on this IMAP server. The messages will then appear in that folder in Apple Mail. Then follow the Importing Mail From Apple Mail instructions.
You can use a Mac utility such as PST Converter Pro to convert the PST file to mbox format. Then import the mbox files into EagleFiler.
You can use a Windows utility such as O2M that can convert the PST file to mbox format. Then import the mbox files into EagleFiler.
Importing OLM Files From Outlook for Mac
To import an Outlook for Mac Data File (.olm), first import it into Outlook, then follow the regular instructions at the top of this section to import from Outlook to EagleFiler. Or you can use a utility such as OLM Extractor Pro to directly convert the .olm file to mbox format and then import the mailbox files into EagleFiler.
Opening Messages in Outlook
You can use Open With or Always Open With to open EagleFiler’s copy of a message in Outlook.
3.6.12 Importing Mail From Outspring Mail
The messages are stored in the folder:
/Users/<username>/Library/Application Support/Outspring Mail/
as individual .eml files. (See How can I open the Library folder?.) They can be imported into EagleFiler via drag and drop or by pressing the capture key in the Finder.
3.6.13 Importing Mail From Postbox
Importing Whole Mailboxes (Postbox 5–7)
Before importing into EagleFiler, make sure that Postbox has completely downloaded all the messages and use the Compact Folders command. The POP/local mailboxes are stored in the folder:
~/Library/Application Support/Postbox/Profiles/<profile>/Mail/Local Folders/
(See How can I open the Library folder?.) The IMAP mailboxes are stored in the folder:
~/Library/Application Support/Postbox/Profiles/<profile>/ImapMail/
The mailbox files have no extension and can be dragged from the Finder to EagleFiler. The .msf files are not mailboxes and can be ignored or deleted from EagleFiler’s library.
Importing the Selected Messages (Postbox 6 and 7)
Select the messages in Postbox and choose File ‣ Save As ‣ File. Choose a folder in your EagleFiler library, e.g. the To Import folder. Postbox will save each message as a .eml file. For large numbers of messages, EagleFiler will be faster if you merge the .eml files into a single mailbox using the Merge Message Files command after importing.
Importing Individual Messages (Postbox 5)
You can drag and drop the selected messages from Postbox to EagleFiler. You can also use the File ‣ Save As ‣ File command to save a message in Mail Files format. Either way you will end up with one .eml file per message in EagleFiler.
For large numbers of messages, EagleFiler will be faster if you merge the .eml files into a single mailbox using the Merge Message Files command after importing.
3.6.14 Importing Mail From PowerMail
There are three ways to import from PowerMail into EagleFiler:
The Export Command
Select some folders or messages and choose File ‣ Database ‣ Export. Choose what you want to export and click the right arrow button. Select Unix Mailbox and make sure that Include attachments and All attachments are both selected; then click Go Ahead. Choose a folder in your EagleFiler library (e.g. The To Import Folder) and click Save.
This method will preserve any attachments that are still in PowerMail’s Attachments folder. Attachments that you have moved out of that folder will be preserved so long as PowerMail can still track where they were moved to. The message status and label are not preserved.
The Capture Key
Select some folders or messages and press the capture key. This method is very convenient, and it preserves the message status and label, but (due to limitations of PowerMail) it does not preserve the attachments.
Importing via Apple Mail
Because of PowerMail’s limitations with attachments, you may find it easier to import via Apple Mail for full message fidelity. If your mail is stored on the server in IMAP mailboxes, you can simply configure Apple Mail to access the same mail account. You can still use PowerMail for your regular e-mail needs, then follow the instructions in the Importing Mail From Apple Mail section when it’s time to import into EagleFiler.
3.6.15 Importing Mail From Thunderbird and Eudora 8
To import an individual message from Thunderbird, select the message and choose File ‣ Save As ‣ File. Save the .eml file into EagleFiler’s To Import folder.
To import whole mailboxes from Thunderbird, make sure that Thunderbird has completely downloaded all the messages and use the Compact Folders command. The POP/local mailboxes are stored in the folder:
/Users/<username>/Library/Thunderbird/Profiles/<profile>/Mail/Local Folders/
(To open the Library folder, go to the Go menu in the Finder and hold down the Option key.) The IMAP mailboxes are stored in the folder:
/Users/<username>/Library/Thunderbird/Profiles/<profile>/ImapMail/
The mailbox files have no extension and can be dragged from the Finder to EagleFiler. The .msf files are not mailboxes and can be ignored or deleted from EagleFiler’s library.
To import an individual message from Thunderbird, use the File ‣ Save As ‣ File command to save the message in Mail Files (.eml) format.
3.6.16 Importing Mail From Webmail/Gmail
Web-based mail services store your data on the server. To import it into EagleFiler, you must first get it onto your Mac. To do this, you can:
- Connect to the mail account using a mail client and then import from that client into EagleFiler. This is described in the Importing Mail section.
- Export individual messages from Webmail to .eml files and then import them into EagleFiler. In Gmail, this is possible with the Show Original command. Other mail providers may call it Show Raw Source.
- Export whole mailboxes from Webmail to mbox format and then import the mbox files to EagleFiler. For example, with Gmail you can export mailboxes using the Takeout feature.
- If your Webmail does not work with mail clients and does not have an export feature, you can drag and drop the message text from your Web browser, use File ‣ Save to save messages into EagleFiler’s To Import folder, or print and choose Save PDF to EagleFiler.
3.7 Drag and Drop
This section summarizes the different ways that you can use drag and drop in EagleFiler:
- Source List
- Folders
Drag a folder or mailbox onto a folder to rearrange the folders in the source list. Drag a file from the records list onto a folder to move it into that folder. Drag onto the Records source to move the record to the top-level Files folder; it will then appear under Unfiled.
Drag from another application onto a folder in order to import directly into that folder.
EagleFiler supports spring-loaded folders. If you drag and hover over a collapsed folder, it will expand so that you can drag onto one of its subfolders.
- Smart Folders
Drag a record onto a smart folder to apply the smart folder actions that you’ve set in the Edit Smart Folder… window.
Drag and drop smart folders into folders to rearrange the source list.
- Tags
EagleFiler supports hierarchical tags. Drag and drop tags to rearrange them in the source list.
Drag records onto a tag to assign them that tag.
Drag from another application onto a tag in order to import the dragged items and then assign that tag.
- Records List
With a folder selected in the source list, drag onto the records list to move the records into that folder (if dragging from another EagleFiler window) or to import into that folder (if dragging from another application).
Drag from the records list onto a folder or tag in the source list in order to move the records or assign that tag.
Drag to the Finder to create copy the files from EagleFiler.
Drag to Terminal to enter the file’s path.
Drag to a text view in another application to create links to the selected records.
- Record Viewer
- You can drag and drop text and images to/from other applications as normal.
- Notes
- You can drag and drop text and images to/from other applications as normal.
- Drop Pad and Dock
- Drag from another application onto EagleFiler’s Drop Pad window or Dock icon to import into the current library.
When dragging from another application, you can drag files, URLs, or text to import them into EagleFiler.
3.8 Shortcuts
This section summarizes EagleFiler’s built-in keyboard shortcuts. Many other keyboard shortcuts are available in the menus, and you can search the menu commands using the Search field in the Help menu. You can customize the keyboard shortcuts from the Keyboard pane in System Settings. You can even add keyboard shortcuts for your favorite named text styles.
- Importing
- F1
- Capture Key. (Depending on your settings in System Settings, you may need to press fn-F1.)
- Option-F1
- Capture with options. (Depending on your settings in System Settings, you may need to press fn-Option-F1.)
- Command-Shift-1
The “EagleFiler: Import” system service. Type this from another application to import the selected text or URL into EagleFiler.
- Command-Shift-Option-1
The “EagleFiler: Import With Options” system service. Type this from another application to import the selected text or URL into EagleFiler. EagleFiler will show the options window so that you can set the destination folder, label, tags, notes, etc.
- Batch Change
- Shift-Command-A
- Append.
- Shift-Command-R
- Replace.
- Command-3
- Choose label.
- Enter or Command-Return
- OK.
- Capture With Options and Quick Entry
- Command-1
- Choose library.
- Command-2
- Choose folder. Then you can select a folder by typing the first few letters of its name.
- Command-3
- Choose label.
- Command-K
- Reset.
- Enter or Command-Return
- Capture or Save.
- Control-Shift-Tab
- Select the previous tab (Metadata, Source, Text). The shortcut is Command-{ on macOS 10.11 and earlier.
- Control-Tab
- Select the next tab (Metadata, Source, Text). The shortcut is Command-} on macOS 10.11 and earlier.
- Info inspector
- Command-click title bar
- Show a path menu for the file being inspected.
- Command-I
- Open the Info inspector and bring it to the front.
- Command-Option-I
- Open the Info inspector without bringing it to the front.
- Command-Shift-E
- Open the Info inspector with the Notes field ready for editing.
- Command-Shift-T
- Make the tags field active.
- Tags inspector
- Spacebar
- Toggle whether the tag is assigned to the selected records.
- Navigating browser windows
- Command-Option-F
- Make the search field active.
- Command-Shift-T
- Make the tag bar active.
- Tab (in source list) or Control-Shift-Tab (in record viewer)
- Make the records list active.
- Tab (in records list) or Shift-Tab (in source list)
- Make the record viewer active.
- Control-Tab (in record viewer) or Shift-Tab (in records list)
- Make the source list active.
- Editing a rich text file or notes
- Option-Tab
- Begin a new bulleted list.
- Tab
- Increase the indentation of the current list item.
- Shift-Tab
- Decrease the indentation of the current list item.
- Records list
- Enter or Return
- Edit the filename of the selected record.
- Option-Enter or Option-Return
- Edit the title of the selected record.
- Delete
- Delete the selected records (if viewing multiple sources or a folder) or untag them (if viewing a tag).
- Option-Delete
- Delete the selected records (even if viewing a tag).
- Command–Up Arrow
- View the container of the current folder or mailbox (i.e. go up a level in the hierarchy).
- Command–Down Arrow
- View the contents of the selected folder or mailbox (i.e. go down a level in the hierarchy).
- Down Arrow or Command-Control–Down Arrow
- View the next record. Down Arrow works in the records list. Spacebar works in the records list and in uneditable viewers. Command-Control–Down arrow works everywhere, even from an inspector window.
- Up Arrow or Command-Control–Up Arrow
- View the previous record.
- Left Arrow
- Change the keyboard focus to the source list.
- Double-click
- Open a folder or mailbox in the same window, like Contents of Record, or open a file in the external viewer.
- Command-double-click
- Open With External Viewer.
- Option-double-click
- Open Source URL.
- Shift
- Hold the Shift key while mousing over a record to see the tooltip faster. The tooltip shows the path and source URL.
- Spacebar
- Quick Look
- Option-Spacebar
- Slideshow
- Three-Finger Swipe Left
- Select the previous record.
- Three-Finger Swipe Right
- Select the next record.
- Source list
- Left/Right Arrow
- Collapse or expand the selected sources. If the selected source is already expanded and you press Right Arrow, changes the keyboard focus to the records list and selects the first record.
- Option-Left/Right Arrow (or Option-click disclosure triangle)
- Collapse or expand the selected sources and all their children.
- Command-click
- Select multiple sources at once.
- Command–Up Arrow
- Select the enclosing folder in the source list.
- Double-click
- Open in New Window.
- Enter or Return
- Edit the filename of the selected source.
- Type-selection
- Type the first few letters of a source’s name to select it.
- Dragging from Source list or Records list
- Drag to Finder
- Create a copy of the file.
- Command-Option-Drag to Finder
- Hold down before starting the drag to create an alias of the file.
- Command-drag to a tag source
- Assign that tag and unassign all others.
- Drag to an EagleFiler browser window
- Copy the record to another library.
- Drag to Terminal
- Enter the file’s path.
- Hiding
- Option-click on another application
- Switch to that application and hide EagleFiler. While hidden, EagleFiler will temporarily show itself if you press the Capture with options key and then re-hide itself automatically.
- Option-click on an EagleFiler window
- Bring EagleFiler to the front and hide the other applications.
- Double-click on the horizontal split bar
- Hide or show the record viewer.
- Tags Bar
- Command-Shift-T
- Move the focus to the tags bar.
- Return or Comma
- End the current tag so that you can begin typing the next one.
- Tab
- Move focus to the search field. Press Tab-Tab to move to the source list or Tab-Tab-Tab to move to the records list.
- Toolbar
- Option-click New RTF
- Creates a new plain text file.
- Option-click Tags
- Opens the Tag Cloud window.
- Windows
- Command-`
- Move focus to next window.
- Command-Shift-`
- Move focus to previous window.
4 Browser Windows
Each browser window contains a source list, a records list, a record viewer, and a toolbar. Drag the split bars to resize the different portions of the window. Double-click a split bar to collapse it entirely. Hold down the Option key while dragging a split bar to grow or shrink the window as you drag.
You can use the Tab key to move between the different panes using the keyboard. When editing in the record viewer, you may need to type Control-Tab rather than Tab (which will insert a tab character into the document).
4.1 Source List
The top-level sources are:
- Library
- Records
- All the records in the library, from all the folders (except the trash). (If you only want to see the top-level records, see the Unfiled smart folder, below.) Click the triangle next to the Records source to expand it and see folder sources matching the folders in the library’s Files folder in the Finder. You can drag and drop files and folders to re-arrange their hierarchy.
- Trash
- The records that have been deleted from the library, but which are still available until you empty the trash. This corresponds to the library’s Trash folder in the Finder.
- Search For
- Recently Added
- The last 25 files that were added to the library.
- Recently Modified
- The last 25 files that were modified within EagleFiler or using another application.
- Unfiled
- Files that are at the top level of the library, e.g. ones that are directly in the Files folder rather than in one of its sub-folders. For example, if you like to categorize all your files into subfolders, Unfiled shows you all the files remaining to be categorized.
- Untagged
- Files anywhere in the library that do not have any tags (other than “note”).
- Tags
- Tag sources behave like playlists in iTunes or albums in Photos. Select a tag source to view all the records with that tag. You can drag records onto a tag source to assign that tag to them. Hold down the Command key to assign the tag and unassign all others (i.e. “move” it to that tag). Each record may appear in any number of tag sources. Deleting a record from a tag source unassigns that tag; the record remains in the library. You can drag and drop tags to re-arrange their hierarchy.
Selecting Multiple Sources
You can select more than one source at a time to view all their contents at once or to winnow by tag. For example:
- To see all the messages in either of two mailboxes, select both mailboxes at once.
- To see all the flagged files in a folder, select the folder and the flagged tag.
- To see all the records that are both flagged and unread, select both the flagged and unread tags. You can select any number of tags at once to show their intersection.
Importing via the Source List
Drag files here to import them. You can drop onto a folder or tag source to import files directly into that folder or to import them and assign that tag. You can use Exposé mid-drag to bring a window to the front and reveal the source that you want to drop onto.
Multiple Windows
You can double-click a record or smart folder source to open it in a new window. For an editable smart folder, Option-double-click to open it in a new window instead of editing the smart folder.
Navigating
You can type the first few letters of a source’s name to select it. See also the collapsing and expanding Shortcuts.
Hiding and Showing
To hide and show the source list, you can use the Show ‣ Source List command in The View Menu. You can also drag or double-click the divider.
Renaming
With a source selected, press Return or Enter to edit its name.
Reordering
The source list is sorted alphabetically, so you can change where a source appears in the list by renaming it. For example, you can make a source sort to the top by putting ! or @ at the beginning of its name or at the bottom by putting z at the beginning of its name.
Custom Folder Icons
You can customize folder and smart folder icons in the source list. First copy an image to the clipboard (e.g. using Preview). Then Control-click on a source and choose Paste Icon. Custom icons can be removed from the Get Info window in Finder. Tag abbreviation symbols are not images, and so cannot be set via pasting. They can be specified as emoji or Unicode symbols in the Tags inspector.
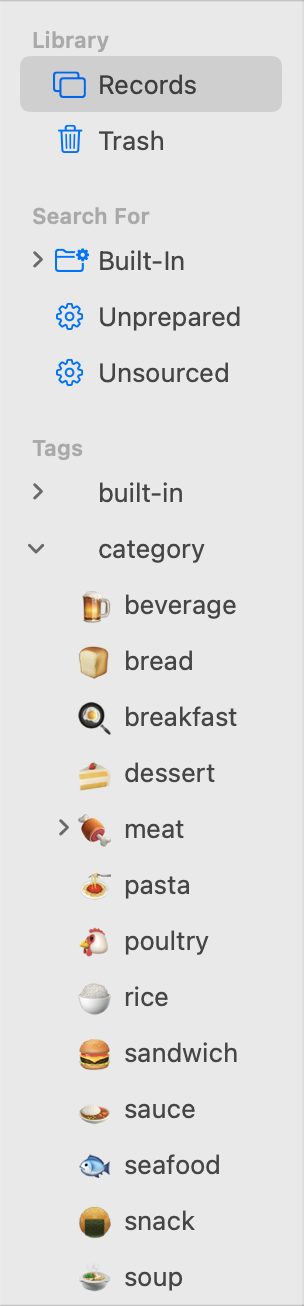
4.2 Records List
The records list shows the contents of the selected source(s). If a folder or tag is the selected source, you can drag files into the records list to import them with that folder or tag.
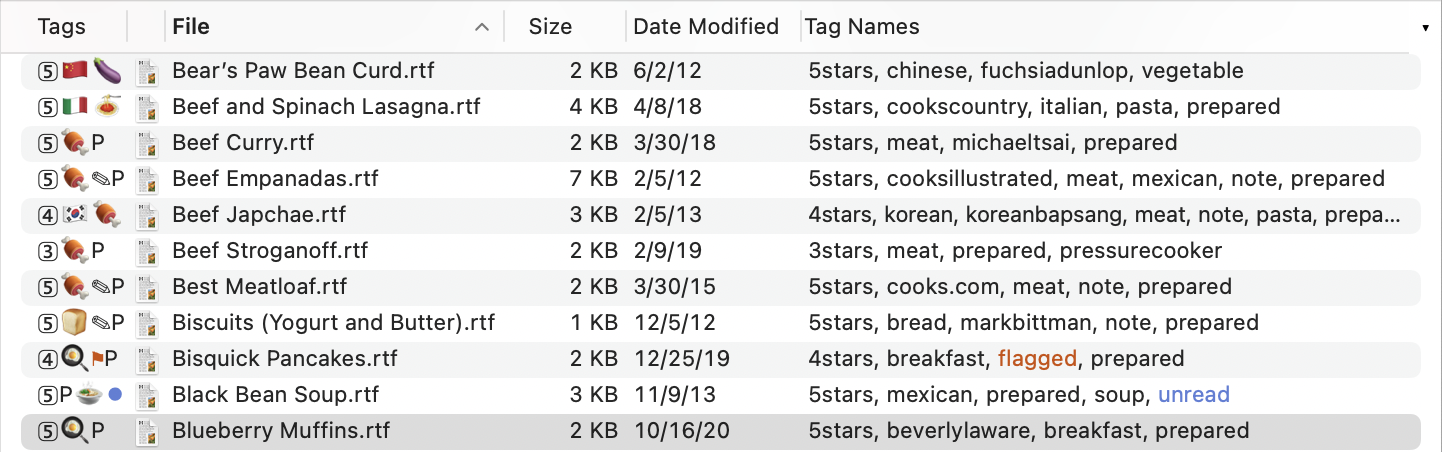
The columns are:
- Tags
- The abbreviations for the assigned tags (e.g. • for unread).
- Count (#)
- The number of pages in a PDF, messages in a mailbox, or attachments in a message.
- Icon
- An icon that shows the record’s type.
- Title
- The subject of a message or title of a document. For most document types, the title is separate from the filename, e.g. it’s the original page title stored in a Web archive, manually set in the Properties window in TextEdit or in Microsoft Word, or manually in the sheet when saving a document in PDF format. If a file doesn’t have an intrinsic title, or if you set the title to be blank, EagleFiler will show the filename (without the file extension) as the title. You can use Batch Change… to clear the titles of many records at once if you want them all to be linked to their filenames. If you want to edit the filename without changing the linked title, you can use the Change Filename, Keeping Title script.
- From
- The sender of a message, author of a document, or domain of a Web page.
- To
- The recipient of a message or document.
- Date Modified
- The date the record’s contents was modified. For a file, this is the file’s modification date. For a message, this is when the message was sent.
- Date Added
- The date the record’s file was added to the library.
- Date Created
- The date the record’s file was created. For a message, this is when the message was sent.
- Size
- The amount of disk space used by the record.
- File
- The name of the file containing the record.
- Kind
- The type of the record.
- Label
- The Finder label color of the record’s file.
- Container
- The name of the folder or mailbox that the record is inside.
- Tag Names
- The full names of the assigned tags.
- Source URL
- The URL where the file was downloaded from.
- Notes
- The record’s note text.
- •
- Whether the record has the “unread” tag.
- ⚑
- Whether the record has the “flagged” tag.
Drag and drop the column headers to change their order. Click the ▾ or Control-click on a column header to choose which columns are visible.
You can type the first few letters of a record’s title to select it. Double-clicking a folder or mailbox in the list opens it in the same window. Double-clicking a file is equivalent to choosing Open With External Viewer. Option-double-clicking is equivalent to choosing Open Source URL. Press Enter (or Return) to rename the selected file or Option-Enter (or Option-Return) to change its title.
4.3 Record Viewer
The record viewer shows the contents of the selected file or e-mail message. Text, RTF, and RTFD files can be edited directly in the viewer. EagleFiler automatically saves your changes to disk, and it supports standard features such as spell-checking, find/replace, and text-to-speech.
EagleFiler knows how to display many different kinds of files. If it does not natively understand a file’s format, EagleFiler uses Quick Look to display a preview of the file.
There is also a tags bar at the bottom of the viewer for assigning or unassigning the tags of the current item.
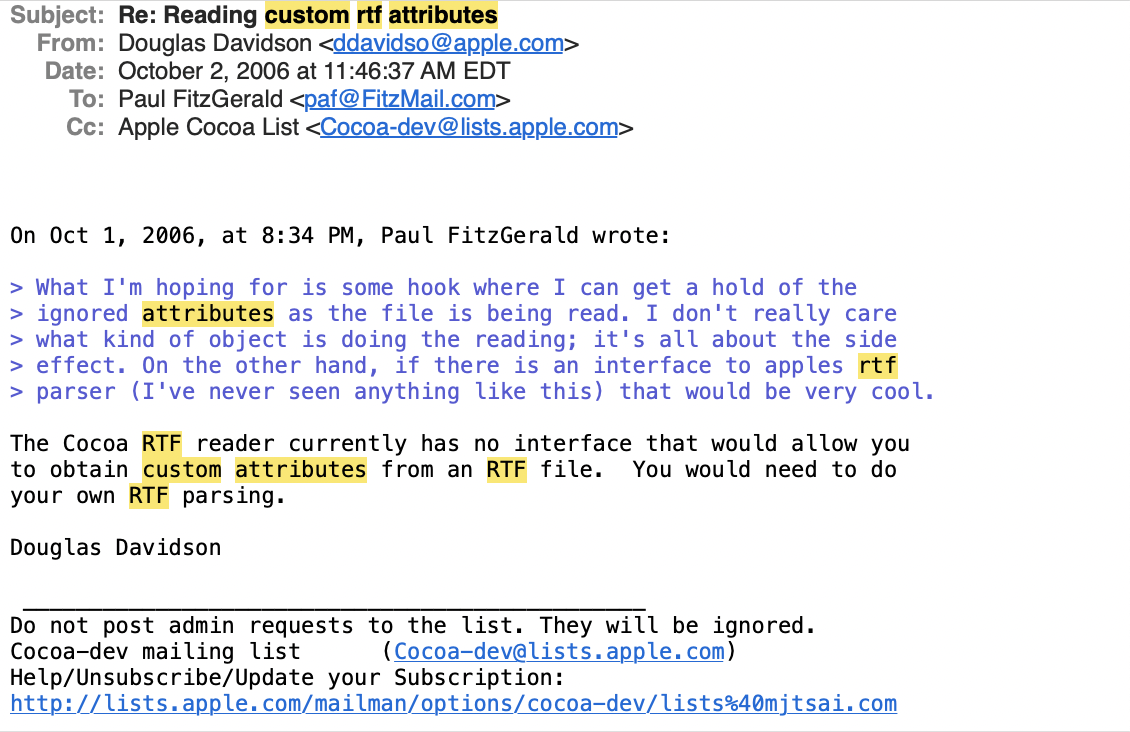
While the record viewer has focus, you can press Command-Delete to delete the current record(s).
Control-click on a selected word or phrase to set that phrase as the tag, filename, from, or title.
To hide and show the record viewer, you can use the Show ‣ Record Viewer command in the View menu or drag or double-click the divider.
4.4 Searching
The search box lets you filter the records of the selected sources to display only those records that match the search criteria. After finding the record you’re looking for, you can then search within it. Searches can be initiated from within EagleFiler or from other applications such as Alfred and LaunchBar.
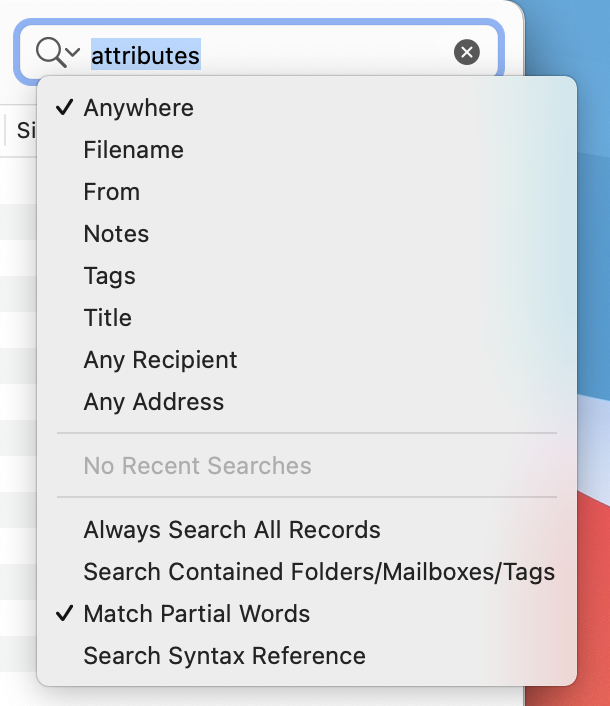
Search Scope
If Always Search All Records is checked, EagleFiler searches the entire library, regardless of which sources are selected. It is as if you had selected the Records source before starting your search. This will include or not include e-mail messages depending on whether Show ‣ Messages in Records Source is checked. When the search is over, EagleFiler goes back to displaying only the records from the selected sources.
If Always Search All Records is unchecked, EagleFiler only searches the records from the selected sources:
- When you have the Records source selected, EagleFiler searches the entire library; this will include or not include e-mail messages depending on whether Show ‣ Messages in Records Source is checked.
- When a folder or tag is selected, EagleFiler displays and searches only the contents of that folder or the records with that tag. If Search Contained Folders/Mailboxes/Tags is checked, EagleFiler searches all the folders and mailboxes inside the folder, or the subtags of the tag; otherwise, it searches only the top level.
Indexed Searches
Indexed searches look for records that contain each word that you type. Words do not include spaces or punctuation characters, and they are case- and diacritic-insensitive. Words do not have to appear in sequence or even near each other.
There are two kinds of indexed searches:
- Anywhere
- Searches the contents of the records, as well as the Title, Filename, From, To, Cc, mail attachment names and contents, and notes. Also searches for records whose tags exactly match the query.
- Notes
- Searches the notes of the records.
For more information about indexed searches, see the Search Query Syntax section. The How does indexing in EagleFiler work? section has additional information about indexing options and troubleshooting.
Exact Searches
Exact searches look for the exact sequence of characters that you type, including partial words, spaces, and punctuation. However, they are case- and diacritic-insensitive, so that searching for e will find by é and E.
There are five kinds of exact searches:
- Filename
- Searches the filenames as displayed in the records list.
- From
- Searches both the names and e-mail addresses.
- Tags
- Finds records that have the specified tag names. For more information, see the Search Query Syntax section.
- Any Recipient
- Searches both the names and e-mail addresses in the To and Cc fields.
- Any Address
- Searches both the names and e-mail addresses in the From, To, and Cc fields.
- Title
- Searches record titles and message subjects.
Note: Searches for From and To/Cc are slow for e-mail messages stored as individual .eml files. If you need to search lots of messages, it’s best to merge .eml files into mailboxes (or import in mailbox format in the first place).
Advanced Searches
More complex searches, with different types of criteria and Boolean conditions, are available using smart folders.
4.4.1 Search Query Syntax
As described in the Searching section of the manual, EagleFiler supports both indexed and exact searches. This section explains the syntax for those search types in more detail. To perform even complex searches with multiple criteria, you can use the New Smart Folder… command.
Indexed Searches
These support an enhanced query syntax:
- &, AND
- Boolean AND. The <space> character also represents a Boolean AND.
- |, OR
- Boolean inclusive OR.
- !, -
- Boolean NOT. For example, apple -orange finds records that contain apple and do not contain orange. (There has to be at least one non-negated term in the query; you cannot do a search for just -orange.)
- (, )
- Opening and closing delimiters for logical grouping. For example, (apple AND orange) OR (apple AND pear) finds records that contain apple and another fruit, but not ones that contain only apple.
- "
- Opening and closing delimiter for phrase-based searching. Phrase-based searches find records that contain all of the words in sequence. Non-word characters inside the quotes are treated as word separators and thus do not need to appear in the match.
- *
- Wildcard for prefix or suffix. Ignored in phrase-based searches. To search for a partial word, use two *’s, e.g. *ant* will find ant, repellant, anthem, and words with ant in the middle. If Match Partial Words is checked, EagleFiler will find partial word matches without your having to type the wildcards each time.
Examples:
- Searching for "IDP policy" "commit fails" finds records containing the two phrases IDP policy and commit fails (since the space implies AND).
- Searching for tech lead !"tech lead" finds records containing both tech and lead but not those two words in sequence.
- Searching for "ProductVersion 1.2" finds records containing the word ProductVersion followed by the word 1 and then the word 2. This includes records containing ProductVersion 1 2 as well as ProductVersion=1.2, because the = and . are considered to be word separator characters for indexed searches.
Tags Searches
If Match Partial Words is not selected, tag searching is exact, so you must type the complete tag names (with the proper case). If the tag name contains a space, put it in double quotes. You can put - or ! before a tag name to find records that don’t have that tag. (Because those characters have special meaning, it’s best not to use them in the names of your tags.)
Example: Searching for unread -flagged will find the records that are unread but not flagged.
Adding Tag Criteria to Exact and Indexed Searches
You can restrict any type of search to records with certain tags by adding tag:<tagname> at the beginning of the query. (This syntax is not available in smart folders; there you should create a separate Tags criterion.) If the tag name contains a space, put it in double quotes. The search will then match only the records with all of those tags.
Examples:
- Searching for tag:apple steve means to search for steve and show only the records with the apple tag.
- Searching for tag:-apple steve means to search for steve and show only the records without the apple tag.
- Searching for tag:mac tag:ipod halo !bungie means to find all the records that include the word halo, do not include the word bungie, and have both the mac and ipod tags.
- Searching for tag:"apple park" means to search for the tag apple park.
- Searching for tag:apple park means to search for park and show only the records with the tag apple.
- Searching for tag:-"apple park" park means to search for park and show only records without the tag apple park.
4.4.2 Searching Within Records
After you have used the main search field to find the records you are interested in, you can search within them to find the relevant part of the document. EagleFiler automatically highlights the search term within the currently selected document. You can use the Find ‣ Find… panel to jump from one occurrence to the next. The Find panel is pre-filled with the current search term. You can jump between occurrences without opening the Find panel by using the Find ‣ Find Next/Previous commands (Command-G and Command-Shift-G). You can also select a new word within the document and set it as the Find panel’s search term using the Find ‣ Use Selection for Find command (Command-E).
4.4.3 Searching From Other Applications
You can quickly initiate an EagleFiler search while in another application by using the x-eaglefiler URL scheme. When you open a URL of the form x-eaglefiler://search?q=query, EagleFiler brings itself to the front, selects the Records source in the current library, and searches for query. You can also initiate searches via AppleScript.
Alfred
To set up Alfred for searching EagleFiler:
- In Alfred’s Settings window, click on Features, then Web Search.
- Click the Add Custom Search button.
- For the Search URL, enter x-eaglefiler://search?q={query}.
- Set the Title to EagleFiler and the Keyword to something that you find convenient, for example ef.
- Click Save.
- You can now search EagleFiler for the word apple by pressing Alfred’s hotkey and then typing ef apple.
LaunchBar
To set up LaunchBar for searching EagleFiler:
- From the Index menu, choose Show Index.
- Click on Search Templates.
- Click the + button at the center of the bottom of the window to create a new search template.
- Set the Name to EagleFiler and the Template URL to x-eaglefiler://search?q=*.
- You can now search EagleFiler for the word apple by pressing LaunchBar’s hotkey, searching for the EagleFiler template, pressing the Spacebar, and then typing apple.
Raycast
To set up Raycast for searching EagleFiler:
- Open the Settings and click on Extensions.
- Add a Quicklink and enter ef or some other abbreviation as the Name.
- Enter x-eaglefiler://search?q={Query} as the Link.
- Set the Open With to EagleFiler.
- Click Create Quicklink.
- You can now search EagleFiler from Raycast by using the ef shortcut.
Specifying a Library
The above examples will search the current library that’s open in EagleFiler. You can also specify a library in the URL scheme by path. EagleFiler will then open that library, if necessary, before performing the search. For example, to search the library located at:
~/Documents/MyLibrary/MyLibrary.eflibrary
you would specify the Alfred search URL:
x-eaglefiler://search?q={query}&library=~/Documents/MyLibrary/MyLibrary.eflibrary
or the LaunchBar search template:
x-eaglefiler://search?q=*&library=~/Documents/MyLibrary/MyLibrary.eflibrary
Mac App Store
The feature to search EagleFiler from other applications is not available in the Mac App Store version of EagleFiler.
5 Menus
5.1 The EagleFiler Menu
5.1.1 About EagleFiler
The About EagleFiler window shows the credits, as well as download and support information.
You can always download the latest version of EagleFiler from the EagleFiler Web site.
Questions about EagleFiler may be sent to eaglefiler@c-command.com. We’re always looking to improve EagleFiler, so please feel free to send any feature requests to that address.
To make sure that you have the latest version of EagleFiler, you can use the Software Update… command.
5.1.2 Software Update…
Checking for Updates
Click the Check Now button, and EagleFiler will tell you whether a newer version is available for download. By default, EagleFiler will automatically check for new versions each time it is launched and once per day. You can disable this feature by unchecking the Check for updates automatically checkbox.
Updating
If a new version is available, EagleFiler will tell you what’s new in that version. Click Download to have EagleFiler download the .dmg file for the new version to your downloads folder. Click Download & Install to have it download the .dmg and then update the installed EagleFiler application to the new version. For more information, please see Updating From a Previous Version.
Installing a Fresh Copy
You can hold down the Option key when you click Check Now to make EagleFiler always download the latest version, even if your version is already up-to-date. This is an easy way to download and re-install a fresh copy of EagleFiler if your copy is damaged.
Privacy
To check for a new version, EagleFiler contacts a Web server at c-command.com over a secure connection. EagleFiler transmits the following information to the server: the name of the product (EagleFiler) and its version, the version of macOS, the kind of Mac and processor, whether EagleFiler has been purchased, whether it is running in dark mode, the values of certain esoteric preferences, and the name of the current language. This information is used to guide future development. No personal information is transmitted.
Mac App Store
If you purchased DropDMG or EagleFiler via the Mac App Store, the Software Update… menu command is not present, and updates are available via the App Store application.
5.1.3 Purchase…
When you launch EagleFiler for the first time, the Purchase window will automatically open. You can also open it by choosing Purchase… from the EagleFiler menu.
Trial/Demo Period
EagleFiler has a free trial. During the trial period, EagleFiler is fully functional; the only difference in behavior is that it will periodically remind you that you are using the trial. To use EagleFiler in trial mode, you can simply close the Purchase window.
The trial period lasts for 30 days. (After the 30 days, if you haven’t had a chance to use EagleFiler very much, you can continue using it for up to a total of 7 launches.) To use EagleFiler beyond the trial period, you must purchase it. This entitles you to free updates and support.
Purchasing
Click the Purchase Online button to enter the online store.
After Purchasing
Soon after paying, you’ll receive an e-mail with your serial number. Enter the name and serial number from the e-mail into the Purchase window and click Personalize. You do not have to “install the purchased version”; rather, EagleFiler will then know that you have purchased and you can keep using it as before—with all the preferences that you had set and data that you had entered.
Reinstalling a Previous Purchase
If you need to re-install EagleFiler, you can simply re-enter your Serial Name and Serial Number and click Personalize; there’s no need to purchase again.
If you cannot find your serial number, click the Look Up My Serial Number button. This will open a form where you can enter your e-mail address and look up your order information.
License Information
A license for EagleFiler is good for one person or one computer. This means that you can use it on your desktop Mac and your laptop, or you and your family can use it (in separate user accounts) on a shared Mac. If there are multiple users on multiple Macs, you should purchase multiple licenses. Discounts for packs of 2, 10, and 50 licenses are available above. A family (all living in the same household) can share a 2-user license. If you already have a single license, you can upgrade to a family license. To do this, e-mail your old order number to sales@c-command.com, and we’ll send you a coupon code.
Upgrade Policy
All maintenance releases (1.0.1, 1.0.2, 1.6.1, etc.) and minor feature updates (1.1, 1.2, 1.5, etc.) are free. We have a track record of many such updates, and they have included significant new features. Major upgrades (2.0, 3.0) are free if you purchased the previous version within the last six months. If you purchased longer ago than that, you get a discount. (Note: The upgrade discounts are only available if you originally purchased direct from C-Command, since the Mac App Store does not support upgrades.)
Mac App Store
The Purchase… menu command is not present if you purchased via the Mac App Store. In that case, there is no trial period, and licensing is based on your iTunes account rather than the number of people or computers.
5.1.4 Mac App Store
EagleFiler is available from the Mac App Store as well as direct from C-Command.
It’s Your Choice
We’re happy wherever you choose to purchase our software. The Mac App Store makes it very convenient to buy, download, and install, and you get updates via the store. The purchase is tied to your iTunes account. If you buy direct, you drag-and-drop to install and get updates via the application’s auto-updater or the Web site. Either way, you can sign up for the EagleFiler News mailing list or the EagleFiler RSS feed to be notified about new versions and important product news.
Prices
Pricing is substantially the same, although there will be slight differences due to Apple’s pricing tiers and currency conversions. All Mac App Store purchases are for single-user licenses. Purchasing direct, you can also buy family packs and get additional volume and educational discounts. Although you pay the same price, Apple’s higher fees mean that direct purchases send 25+% more of your money to C-Command.
Trials
EagleFiler has a fully-featured 30-day trial version that’s available from the Web site. If you purchase direct, you can click a link in your order confirmation to enter your serial number and take it out of trial mode. If you purchase from the Mac App Store, you should first delete your trial version so that the store doesn’t see EagleFiler as already installed. Your preferences and user data will be seamlessly shared between both versions.
Updates and Upgrades
Our standard policy has been to provide customers lots of free minor updates and 50% discounts on major upgrades. The Mac App Store does not support upgrade pricing, and Apple does not allow upgrade pricing for cross-grades out of the Mac App Store, so we can only offer the discount if you originally purchased direct from C-Command.
Updates to EagleFiler will be available from the Mac App Store sometime after they are available direct from C-Command. This delay is due to Apple’s review process, which has historically taken anywhere from a few days to a few weeks. For example:
- Regular app review usually takes about a week.
- Mac OS X 10.9 introduced a bug that could prevent apps downloaded from the store from being signed (and, thus, launched). Therefore, we had to suspend submitting updates to Apple for several months in order to prevent customers from downloading updates that couldn’t be launched.
- In June 2015, there was a problem with Apple’s server that was causing it to reject the EagleFiler archive that we uploaded, even though it was valid. It took a month for Apple to fix this.
- In October 2015, it took 61 days for Apple to review an update.
- In May 2016, two Apple server bugs prevented shipping a DropDMG update for about three months. DropDMG had to be removed from sale, and previous purchasers could not download a working version from the Mac App Store.
Once an updated version of EagleFiler is available, the Mac App Store does not let you download previous versions. This can make it impossible to reinstall EagleFiler if you are using an older version of macOS than the new version of EagleFiler supports. With the direct version of EagleFiler, you can always download previous versions for use with prior OS versions.
Transfers
If you purchase via the Mac App Store, the direct version will recognize your receipt from Apple. So (barring changes in the way Apple handles receipts) you’ll always have the option of downloading the software yourself to get the full features and the latest updates. Apple, unfortunately, provides no way to transfer purchases in the other direction, for existing customers who would prefer to receive updates via the Mac App Store.
Feature Differences
We intend the Mac App Store and direct versions of EagleFiler to be as similar as possible, however some differences are necessary in order to comply with the rules for Apple’s store. Our first priority is to design the direct version as best we know how; it should not be limited by Mac App Store considerations. Secondly, if a feature cannot be accepted in the Mac App Store, we will try to adapt it or make it available in another way. This may not always be possible or practical, however. Additionally, the Mac App Store rules are subject to change, and so EagleFiler will change with them. If it becomes impossible to deliver EagleFiler through the Mac App Store with the level of features and quality that we consider essential, we may remove it from the store and only sell it directly.
Here are the current differences between the Mac App Store and direct versions:
- The direct version automatically adds a Save PDF to EagleFiler command to each application’s Print dialog. With the Mac App Store version, you can install the PDF service manually.
- The direct version uses OpenMeta to share your recently used tags with other applications. The Mac App Store version can read the list of recent tags but cannot update it.
- The Verify command in the direct version can fix file ownership problems. The Mac App Store version cannot.
- It is likely that, in a future version, the Mac App Store version will not be able to create encrypted libraries.
- The Mac App Store version cannot capture from Numbers or Microsoft PowerPoint.
- The Mac App Store version does not support double-clicking a smart folder to edit it.
- The Mac App Store version does not support Searching From Other Applications.
- The Mac App Store version does not support the Always Search All Records option, however you can get the same behavior by clicking on the Records source before starting your search.
- The Mac App Store version does not support the Message ‣ Use Quick Look option.
5.2 The File Menu
5.2.1 New Library…
Creates a new library to hold a collection of records. You can create a library on your Mac’s internal storage (either in the Documents or Desktop folder, in iCloud Drive or Dropbox, or elsewhere); on an external hard drive, SSD, SD card, or thumb drive; or on a network drive or server (though these can be slow).
Although one EagleFiler library can hold many files/documents from other applications, the library itself is treated as a single document from the perspective of the EagleFiler application. For example:
- Since most EagleFiler operations target a particular library, EagleFiler itself won’t do much until you have either created a new library or opened an existing one. You can double-click the .eflibrary file to open an existing library in EagleFiler.
- You can create multiple libraries and have more than one open at a time.
- Each open library has one or more windows in EagleFiler. Closing all of a library’s windows closes the library so that it is no longer accessible in EagleFiler. You can re-open a library by opening its .eflibrary file or by using the Open Library… or Open Recent command in the File menu.
- To make EagleFiler automatically open certain libraries, see the Remember open libraries between launches preference.
- You can move the library folder around in the Finder, so long as it isn’t currently open in EagleFiler.
Splitting Libraries
EagleFiler is designed to support multi-gigabyte libraries with many thousands of files. Thus, it is usually not necessary to split up a large library for performance reasons. However, sometimes people find after using EagleFiler for a while that it makes sense to split one library into two for organizational reasons. To do this, make a folder in your library, and move into it all the folders and files that you want to move to the second library. Create the second library and drag the folder from the first library onto the Records icon in the second library’s source list. After the import has completed, you can then delete the folder from the first library.
Merging Libraries
To combine two libraries, first open both of them in EagleFiler. Drag the Records icon from one library’s source list onto the Records icon in the other library’s source list. This will import the entire contents of the library, including all of the metadata.
See Also
5.2.2 New Record ‣ Rich Text File
Creates a new, empty RTF or RTFD file inside the selected source.
If the File column is visible, EagleFiler brings the filename into edit mode so that you can set the name of the newly created file. When you’re done, press Tab or Return, or click in the viewer to begin entering the contents of the file.
If the File column is hidden, EagleFiler opens a sheet that lets you enter the name of the new file.
5.2.3 New Record ‣ Plain Text File
Creates a new, empty plain text (UTF-8) file inside the selected source. Plain text files are easier to edit on iOS devices.
If the File column is visible, EagleFiler brings the filename into edit mode so that you can set the name of the newly created file. When you’re done, press Tab or Return, or click in the viewer to begin entering the contents of the file.
If the File column is hidden, EagleFiler opens a sheet that lets you enter the name of the new file.
If you enter a name containing an extension, EagleFiler uses that; otherwise, it adds .txt as the file extension.
5.2.4 New Record ‣ From Clipboard
Creates a new RTF, RTFD, or PNG file inside the selected source. The content of the file is taken from the clipboard. In a way, you are creating a new file in EagleFiler by “pasting” text or an image, and the keyboard shortcut of Command-Shift-V reflects this.
You can Edit ‣ Copy a file in Finder and then use New Record ‣ From Clipboard to import a copy of it. This may be preferable to using the capture key if you want to import into the currently selected folder, rather than the top level (Unfiled) or the folder last selected for Capture with options.
Because you are creating the file directly, EagleFiler does not check whether it’s a duplicate of a file that’s already in the library.
You can use the PrefersRichText esoteric preference to set EagleFiler to create plain text files instead.
5.2.5 New Record ‣ Open Stationery Folder
EagleFiler has built-in support for creating new plain text and RTF files. The stationery feature lets you create other types of new files from within EagleFiler. Additionally, your stationary items do not have to be empty documents; they can be templates with some text, images, or formatting already added. For example, some possible stationary items are:
- A Microsoft Word file or OmniOutliner file with your favorite styles already set up.
- An RTF template for letters, with your return address and spaces to enter the destination address and date.
- A form with labeled fields and empty spaces to fill in.
- A text file for a daily journal entry, with the filename automatically set to the current date.
Adding Stationery Items
Choose Open Stationery Folder to have EagleFiler open the Stationery folder in the Finder. Whichever files you put in the Stationery folder become available in the File ‣ New Record menu and in the toolbar. You can also put whole folder hierarchies in the Stationery folder, e.g. if you often need to create subfolders with a particular structure.
Keyboard Shortcuts
You can assign keyboard shortcuts for your stationery items from the Keyboard pane in System Settings. Click on Application Shortcuts and then click the + button to add your own shortcut.
Setting Stationery Metadata
You can edit the stationery file in the Finder in order to control the metadata that EagleFiler assigns when creating a new record from the stationery. For example, you can assign a label or add Spotlight comments. The new record will have the same label as the stationery file, and the Spotlight comments will control the tags and notes.
For example, to set the tags to “journal” and “draft” and the note to “This is the note.”, set the Spotlight comments to:
&journal &draft This is a note.
The Writing Stationery Scripts section describes how you can use AppleScript to create even more powerful stationery items.
5.2.6 New Folder…
Creates a new folder in the source list of the current library. You can set a custom icon for the folder by selecting it in the Finder, choosing File ‣ Get Info, clicking on the icon, and pasting your own image.
If a smart folder is selected, creates a folder for holding smart folders rather than a folder for holding files.
5.2.7 New Tag
Creates a new tag and selects it in the source list. If records are selected, they are assigned the new tag. If a tag is selected, the new tag becomes a subtag of that tag. You can drag and drop tags to re-arrange their hierarchy.
5.2.8 New Browser Window
Creates an additional browser window for viewing the contents of the current library. To instead create a new window tab, see the New Tab command.
5.2.9 New Tab
Creates an additional browser window tab for viewing the contents of the current library.
You can equivalently click the + button in the tab bar. For more information, see the Show Tab Bar section.
5.2.10 New Smart Folder…
A smart folder is like a saved search; it shows shows records in the library that match certain criteria. EagleFiler has four built-in smart folders: Recently Added, Recently Modified, Unfiled, and Untagged. This command lets you create your own smart folders.
You can organize smart folders into folders. To do this, select a smart folder and choose New Folder…. Then re-arrange the smart folders using drag and drop.
5.2.11 Edit Smart Folder…
- The Conditions Tab
The Conditions tab lets you set the criteria that determine which records are shown in the smart folder.
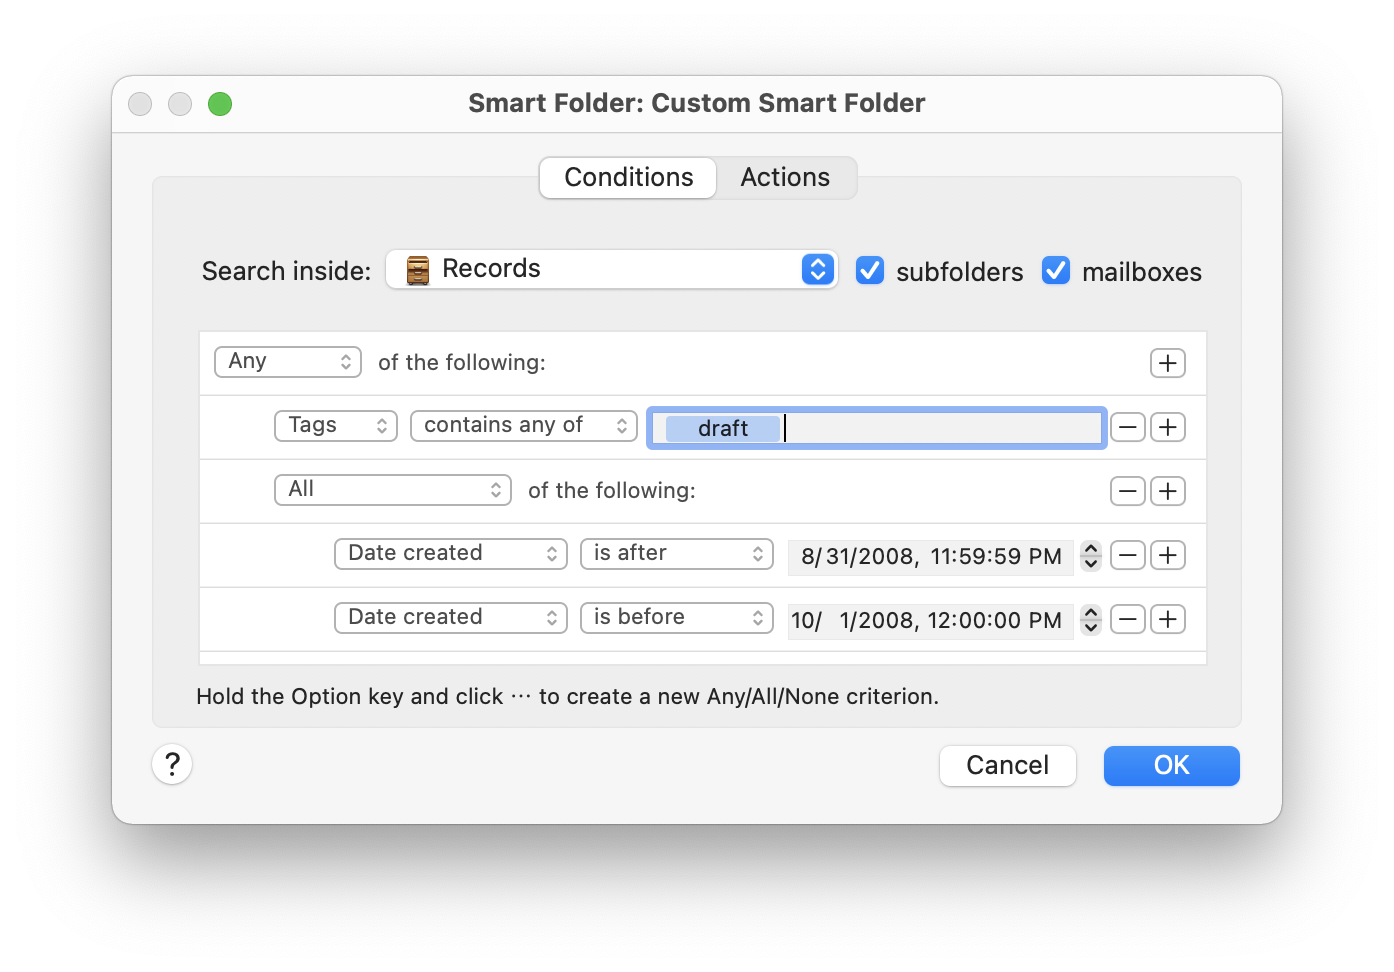
- Search Scope
- Search inside
- This pop-up menu lets you select a folder, a mailbox, or the entire library to determine which records the smart folder can display.
- subfolders
- If this is checked, EagleFiler searches the entire contents of the folder or library. If it’s unchecked, it only searches the first level of files in the folder.
- mailboxes
- If this is checked, when EagleFiler encounters a mailbox it searches the messages inside of it. If you don’t need to search the messages, unchecking this will make the search go faster.
- Adding and Removing Criteria
- Now that you’ve chosen which records EagleFiler will search, you can create an unlimited number of criteria to narrow down the results. Click + to add a criterion or - to remove one. You can drag and drop to re-arrange the criteria.
- Nested Criteria
- If you hold down the Option key, the + button will change to …. Click the … button to add a new Any/All/None grouping of criteria. This lets you create nested Boolean conditions (i.e. multiple levels of searching).
- The Available Criteria
- Anywhere
- Searches the contents of the records, as well as the Title, From, To, Cc, attachment names, and notes (but not tags). There are separate options for matches (whole words) and matches (partial words). The detailed search options are described in the Searching section.
- From
- The names and e-mail addresses.
- Any Recipient
- The names and e-mail addresses of the To and Cc fields.
- Title
- Record titles and message subjects.
- Count
- The number of pages in a PDF, messages in a mailbox, or attachments in a message.
- Source URL
- The URL that a record was downloaded from.
- Label
- The Finder label of the record’s file.
- Notes
- The notes, set in the Info inspector. There are separate options for matches (whole words) and matches (partial words). The detailed search options are described in the Searching section.
- Tags
- The full names of the assigned tags.
- Filename
- Searches the filenames as displayed in the records list.
- Size
- The amount of disk space used by the record.
- Kind
- The type of the record, as shown in the records list.
- Container name
- The name of the folder or mailbox that the record is inside.
- Date added
- The date the record was added to the library.
- Date created
- The date the record’s file was created.
- Date modified
- The date the record’s contents was modified. For a file, this is the file’s modification date. For a message, this is when the message was received.
- Every record
- This is useful when combined with subfolders and mailboxes. When you click on a folder in the source list, EagleFiler shows only the immediate contents of the folder. If you create a smart folder using Every record, EagleFiler will show the contents of the folder and of its subfolders.
- Matching Text
- Text criteria such as From and Title support matching by contains, begins with, ends with, is, and matches regex. Regular expression matches can be used to prevent matching partial words. For example, if you want to find chase but not purchase, you could search for \bchase\b (where \b matches word boundaries).
- The Actions Tab
The Actions tab lets you control what happens when you drag a record onto the smart folder or create a new file while the smart folder is selected. Actions can add tags, remove tags, set the label, or move the records to a folder.
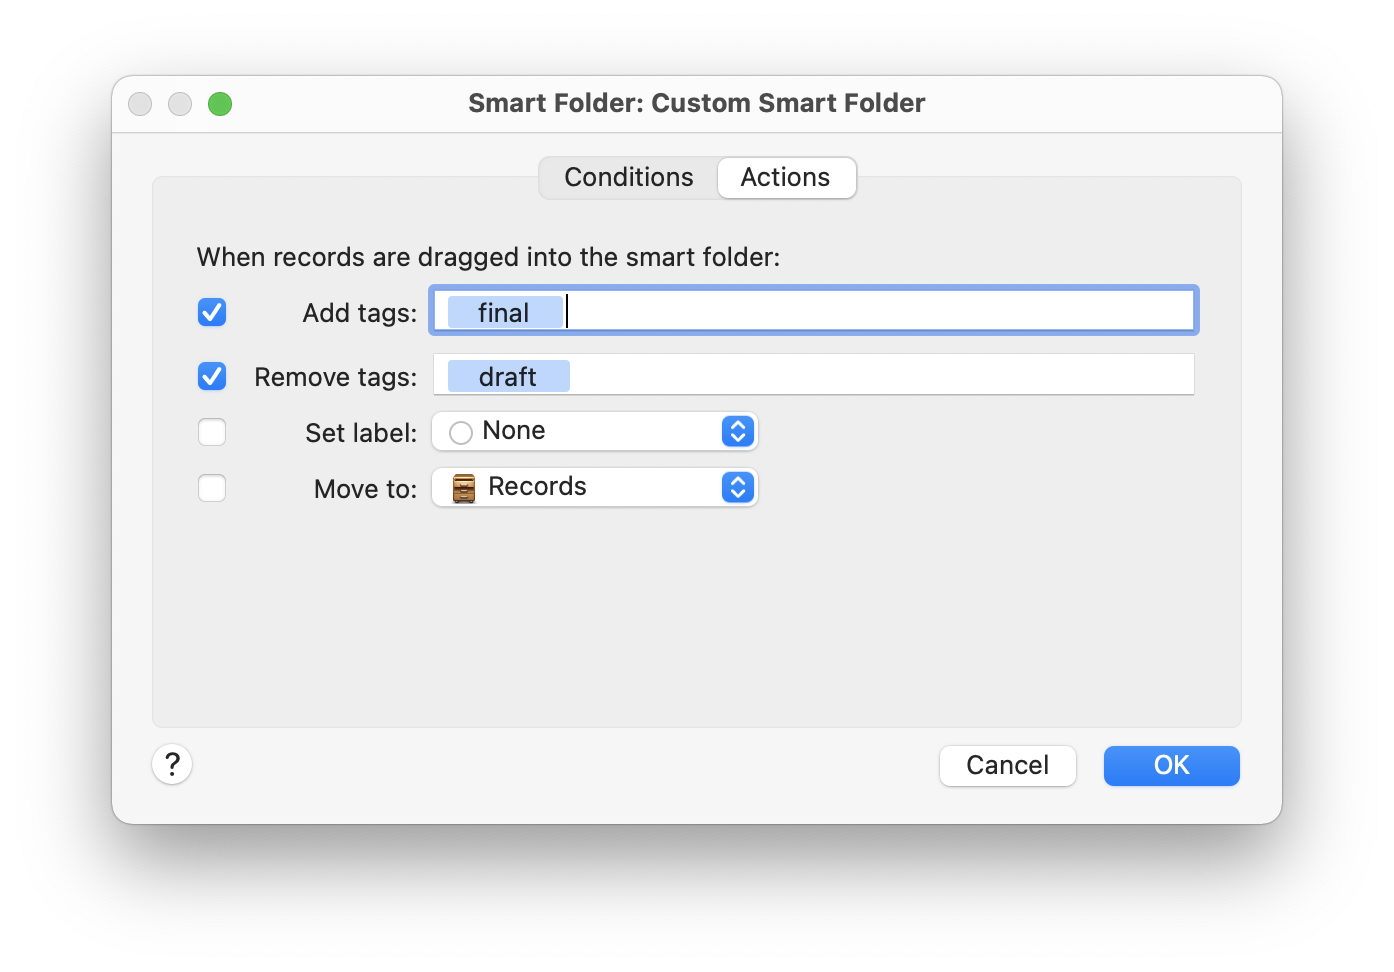
Note: As a shortcut for the menu command, you can double-click a smart folder to edit it.
5.2.12 Open Library…
Opens a .eflibrary file, letting you view the library in EagleFiler.
To open an encrypted library, first double-click its .sparsebundle or .sparseimage file in the Finder and enter your passphrase. Then you will be able to see the .eflibrary file and open it in EagleFiler. For quick access, you can also drag the .eflibrary file to the Dock or create an alias.
See also: Remember open libraries between launches.
If a Library Won’t Open
There may be additional information about why the library won’t open in the system Console. Please see the Sending in an Error Report section. You can also rebuild/restore a library that won’t open, as described in the How can I rebuild a library? section.
Rebuilding a Library’s Indexes
To rebuild a library’s indexes, hold down the Command and Option keys when opening the library. For more information, see the How does indexing in EagleFiler work? section.
Skipping Initial Operations
When you open a library, EagleFiler will automatically verify that all of the files are present, backup the metadata, copy the tags to OpenMeta, and copy the tags to the Spotlight comments (if you’ve selected that option). To skip these operations, hold down the Shift key when opening the library.
5.2.13 Close & Lock
Closes an encrypted library and ejects its disk image. Accessing the library again will require its passphrase.
5.2.14 Scan for New Files
An easy way to add new files to your EagleFiler library is to save new files (or move existing files) directly into the Files folder in the library folder. When EagleFiler scans the library folder, it will import the new files in-place (without copying them) and assign tags and notes based on the Spotlight comments and Finder tags. When importing in this manner, EagleFiler does not skip duplicate files; any file that you specifically add to the library folder will stay there.
EagleFiler scans the Files folder for new files when you open the library. In this way, files added since the last session will be auto-imported. Unlike with the To Import folder, EagleFiler does not automatically scan the Files folder for new files once the library is open. This is to prevent accidentally importing files (or packages) that are in the midst of being saved, which could lead to duplicate files or data corruption. Instead, you can manually trigger a scan at an opportune time (i.e. when you are not in the midst of copying or saving new files) by choosing Scan for New Files from the File menu or by invoking that command via AppleScript.
Preventing Folders From Being Scanned
There may be cases where you want to prevent certain files from being auto-imported by a scan. To hide the contents of a folder from EagleFiler, assign it the ef_unscanned tag. This will let you store files in that folder in the Finder, without having EagleFiler detect them, import them, and clutter up its window.
Preventing Files From Being Scanned
You can use the UnscannedExtensions default to make the scan ignore files and folders of certain types inside of an already-imported folder. For example, to prevent EagleFiler’s scan from picking up temporary files generated by LaTeX (.aux, .out, .toc), you could type this command into Terminal:
defaults write com.c-command.EagleFiler UnscannedExtensions -array aux out toc
You can also use the UnscannedFilenames default to make the scan ignore files and folders with a certain name inside of an already-imported folder. For example, to prevent EagleFiler’s scan from picking up ctags files named tags, you could type this command into Terminal:
defaults write com.c-command.EagleFiler UnscannedFilenames -array 'tags'
For both of these defaults, changes take effect for new files imported after you relaunch EagleFiler. (There is no need to restart your Mac.) Each invocation of the command overwrites the previous one, so, for example, to set multiple extensions as unscanned they should all be listed in a single command.
Disabling Scans
You can disable automatic scans using the ScanForNewFilesOnOpen esoteric preference.
5.2.15 Import Files…
Opens a sheet that lets you choose one or more files or folders to be imported into the current library.
5.2.16 Import URLs…
Opens a sheet for importing one or more URLs into the current library, using the Web page format chosen in the settings. The text field will be pre-filled with the contents of the clipboard.
You can enter multiple URLs, one per line.
If you enter a URL that’s not for a Web page (e.g. the URL of a PDF or image file) EagleFiler imports the file directly rather than converting it to a Web archive, PDF, etc.
To import URLs from your browser’s bookmarks, you should instead use the Import Bookmarks… command.
See also the Importing Web Pages and URLs page.
5.2.17 Import Bookmarks…
EagleFiler can import Netscape-format HTML bookmarks files from the following products:
- Delicious
- Go to Settings and then Export / Backup Bookmarks.
- Instapaper
- Go to Settings an then Export / Download .HTML file.
- Pinboard
- Go to Pinboard’s export page and choose the option to export as HTML. Choose a filename that ends with .html.
- Go to Manage account ‣ Export and click Export HTML file.
- Raindrop.io
- Use the Export command and select HTML as the format.
- Safari
- Choose Export Bookmarks… from the File menu.
The URLs will be imported using the chosen Web page format. EagleFiler will preserve the tags, titles, and descriptions that you’ve set, as well as the original bookmarking date.
If Skip URLs that are already in the library is checked, EagleFiler will not import a URL if there is already a (non-trashed) file in the library with the same source URL (even if file format is different). This setting does not affect duplicate URLs within the bookmarks file.
To automatically import new URLs from Instapaper and other services that provide RSS feeds, see the Import From Instapaper via NetNewsWire script.
5.2.18 Import ENEX File…
There are two ways to export from Evernote to rich text (RTF) files in EagleFiler:
- You can select some notes in the Evernote window and then press EagleFiler’s capture key. (This works with older versions of Evernote, as Evernote 10 no longer supports AppleScript.)
- The Import ENEX File… command in the File menu lets you import notes previously exported from Evernote into a .enex file. The current version of Evernote limits exports to 100 notes at a time, so you may need to do this in batches. (With Evernote 9, you can optionally use the Evernote Bulk Export script to export all your Evernote notes, creating a separate .enex file for each notebook.)
Either way, when importing from Evernote, EagleFiler converts the Evernote Markup Language to macOS’s standard Rich Text With Attachments (RTFD) format. EagleFiler preserves the rich text formatting, embedded images and other attached files, tags, source URLs, to-do list checkboxes, note titles and authors, and creation and modification dates. Any Optical Character Recognition (OCR) results are attached to the records as EagleFiler notes, so that you can search for printed and handwritten text that Evernote had extracted.
Importing preserves the fonts that you’ve chosen in Evernote. Text in a note that does not have a font specified will be imported using the rich text font set in EagleFiler’s Fonts settings.
Any encrypted text within a note will remain in the <en-crypt> format; if you want to store it unencrypted in EagleFiler, you should decrypt it with Evernote before importing.
Evernote notes that contain only a single attached file (e.g. a PDF file) are imported into EagleFiler as just that file, as that’s more useful than embedding the file inside an otherwise empty RTFD document.
To preserve which Evernote notebook each note came from, it’s easiest to import using the capture key rather than by exporting a .enex file (since the .enex format does not store the structure). For example, to import everything at once you could click on All Notes and choose Edit ‣ Select All. Then, when you press the capture key, EagleFiler will import each note into an EagleFiler folder named after its Evernote notebook. Alternatively, you can export each notebook to a separate .enex file and then import the files in EagleFiler. The Import ENEX File… command lets you select multiple .enex files at a time.
To preserve the exact HTML formatting of an Evernote note, rather than converting to rich text format, you can choose File ‣ Export Note… in Evernote and choose HTML as the format. (Note: This feature was removed in Evernote 10.) HTML files are not directly editable in EagleFiler, but you can use the Convert for Editing command to convert them to RTF at a later date.
5.2.19 Import from iPhone Camera
The Import from iPhone or iPad command in the File menu uses Continuity Camera to allow direct importing from your iOS device into EagleFiler:
- Choose Take Photo to take a picture with the camera and add it to your EagleFiler library as a JPEG file.
- Choose Scan Documents to use your camera to scan a multi-page document and add it to your EagleFiler library as a PDF file.
- Choose Add Sketch to draw on your iPhone or iPad’s screen and then import the sketch to your EagleFiler library as a PNG file.
You can also import from your iPhone to create attachments within a rich text file (instead of separate files, as above). To do this, Control-click within the rich text file in the record viewer and choose Insert from iPhone or iPad.
Continuity Camera requires an iPhone with iOS 12 or later and a Mac with macOS 10.14 or later, amongst other requirements.
5.2.20 Export…
Opens a sheet that lets you choose a folder to which the selected records will be exported.
- The selected files/folders will be copied into the folder.
- Individual selected e-mail messages will be exported as a single mailbox file. To access the messages, import them into a mail program or EagleFiler.
Please note that, because the library is open, it is not necessary to export files in order to open them with other applications. You could instead use the Open With External Viewer or Reveal In Finder commands. The Export… command is intended for when you want to make copies of the selected files or when the selected records are scattered throughout the library so that they would not be easy to access from the Finder.
Importing EagleFiler Mailboxes Into Other Mail Clients
EagleFiler natively stores e-mail as mailbox files using the standard mbox format. All Mac e-mail programs can import files in this format. So, usually, it’s not necessary to export mail from EagleFiler before importing it into another app. Here are specific instructions for some common e-mail programs:
- Apple Mail
If you have a mailbox stored in EagleFiler that you want to import into Apple Mail, go to Mail and choose File ‣ Import Mailboxes…. Select the mbox files radio button, click Continue, and then choose the folder containing the mailbox file. Select the mailboxes that you want to import.
If you don’t want to import the whole mailbox, first select the messages in EagleFiler that you want and choose File ‣ Export:. This will create a new mailbox file (outside of EagleFiler) that you can then import into Mail as described above.
For messages stored as individual .eml files, you can simply double-click the file to open it in Apple Mail. Once open, you can use the Message ‣ Copy Message menu command to copy it into a mailbox in Mail’s data store.
- Outlook 2016
- This version of Outlook does not support importing mail in standard formats. However, you can import the messages into Apple Mail (above) and then use it to copy them into server mailbox, which would then sync automatically to Outlook.
- Outlook 2011 and Entourage
- Choose File ‣ Import…, select the Contacts or messages from a text file radio button, then click the right arrow. Select the Import messages from an MBOX-format text file radio button and click the right arrow. Select the file and then click the Import button.
- Thunderbird
- Install the ImportExportTools NG extension and then use the Import mbox file command.
- Windows Mail Clients
- To read mbox files on Windows, make sure that you import the files rather than trying to open them by double-clicking. The Windows versions of Eudora and Thunderbird (as well as many other mail programs) can import mbox files.
Exporting Mail Before Importing
If you’re unable to directly import a mailbox file that’s stored in EagleFiler, it may help to select the messages and export them as a new mailbox file. This is for two reasons:
- EagleFiler stores the messages exactly as you imported them, and some mail programs are not very tolerate of format differences. When you export, EagleFiler tries to convert the messages to as standard a format as possible, and this can lead to more successful imports.
- Entourage and Outlook will only let you select a file for importing if it has type code TEXT. Most mailbox files do not have a type code, however EagleFiler will set the type code when you ask it to create a new mailbox using the Export… command.
Exporting Mail to PDF
To save a message in PDF format, double-click it in EagleFiler to open it in Apple Mail. Then choose File ‣ Export as PDF….
5.2.21 Backup Metadata
Metadata is EagleFiler-specific information such a record’s title, from, checksum, source URL, tags, and notes. It is stored inside the .eflibrary file.
EagleFiler will automatically backup a library’s metadata when it’s opened and also periodically thereafter. You can manually backup the metadata by holding down the Option key and choosing Backup Metadata from the File menu or by using the backup metadata AppleScript command.
Metadata is backed up to invisible XML .EagleFiler Metadata.plist files inside the library folder. These are standard macOS property lists that can be viewed in TextEdit and processed by many other programs.
The backups allow EagleFiler to reconstruct all of your metadata if the .eflibrary file is damaged or deleted.
To restore from a library’s metadata backup, please see the How can I rebuild a library? section.
Excluding Folders From Metadata Backups
If you don’t want EagleFiler to try to make a metadata backup for a certain folder, e.g. because you don’t have write access to it, you can assign it the ef_nometa tag.
Metadata Files Visible in the Library
The metadata .plist files should be invisible in the Finder and not appear as records in EagleFiler. However, opening a newer EagleFiler library using an older (pre-1.6.7) version of EagleFiler can cause the .plist files to be imported. This is undesirable because it crowds the records list and will cause checksum errors if you ask EagleFiler to verify the files. To fix this:
- Make sure that EagleFiler is updated to version 1.6.7 or later on all your Macs.
- Open the library and click on the Records source.
- Do a Filename search for .EagleFiler Metadata.plist and delete all the matching files.
- The next time it does a metadata backup, EagleFiler will create new .plist files, and they will not appear in the records list.
5.2.22 Empty Trash…
Empties the trash of the current library, permanently deleting any files that you had moved to the Trash folder. Hold down the Option key to skip the warning. You can also empty the trash by pressing the Delete key while Trash is selected in the source list.
5.2.23 Print
By default, EagleFiler prints the contents of the record viewer. If the source list or records list has focus, and you hold down the Option key, EagleFiler will instead print the list.
5.3 The Edit Menu
5.3.1 Undo/Redo
Most actions in EagleFiler can be undone and redone, and EagleFiler supports multiple levels of undo. When you close a library or empty the trash, EagleFiler clears the list of undoable actions for that library.
5.3.2 Copy
Copies the selected text, the titles of the selected records or sources, or the names of the selected tags.
See also: Copy Source URL, Copy Record Link, Copy Filename, and Copy File Path.
5.3.3 Copy Source URL
Copies to the clipboard the original http URLs for files that were imported from Web pages.
5.3.4 Copy Record Link
Copies a x-eaglefiler URL to the clipboard for each selected record. You can then paste the link into an EagleFiler note or into another application. Opening the URL will launch EagleFiler, open the library, and select the record so that its contents are shown in the source list or viewer.
To open a URL in a rich text view, just click the blue, underlined link. To open a URL in a plain text view, select the link, Control-click, and choose Open URL from the contextual menu.
Links will continue to work as you re-arrange the files within the library. However, if you move the library folder or rename the .eflibrary file in the Finder, previously copied x-eaglefiler URLs for that library will break. Links to individual e-mail messages will break if you merge the message’s mailbox with another mailbox, as that will delete the original mailbox.
Another way to use record links is to select some records in EagleFiler and choose a command from the Services menu, e.g. Text Edit ‣ New Window Containing Selection or OmniFocus: Send to Inbox. This will send the record links to that application without your having to copy and paste.
See also the Copy File URL script.
5.3.5 Paste/Paste and Match Style
Regular Paste preserves the font and style information from the copied text. This means that the pasted text may not fit in with its surroundings.
Paste and Match Style is like converting the clipboard to plain text before pasting. Any formatting is removed. The pasted text will blend in with the surrounding text.
5.3.6 Find ‣ Library Search…
Brings the focus to the search field in the current browser window so that you can search the library for the records that are of interest. This is described in the Searching section. After searching, the query is automatically entered into the Find panel so that you can search within the current record, e.g. using Find ‣ Find Next/Previous.
5.3.7 Find ‣ Find…
Opens the Find panel so that you can find (or replace) text within the current record. You can hold down the Option key when clicking the Replace All button to make it only replace within the selection.
5.3.8 Find ‣ Find Next/Previous
If the query has already been set (using Find ‣ Find… or Find ‣ Use Selection for Find), jumps to the next (or previous) occurrence within the current record.
5.3.9 Find ‣ Use Selection for Find
A shortcut for entering the selected text into the Find panel. This, combined with Find ‣ Find Next/Previous, makes it possible to search within a record without having to open the Find panel.
5.3.10 Spelling and Grammar
This submenu lets you check the spelling and grammar, turn automatic checking on/off, and turn automatic spelling correction on/off.
5.3.11 Substitutions
This submenu lets you control whether EagleFiler uses smart copy/paste, smart quotes, smart dashes, smart links, data detectors, and automatic text replacement.
5.3.12 Transformations
This submenu contains commands for making the selected text lowercase, uppercase, or capitalized.
5.4 The View Menu
5.4.1 Show Tab Bar
EagleFiler supports tabbed windows. A single window can have multiple tabs for either a single library or for different libraries.
- The View ‣ Show Tab Bar menu item lets you hide and show the tab bar.
- The Window menu contains the following items to manipulate tabs: Show Previous Tab, Show Next Tab, Move Tab to New Window, and Merge All Windows. You can also move tabs between windows using drag and drop.
- Clicking the + button in the tab bar creates a new tab for the current library, equivalent to the New Tab command in the File menu.
- To create a new window (not in a tab) for the current library, use the New Browser Window command in the File menu.
- You can control whether new windows are created as tabs or as separate windows from the Desktop & Dock pane of System Settings. The Prefer tabs when opening documents setting has three options: Never, Always, and In Full Screen Only.
5.4.2 Show All Tabs
This command shows thumbnails of all of the window’s tabs so that you can easily pick one to switch to. For more information about tabs, see the Show Tab Bar section.
5.4.3 Message ‣ Raw Source
If this is checked, the viewer will show the raw RFC-822 source for e-mail messages. The font will always be the Plain text font specified in the Fonts settings.
If this is unchecked, messages will be displayed according to which one of Message ‣ Plain Text, Message ‣ Rich Text, and Message ‣ Use Quick Look is checked.
5.4.4 Message ‣ Plain Text
If this is checked, EagleFiler will show all e-mail messages in plain text format. For HTML-only messages, a plain text representation will be created. The font will always be the Plain text font specified in the Fonts settings, and no images will be shown. Levels of quoting will be indicated using angle brackets and the chosen Quoted Text Colors. The display will adapt for Dark Mode.
See also: Message ‣ Rich Text and Message ‣ Use Quick Look.
5.4.5 Message ‣ Rich Text
If this is checked, EagleFiler will show rich text (i.e. HTML) representations of e-mail messages where available. The font will be the Rich text font specified in the Fonts settings. Levels of quoting will be indicated using the chosen Quoted Text Colors. Remote images will be displayed; attached images will not be. The display will adapt for Dark Mode, though in some cases this may be difficul to read depending on how the message was formatted. You can turn off Dark Mode for this view by clicking here.
See also: Message ‣ Plain Text and Message ‣ Use Quick Look.
5.4.6 Message ‣ Use Quick Look
If this is checked, EagleFiler will use Quick Look rather than its own e-mail engine to display messages in the record viewer.
The advantages of EagleFiler’s engine are that it is faster, it lets you control the fonts and colors, you can select and copy text, search matches are highlighted, and you can use the Find panel. It can also display remote images. Unlike the Quick Look engine, it won’t get stuck showing a spinner if the Quick Look subsystem is bogged down.
The advantages of the Quick Look engine are that it can display images that are attached to the message (both engines can display remote images that are referenced by URL) and in some cases it has better HTML rendering. A future version of EagleFiler’s engine will incorporate these features so that it’s not necessary to use Quick Look.
See also: Message ‣ Plain Text and Message ‣ Rich Text, the Importing Mail section.
The Use Quick Look option is not available in the Mac App Store version of EagleFiler.
5.4.7 PDF ‣ Next/Previous Page
These commands let you control which page of a PDF is displayed in the record viewer. There are several ways to change the page without using the menu bar:
- Click on the PDF page, so that it gets keyboard focus, and then press the Down or Up arrow key. In order for this to work, View ‣ Zooming ‣ Zoom to Fit must be checked.
- Press Command–Left Arrow or Command–Right Arrow.
- Control-click on the PDF page and use the commands in the contextual menu.
- Use the View ‣ Customize Toolbar command to add Next and Previous toolbar buttons for changing the page.
- Use the Keyboard pane of System Settings to change the keyboard shortcuts for Next Page and Previous Page.
5.4.10 Show ‣ Deleted Messages
E-mail messages that you’ve deleted are still stored in their mailbox files, but they are hidden from view. This option in the View menu lets you see all of the messages, even the deleted ones. To undelete a message, select it and press Delete.
There are two ways to compact a mailbox to remove the deleted messages:
- Select all the (non-deleted) messages in the mailbox, choose Export…, import the newly created mailbox file, and delete the original. (This way is faster but does not preserve the tags and notes on the messages.)
- Make a folder, move the non-deleted messages to the folder, select them in the folder and choose Merge Message Files, and delete the original mailbox.
5.4.11 Show ‣ Messages in Records Source
If this is checked in the View menu, EagleFiler will show e-mail messages (from all your mailboxes) as well as files in the Records source. Uncheck it if you want to avoid the clutter of seeing all the e-mail messages, or if viewing the library is slow because you have lots of messages. This setting is saved per-library.
5.4.12 Show ‣ Messages in Tag Sources
If this is checked in the View menu, EagleFiler will show e-mail messages (from all your mailboxes) as well as files in tag sources. Uncheck it if you want to avoid the clutter of seeing all the e-mail messages, or if viewing tag sources is slow because you have lots of messages. This setting is saved per-library.
5.4.13 Allow Editing in Record Viewer
This controls whether Text, RTF, and RTFD records can be edited directly in the record viewer, without opening the file in another application. You might uncheck this if you want to avoid making accidental changes while viewing a record.
5.4.14 Open in New Window
This opens a new browser window in EagleFiler and selects the current record. If more than one record is selected, EagleFiler opens one window per record.
A shortcut for this command is to double-click an item in the source list.
5.4.15 Enter Full Screen
This makes the browser window take over the whole screen. You can still bring up the info and tag inspectors if desired.
5.5 The Go Menu
The commands at the bottom of this menu let you quickly jump to key items in the source list: Records, Recently Added, Recently Modified, Unfiled, Untagged, flagged, and unread.
5.5.1 Enclosing Record
View the container of the current folder or mailbox (i.e. go up a level in the hierarchy). For example, if you have a file selected in the records list, this will select the file’s folder in the records list. If you have a folder selected in the source list, this will select the containing folder in the source list.
5.5.2 Contents of Record
View the contents of the selected folder or mailbox (i.e. go down a level in the hierarchy). For example, if the Records source is selected, you can use the search box to enter the name of the folder or mailbox that you want to view, select it in the record list, and then choose Contents of Record. This is often quicker than expanding the various folders inside the Records source to find the one you want.
If a message or non-mailbox file is selected, Contents of Record will instead say Reveal in Container, and it will select the containing mailbox or folder in the source list and select the message or file in the records list. This lets you search for a message or file in Records, a tag source, or a smart folder, and then reveal it in its original context.
5.5.3 Previous/Next Record
These commands select the previous or next record in the record list. This lets you change which record is being viewed while the viewer pane has keyboard focus.
When the records list or the record viewer has keyboard focus, you can type Spacebar or Shift-Spacebar to select the next or previous record.
5.6 The Record Menu
5.6.3 Tag
Gives keyboard focus to the tags text field at the bottom of the browser window, which lets you edit the tags of the selected record. You can enter multiple tags by pressing Return or Comma.
![]()
5.6.5 Set Label
The Set Label command lets you set the colored label of the selected records. Each file can have one of 7 possible label colors, or none at all. The label is shown as the background color in the records list and also in the Label column.
EagleFiler stores labels in the standard Mac filesystem metadata, so that they are available in the Finder and in other applications. Some cloud syncing software does not support this metadata and so will not preserve labels.
The Importing Mail section describes how e-mail messages in EagleFiler may be stored as individual files or in mailbox files. With mailbox files, multiple messages are stored in a single mailbox file. Thus, there can only be one filesystem label for the mailbox and all messages in the mailbox will show the same label in EagleFiler.
To have separate colors for messages that are stored in mailboxes, you can use tags instead of labels. Tags can be displayed in the records list as colored names or colored abbreviation symbols. For more information, see the Show Tags section.
On macOS 10.8 and earlier, the label names are editable in the Finder’s Settings window. On macOS 10.9 and later, the label names are always the system color names.
5.6.7 Batch Change…
This window lets you set the title, from name, label, tags, and notes of multiple selected records at once. You can either Append or Replace. For example, appending tag mac will add that tag to the selected records, while Replace would add the mac tag and remove any pre-existing tags.
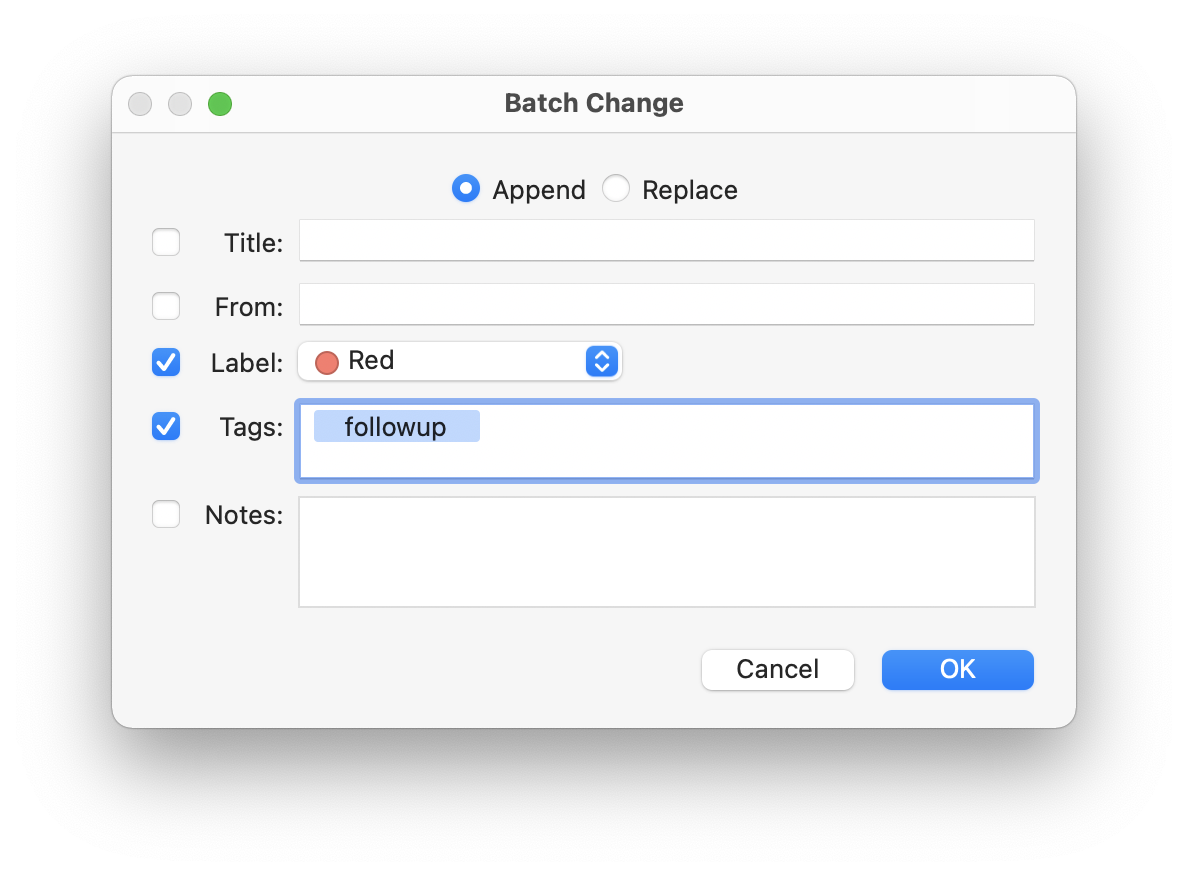
There are keyboard shortcuts for Append (Shift-Command-A), Replace (Shift-Command-R), Label (Command-3), Cancel (Command-. or Escape), and OK (Enter or Command-Return).
You can change all the titles to match the filenames by using Replace and setting the title to be blank.
Scripts
There are also a variety of batch operations than can be performed via AppleScript:
5.6.8 Convert for Editing
Converts the selected Web archives or HTML files to (editable) rich text files, preserving the tags, notes, source URL, and other metadata.
The ImportTextAsWebArchive esoteric preference can be used to make selected Web text always import in rich text rather than Web archive format, so that it’s not necessary to convert for editing.
5.6.9 Verify
When you open a library, EagleFiler checks that all the files and notes are present. The Verify command does this, and it additionally checks that their contents are what EagleFiler was expecting. To verify the entire library, select the Records source and choose Verify. You can also verify individual files or folders.
Detecting File Corruption
Verification can help you detect file corruption before it becomes a serious problem. For example, if there is damage to your disk and a file becomes corrupt, you’ll learn of the problem as soon as you use the Verify command. Without Verify, you would only learn of the problem when you tried to access the file (perhaps a long time in the future), and perhaps not even then, because the corruption might not be readily apparent. Because you learn about the damage early, you can restore a correct version of the file from a backup, rather than filling your future backups with damaged copies of the file.
How Verification Works
In order to detect when files have changed, EagleFiler stores a checksum of each file. If EagleFiler reads a file and calculates the same checksum that it got before, it knows that the file has not changed. Thus, if the file was in good condition before, it is still in good condition. If EagleFiler calculates a different checksum, that means that the file’s contents are different.
Sometimes, the checksum should be different. For example, when you edit a file, you intentionally change its contents, resulting in a different checksum. When you edit a file within EagleFiler, EagleFiler automatically updates its stored checksum to match the file’s new contents. Thus, if you only edit files using EagleFiler, the checksums will always be in sync with the files’ contents, and any checksum that doesn’t match means that the file is damaged.
EagleFiler also allows you edit files using other applications. For example, you can double-click a Microsoft Word document to open it in Word, make some changes, and choose File ‣ Save. In this case, the file has changed, but there is no way for EagleFiler to know that this is because of what you did in Word. The changes could have been due to damage. Thus, if you edit a file outside of EagleFiler, you must use the Update Checksum command to tell EagleFiler that the file’s current contents are correct. EagleFiler will then update its stored checksum to match.
Using the Verify Command
Verify is a specialized feature for people who want extra data integrity protection. If you don’t need this, or if you frequently edit files outside of EagleFiler and don’t want to have to Update Checksum, then you can simply ignore the Verify command. EagleFiler will then behave like a normal Mac application: it won’t complain about files being different than it expected, but neither will it detect when they are damaged.
A verification can fail with two different types of errors:
- Missing File
This means that you had a file in your library, but it is no longer where EagleFiler expects to find it. Probably the file (or a containing folder) was renamed, moved, or deleted using an application other than EagleFiler. (As described in the Library Folders section, you should not do this.)
The Errors window shows the expected name of the file, and you can click Reveal to show its expected folder in the Finder or Reveal in Library to show its expected folder in EagleFiler.
If you can find the file in the Finder (or in a backup), use the Finder to move back to the expected folder. Then EagleFiler will be able to find it again.
If you cannot find the file, you click the Trash button to delete it in EagleFiler and then empty the trash so that EagleFiler stops looking for it.
If you have reorganized the files in the Finder and cannot move them back to their proper locations, as a last resort you can rebuild the library to tell EagleFiler that you like everything the way it is now. However, this will lose metadata such as custom titles, from names, and notes for files that have been moved.
- Bad Checksum
- This means that the file’s contents no longer match what EagleFiler was expecting. If you have modified the file outside of EagleFiler, this is normal and you can click Update Checksum to tell EagleFiler that the file is OK. Otherwise, the file is probably damaged, and you should try to restore it from a backup. Use the Finder to move the correct file into place, replacing the one with the bad checksum.
To quickly delete a large number of verification errors, choose Edit ‣ Select All and then press the Delete key.
Repairing File Ownership and Permissions
In addition to detecting damaged file content, the Verify command can optionally fix file metadata problems. See the FixOwnershipWhenVerifying and FixPermissionsWhenVerifying options in the esoteric preferences.
5.6.10 Update Checksum
The Update Checksum command tells EagleFiler that you have edited the selected file(s) using another application. This is necessary for proper operation of the Verify command and duplicates detection.
If you do not edit files outside of EagleFiler, or if you do not use Verify or duplicates detection, you can ignore the Update Checksum command.
5.6.11 Merge Mailboxes/Message Files
Merges the selected mailboxes (or .eml files) into a single mailbox file with the name and location of the oldest mailbox (or .eml file) in the selection. The tags and notes of the messages are preserved. (Source URLs of the mailboxes and custom titles and from names of message files, in the unlikely event that there are any, are not.) The original files are then moved to the trash.
Merging can reduce clutter in the source list and speed up EagleFiler. For more information about mailbox files and message files, see the Importing Mail section.
Apple Mail .emlx Files
Although it can search and display them, EagleFiler cannot directly merge .emlx files, and it is generally not recommended to use .emlx files because there can be multiple files per message that may get separated. If you follow the instructions in the Importing Mail From Apple Mail section, you can ensure that EagleFiler imports mail using either the .eml or mbox format, both of which are standard formats, and both of which support merging.
Folders
EagleFiler cannot directly merge a folder and a mailbox. You would need to select the .eml files within the folder, along with the mailbox, in the records list. If this is inconvenient, you can do it in two steps: first merge the messages to create a new mailbox and then select the two mailboxes to merge. Or you can tag the various messages and mailboxes that you want to merge, then select everything within that tag and choose Merge Mailboxes.
Duplicate Messages
Merging keeps all of the messages. If you merge two mailboxes that each contain a copy of the same message, that message will appear twice in the merged mailbox. This can be useful because the two copies might have each had their own tags and notes. You can remove duplicate messages after merging, if desired.
5.6.12 Reply to Message
This command lets you reply to a message in your default e-mail program. You can also double-click a message to open it and then use the mail program’s native reply feature.
5.6.13 Open With External Viewer
Opens the selected records in a specialized viewer application such as Preview, Safari, or Mail. Folders and mailboxes will open in a new window in EagleFiler. If you open an e-mail, the message that’s displayed in Mail is the message that’s stored in EagleFiler’s library, not the original message that was imported from Mail (which might already have been deleted).
If a search is in effect, EagleFiler passes the search string to the external viewer so that it can show you the matches in the document.
Double-clicking a record is a shortcut for choosing this command from the menu. Hold down the Option key to open the source URL instead of the stored file.
To open the record using an application other than the default, use the Open With command.
To change the keyboard shortcut for this command, see the CommandOToOpenRecord esoteric preference.
5.6.14 Open With
The Open With submenu lets you temporarily override the default application for opening a file. For example, perhaps you normally open PDF files using Preview, but in a particular circumstance you want to use Adobe Reader instead. To do this, select the file and choose Open With ‣ Adobe Reader from the Record menu or the contextual menu.
The Always Open With submenu lets you change the default application for all files of a particular content type (UTI). For example, perhaps you want all your HTML files to open in BBEdit when double-clicked.
To change the default application just for a particular file, use the Reveal in Finder command, then choose Get Info from the Finder’s File menu and look in the Open with section of the info window.
EagleFiler will open Web archives in Safari even if you’ve chosen Firefox or Google Chrome as your default Web browser. This is because Web archives are a Safari-specific format. However, you can use the Open Source URL command to open a live version of the Web archive in your default Web browser.
5.6.15 Open Source URL
With a Web archive record (or an RTFD file converted from a Web archive) selected, this opens the (live, not archived) Web page in your Web browser.
You can also Option-double-click on a record to open its source URL.
EagleFiler uses the Default web browser that’s set in the General pane of System Settings (or in Safari’s preferences on older versions of macOS).
5.6.16 Quick Look
EagleFiler uses Apple’s Quick Look technology to preview in the record viewer files that it doesn’t natively understand. The Quick Look menu command lets you open a larger preview window.
You can Quick Look multiple records at once to compare thumbnails of them in the Quick Look window.
A shortcut for opening the Quick Look window is to press the Spacebar when in the records list.
5.6.17 Slideshow
Opens a full-screen Quick Look window to view the selected records. To see this menu command, hold down the Option key.
A shortcut for opening the Quick Look window is to press Option-Spacebar when in the records list.
5.6.18 Reveal in Finder
This shows the selected records in the Finder. If you have Path Finder running, the files will be revealed in it instead. You can set another external viewer by entering a Terminal command. For example, to use ForkLift, enter:
defaults write com.c-command.EagleFiler NSFileViewer com.binarynights.ForkLift-3
5.7 The Format Menu
This menu contains commands for use when editing a rich text file in EagleFiler’s viewer or when editing a note. You can change the font and style and add clickable links, lists, and tables. In addition to the standard macOS formatting commands, EagleFiler provides a command called Highlight, which makes the background of the selected text yellow, as if it had been drawn over with a highlighter.
5.8 The Window Menu
5.8.1 Show Info
This window lets you view and edit the properties of the selected records. You can type Tab to move between to text fields, or Control-Tab to move out of the notes text view. The Info inspector can be opened via Command-I or Command-Option-I.
- File Properties
This shows the file’s name, kind, size, and dates, as well as EagleFiler metadata such as the title, source URL, and from. These are described in the Records List section of the manual.
If the file didn’t have an embedded title (or you set the title to be blank), EagleFiler will use the filename (without the extension) as the title, and the title will stay in sync with the filename if you rename it.
- Label
- This is the Finder label of the file. For more information, see the Set Label section.
- Tags
- This shows the tags assigned to the record. You may find it more convenient to create and assign tags by typing them in the text field than by using the Show Tags command. For more information about tags, see the Add Tags and Notes section of the manual.
- Notes
- This shows the notes that are associated with the record. Most of the commands for editing notes are in the Format menu. You can use the Copy Record Link to copy a link to an EagleFiler record; then paste the link into another record’s note so that you can easily find one record while viewing the other. As a shortcut, you can type Option-Tab to start a bulleted list or Option-Shift-Tab to dedent the current list item. For more information about notes, see the Add Tags and Notes section of the manual.
To make changes to more than one record at once, you can use the Batch Change… command.
5.8.2 Show Tags
This window shows a list of tags for the current library. You can also view the tags using the Show Tag Cloud command.
The columns are:
- ✓
- The box is checked if all of the selected records in the browser window have this tag. It shows a - sign if some (but not all) of the selected records have the tag. It is disabled if no records are selected.
- •
- The abbreviation (if any) for the tag. For example, the “unread” tag is shown as a blue •, and the “flagged” tag is shown as a red ▸. Abbreviations are shown in the Tags column of the records list. Double-click on an abbreviation to edit it. The abbreviation can be composed of ordinary letters, as well as any of the special symbols and emoji found on the EagleFiler Tag Symbols Web page. You can open this page by clicking on the Characters button in the toolbar. You can also use the Tag Abbreviation Style AppleScript to switch between different sets of symbols for the built-in tags.
- Name
- The name of the tag, which is shown in the Tag Names column of the records list. Double-click on a name to edit it. (The names of built-in tags such as “unread” cannot be edited.) Each tag must have a unique name.
You can give the tags inspector keyboard focus by:
- Clicking in its title bar.
- Choosing Show Tags from the Record menu.
- Clicking the Tags button in the toolbar of a browser window.
- Editing an abbreviation or name.
Once the tags inspector has keyboard focus, you can:
- Type the first few letters of a tag’s name to select it in the list.
- Press the spacebar to toggle whether the selected records in the browser window have the selected tags. This is like checking or unchecking the boxes of all the selected tags at once.
- Click the Colors button in the toolbar. Then choose a new color for the selected tag(s) and abbreviation(s).
You can Control-click on a tag to reveal it in the source list, thus showing all the records with that tag.
See also: How do Finder tags work with EagleFiler?
5.8.3 Show Tag Cloud
The Tag Cloud window shows a compact listing of all the tags. You can click on a tag to toggle whether it’s assigned to the selected record(s).
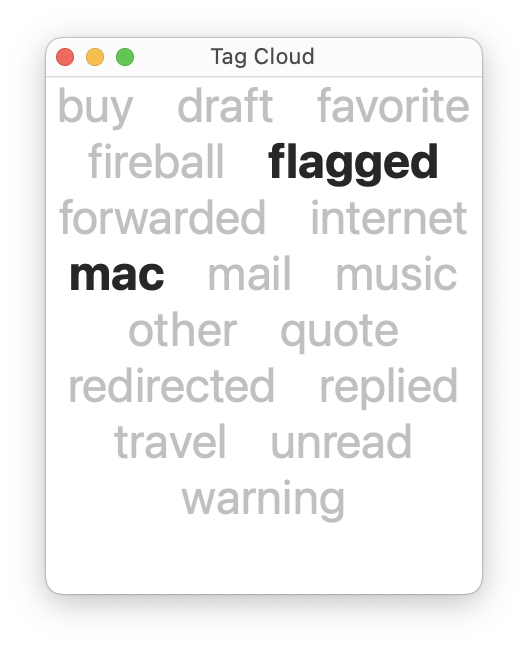
A shortcut for opening the Tag Cloud window is to Option-click the Tags button in the toolbar.
5.8.4 Activity
EagleFiler can do many operations—such as adding files and URLs to the library, indexing, verifying—in the background. This window shows a list of the tasks that EagleFiler is currently working on for each library.
A shortcut for opening the Activity window is to click the progress spinner at the bottom of a browser window.
5.8.5 Drop Pad
The Drop Pad tells you which library is active. You can drag files onto the Drop Pad to import them into the active library. You can use the pop-up menu on the Drop Pad to change the active library (without introducing window clutter). The Drop Pad also provides information about whether EagleFiler can capture from the current application.
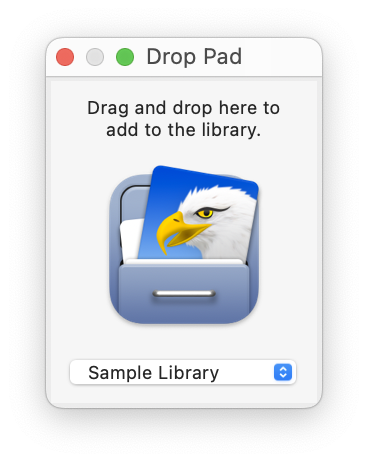
You can control the number of recent libraries shown in the Drop Pad window via the General pane in System Settings. You can clear the list of recent libraries from the File ‣ Open Recent menu.
5.8.6 Errors
This window shows a list of errors that have occurred since you launched EagleFiler. You can select errors and copy them to the clipboard.
The Verify and Importing Mail From Apple Mail sections describe some common types of errors and how to deal with them.
You can Option-click the Reveal button to open the file with its default application instead of revealing it in the Finder.
5.9 The Help Menu
This menu provides access to the full EagleFiler documentation (in Apple Help or PDF format) as well as a link to the technical support Web site.
5.10 The Dock Menu
To access the Dock menu, right-click or hold down the Control key when clicking on EagleFiler’s Dock icon.
The Open Recent commands let you access EagleFiler libraries that might not currently be open. The Capture From <Application> command is equivalent to pressing the capture key. The Import Clipboard command will import any text on the clipboard as a new rich text file. The New Record commands let you create new files in the current library.
6 Settings
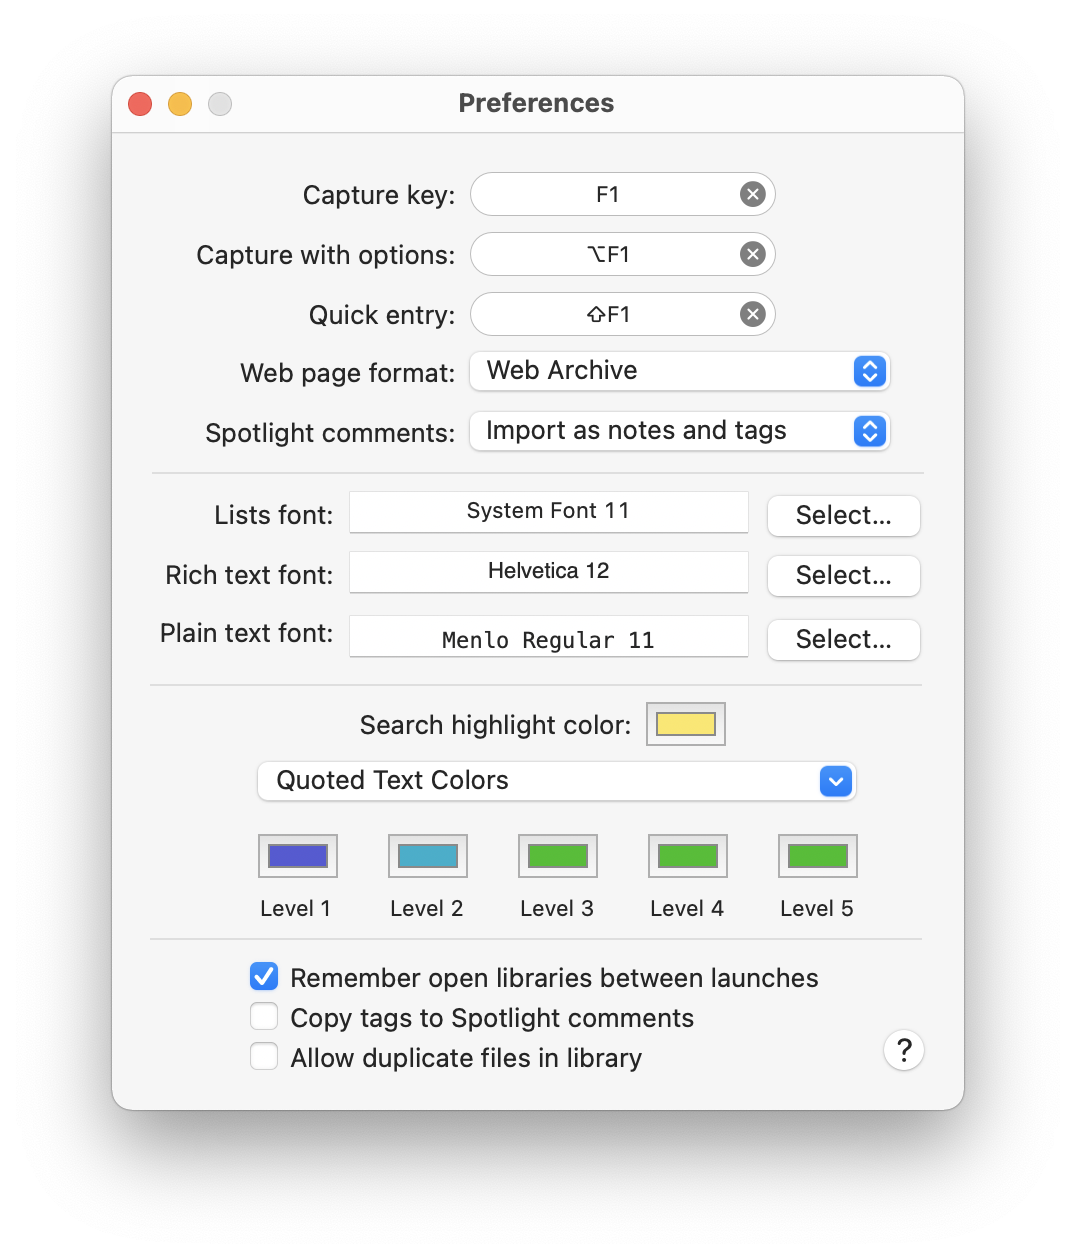
6.1 Capture key
You can always import into EagleFiler using Import URLs…, Import Files…, or drag and drop. However, if you are already viewing the information that you want import, it’s much easier to just press the capture key.
![]()
When you press the capture key, EagleFiler automatically determines what you’re currently viewing (or what you have selected) and imports it into the current library. If no library is currently open, EagleFiler opens the Capture with options window so that you can pick a library.
Note: The first time you press the capture key, you may need to give EagleFiler Automation access.
The Capture Process
EagleFiler will bounce its Dock icon once and show a camera icon in the Dock to let you know that the capture has started. This phase is when EagleFiler figures out which items you asked it to import. It usually only takes a fraction of a second, but it can last longer if you’ve selected a large number of messages in Apple Mail. In that case, you will see an occasional status window in the center of the screen telling you how many messages it’s found so far. When EagleFiler has figured out what to import, it will play a camera shutter sound. Then the Dock icon will change to show the green import arrow. This is the main phase of the importing, and you’ll see progress in EagleFiler’s Activity window and a spinner in the main window. When the import has finished, you’ll see a notification in Notification Center.
Which Key to Press
By default, the capture key is F1. If you have a notebook or an aluminum Apple keyboard, you’ll need to hold the fn key to type F1 unless you’ve checked Use all F1, F2, etc. keys as standard function keys in the Keyboard & Mouse settings pane or are using FunctionFlip. If you have a Microsoft keyboard, you may need to check the position of the Fn Lock key. You can also change the capture key to a different key or key combination if you prefer.
You can also capture by clicking and holding on EagleFiler’s Dock icon and choosing Capture From <Application> from the menu.
When You Can Capture
The capture key works when the frontmost application is one that supports capture. The Drop Pad window will tell you when this is the case.
EagleFiler must be running in order for the capture key to work. Thus, you may wish to add EagleFiler to your Login Items in the Accounts pane of System Settings. You can easily do this by clicking on the EagleFiler icon in the Dock and choosing Open at Login.
Importing Only Part of a Page
If you’d rather import just the selected text instead of the entire Web page or document, you can use drag and drop or the EagleFiler: Import service (⌘!) instead of the capture key.
6.2 Capture with options
![]()
This works like the capture key: you press it while in one of the applications that support capture, and EagleFiler imports the “current item” into your library. The difference is that you can specify which library to import into, and which folder within that library. You can also set the title, from name, label, tags, and notes:
EagleFiler remembers this metadata (except the title and notes) for each library, so it’s easy to quickly capture a bunch of related items. Pressing the Reset button clears the metadata and sets the folder so that EagleFiler once again imports into the Unfiled source.
There are keyboard shortcuts for choosing the library (Command-1), folder (Command-2), Label (Command-3), Reset (Command-K), Cancel (Command-. or Escape), and Capture (Enter or Command-Return). Once the folder menu is open, you can select a folder by typing the first few letters of its name.You can switch between the Metadata and Source tabs using Control-Tab and Control-Shift-Tab.
6.3 Quick entry
Press this hotkey to bring up a dialog for creating a new file. You can enter the text content of the file and set the metadata (label, tags, notes, etc.). The Format pop-up menu lets you choose whether to create a Rich text (RTF or RTFD) or plain text (UTF-8) file.
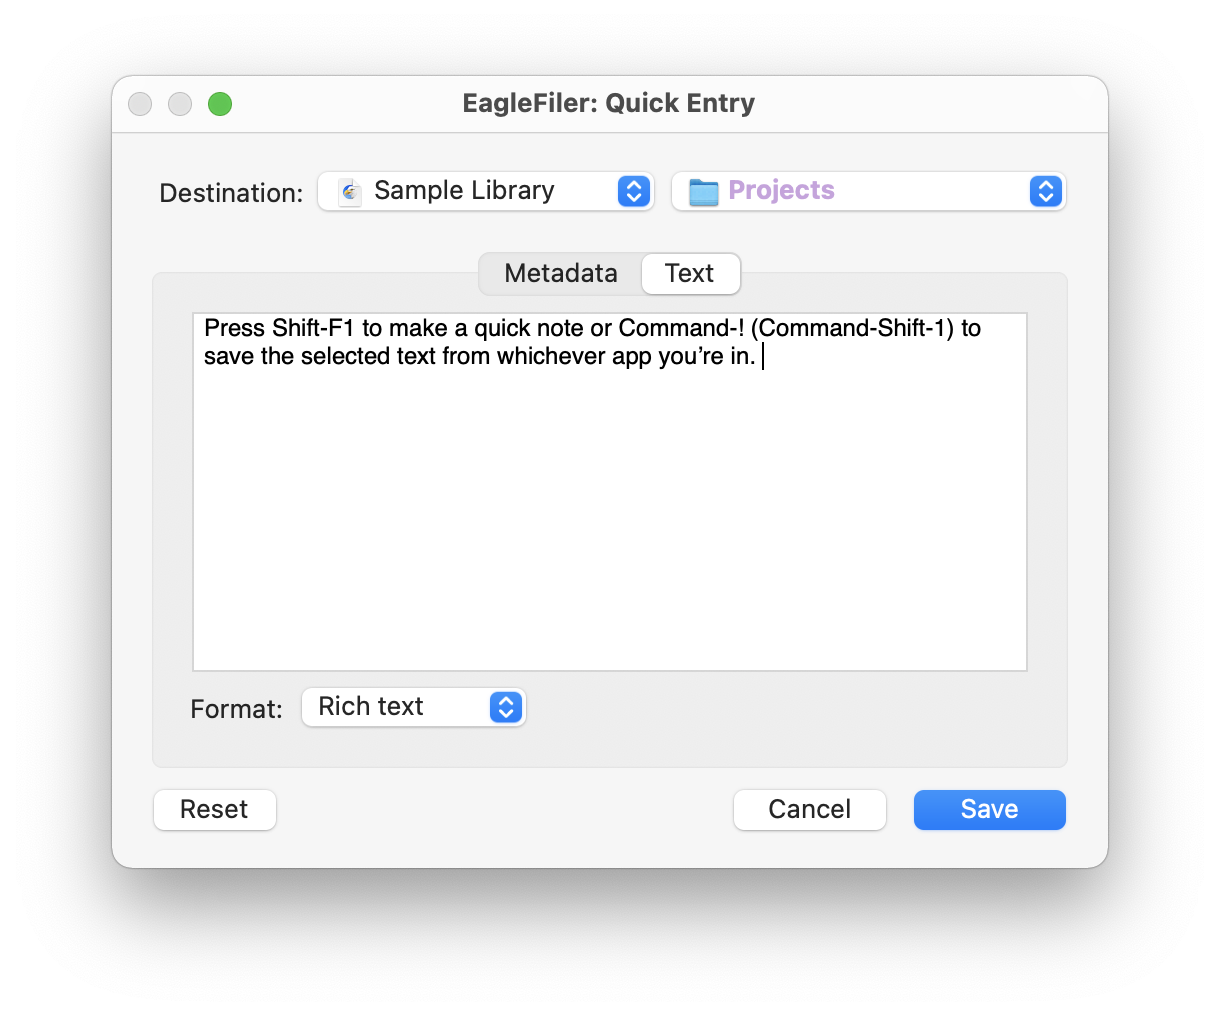
Pressing the Reset button clears the metadata and sets the folder so that EagleFiler once again imports into the Unfiled source.
There are keyboard shortcuts for choosing the library (Command-1), folder (Command-2), Label (Command-3), Reset (Command-K), Cancel (Command-. or Escape), and Save (Enter or Command-Return). Once the folder menu is open, you can select a folder by typing the first few letters of its name. You can switch between the Metadata and Text tabs using Control-Tab and Control-Shift-Tab.
6.4 Web page format
When you import an entire Web page, EagleFiler can save it using the following formats:
- Bookmark
- A .webloc file that stores the URL and page title. This does not save the contents of the page, thus conserving disk space but restricting your search options. You can also edit (and update) the URL in a bookmark.
- HTML
- A plain .html file that stores the page’s text content. Formatting and images may not be fully preserved, in the effort to save a smaller file in an open format. If you want to preserve the full formatting and images, consider using the Web archive format instead.
- PDF files preserve the text, formatting, clickable links, and images. Web pages containing HTML frames cannot be saved as PDF files; when importing such pages, EagleFiler will save them as Web archives.
- PDF (Single Page)
- As above, except that the PDF is formatted as a single page and with tighter margins for easier on-screen viewing. For best results, set EagleFiler or your PDF viewer to display in “Single Page Continuous” mode. Printing PDFs in this format can be a problem, however, because the PDF page will generally be much larger than a sheet of paper.
- Plain Text
- Plain text files include the text content of the page, with no formatting or images. Thus, they make very efficient use of disk space.
- Rich Text
- RTF files preserve the text, formatting, and clickable links, but not the images.
- Rich Text With Images
- An RTFD package that preserves the text, formatting, clickable links, and images.
- Web archive
- Safari Web archives preserve the entire page contents in its original format (HTML, CSS, images). They’re slower to display than PDFs, but you can resize the window to change the displayed width, and you can adjust the font size (often more useful than zooming a PDF). Web archives can be viewed on Macs (using Safari) and iPhones, but currently there are no Windows or Linux applications to display them. Firefox and Google Chrome do not support Safari Web archives.
You can use bookmarklets to temporarily override the format chosen in the settings.
6.5 Spotlight comments
This setting controls what happens to a file’s Spotlight comments (a.k.a. Finder comments) when you import it into EagleFiler.
- Ignore
- EagleFiler preserves the Spotlight comments.
- Import as notes and tags
- EagleFiler extracts tags (prefixed by & or marked using Punakea’s format) and assigns them as EagleFiler tags. It imports the remaining comments text as notes.
- Import as tags
- Each word in the comments is imported as a tag.
EagleFiler always imports tags that are stored in the file’s extended attributes under com.apple.metadata:kOMUserTags by applications such as Tags, TagIt, and Default Folder X.
6.6 Fonts
- Sources
- See the Sidebar icon size pop-up menu in the General tab of System Settings and SourcesRowSizeStyle in the esoteric preferences.
- Lists
- Used in the records list in browser windows and in the list of tags in the tags inspector.
- Rich text
- Used for e-mail header information, HTML messages, and as the default font for notes.
- Plain text
- Used for plain text e-mail messages and text files.
The fonts for Web archives are mostly controlled by the Web archives themselves.
6.7 Search highlight color
This is the color that EagleFiler uses to emphasize the search terms in the records list and record viewer.
6.8 Quoted Text Colors
EagleFiler colors plain text e-mail messages according to the number of quote characters at the start of each line. The pop-down menu lets you choose a preset coloring scheme.
6.9 Remember open libraries between launches
If this is checked, EagleFiler will remember which libraries were open when you quit it, and it will re-open them the next time EagleFiler is launched.
In addition, you can put aliases to your favorite libraries in the folder:
/Users/<username>/Library/Application Support/EagleFiler/Startup Items
so that EagleFiler will always open them at launch. (See How can I open the Library folder?.) You can hold down the Shift key at launch to prevent it from re-opening the libraries or opening the startup items.
If EagleFiler is closed, and you don’t want it to re-open a certain library at the next launch, you can remove that library’s alias from the folder:
/Users/<username>/Library/Application Support/EagleFiler/Open Libraries
6.10 Copy tags to Spotlight comments
This feature is only recommended for use with macOS 10.7 through 10.8. As of macOS 10.9, EagleFiler supports Finder tags, which are indexed by Spotlight and are much faster than copying tags to Spotlight comments.
If this is checked, EagleFiler will set the Spotlight comments for each file to the names of the tags that it’s been assigned. This enables you to search for a file using Spotlight by typing tag names as part of the query. Any existing comments will be lost. If this is not checked, EagleFiler will preserve the existing Spotlight comments when importing files.
EagleFiler will automatically copy the tags to the comments when a library is opened and periodically thereafter. You can force it to update the comments by using the Backup Metadata command.
There is an esoteric preference to control the tag prefix that’s added to each tag name in the comments. The default prefix is “&”.
6.11 Allow duplicate files in library
Normally EagleFiler will prevent you from importing a file if a file with the same contents (in the data fork) is already in the library. You can check this option if you prefer to import every file, even duplicates. In order for duplicate detection to work, your files’ checksums must be up-to-date. For more information, please read about the Verify and Update Checksum commands.
When you import via Scan for New Files, EagleFiler does not check for duplicates. This is because you have specifically put the files in EagleFiler’s library folder.
To remove duplicates after the files are already in the library, see the Remove Duplicate Files script.
Duplicate URLs
Archived Web pages with the same source URL will generally contain different data, so EagleFiler will not treat them as duplicates. However, there is a script for removing duplicates by URL if that’s what you want to do.
Duplicate E-mail Messages
- EagleFiler checks for duplicates at the file level. Thus, when you import a mailbox file containing a bunch of e-mail messages, EagleFiler checks for a duplicate mailbox but does not check the individual messages within that mailbox file for duplicates.
- When importing the selected messages from an e-mail client (using the capture key), EagleFiler automatically skips duplicate messages within the same mailbox. See also: Handling Duplicate Messages in Apple Mail.
- To prevent importing all duplicate e-mail messages, you can import them as individual .eml files. See the Importing Mail section.
- To remove duplicate e-mail messages from a mailbox, after importing, see the Remove Duplicate Messages script.
6.12 Esoteric Preferences
You can set esoteric EagleFiler preferences by clicking the links on this page. Unlike with regular settings, you must generally quit and re-launch EagleFiler in order for an esoteric preference to take effect.
- AlwaysShowNewRecordSheet
- When you create a new record, EagleFiler normally shows the sheet to enter the filename only if the File column is hidden. You can also set it so that filename entry is always via the sheet rather than the records list.
- AutomaticallyBackupMetadata
- EagleFiler automatically backs up your libraries’ metadata (and, at the same time, copies tags to the Spotlight comments, if you’ve asked it to do that), but you can turn this feature off for a slight speed increase.
- CalculateFolderSizes
- This controls whether EagleFiler calculates folder sizes to display them in the records list. Turning off this feature will increase EagleFiler’s responsiveness.
- CaptureNotSupportedJustBeep
- Normally if you press the capture key in an application that EagleFiler doesn’t know how to capture from, it presents an error alert that explains the situation. You can also set it to just beep if you understand how capturing works and prefer a less intrusive notification when you accidentally press the key.
- CaseSensitiveTagCompletion
- Normally, tag auto-completion is case-insensitive so that you see as many matching tags as possible. You can also set it to be case-sensitive so that it is easier to type new tag names that are similar to existing tags but with differing case.
- ClearSearchWhenChangingSources
- Normally EagleFiler clears the search so that clicking on a different folder takes EagleFiler out of search mode and shows you all the records. You can also set EagleFiler to preserve your search query (like in OmniFocus) when you view different sources, so that you can easily search different folders without retyping the query.
- CommandOToOpenRecord
- Normally EagleFiler uses the keyboard shortcut Command-Shift-O for Open With External Viewer. You can also set it to use Command-O (swapping the shortcut with Open Library…).
- DarkTextBackgroundInDarkMode
- Normally EagleFiler will use adaptive color mapping (like TextEdit) when displaying rich text documents and notes so that you automatically see light text on a dark background when your Mac is running in Dark Mode. You can turn off this behavior if you need to precisely edit the colors in your documents or notes so that WYSIWYG.
- DefaultMessageEncoding
- When a message doesn’t specify which text encoding it uses, EagleFiler has to guess. An incorrect guess may cause the message to display using strange accents or garbage characters. By default EagleFiler guesses MacRoman, but you can change it to guess ISO Latin 1 or UTF-8 instead.
- DefaultWebEncoding
- When a Web page or HTML file doesn’t specify which text encoding it uses, EagleFiler has to guess. An incorrect guess may cause the page to display using strange accents or garbage characters. By default EagleFiler guesses ISO-8859-1, but you can change it to guess Macintosh or UTF-8 instead.
- DisableNotificationCenter
- EagleFiler normally posts to Notification Center when it finishes importing a batch of files. You can control in Notification Center when and how the notifications are displayed, or disable this feature entirely if you don’t want your filenames to be stored in the Notification Center database.
- DisplayImagesWithQuickLook
- To prevent leakage of sensitive image data, you can tell EagleFiler not use Quick Look to display images, or go back to the default behavior of using Quick Look to display SVG images.
- DisplayPDFsWithQuickLook
- There are some bugs in macOS 10.12’s PDF view. You can tell EagleFiler to instead use the Quick Look view (which is unaffected by some of the bugs but has other limitations) to display PDF files, or go back to the default behavior of using PDFView.
- EnableJavaScript
- Normally, EagleFiler will use JavaScript to help display HTML files and Web archives. However, you can also disable JavaScript, which may make the pages less distracting to view. EagleFiler always enables JavaScript when importing Web pages (e.g. to make sure all the content is saved into a Web archive or PDF) except for sites where JavaScript is known to cause problems, and unless you have changed the EnableJavaScriptForWebTool esoteric preference below.
- EnableJavaScriptForMail
- Normally, EagleFiler will use JavaScript to help display HTML e-mail messages. However, you can also disable JavaScript, which can work around some crashing bugs in macOS.
- EnableJavaScriptForWebTool
- Normally, EagleFiler will use JavaScript when importing a URL because many Web pages use JavaScript to load or help display content. However, you can also disable JavaScript if you are worried about JavaScript security bugs on older versions of macOS.
- EnableWebPlugIns
- Normally, EagleFiler will show content from Web plug-ins (such as Flash) when displaying an HTML file or Web archive. However, you can also disable plug-ins if you don’t want to see this content.
- ErrorsOpenForDuplicates
- Normally, EagleFiler will open the Errors window when a file has been skipped during an import because it’s a duplicate. However, you can also set EagleFiler to log the error without opening the window, for example if you expect there to be duplicates and don’t care to see them.
- ExcludeIndexesFromBackup
- EagleFiler’s index files are normally included in Time Machine backups. This way, you can immediately search your library after restoring it from backup. To save space on the backup device and speed up your backups, you can set EagleFiler to exclude the indexes from backups. The downside to this is that, as with Spotlight, you’ll have to wait for the files to be re-indexed after restoring.
- FindPanelDiacriticInsensitive
- EagleFiler’s Find panel normally works like TextEdit’s. Searching for “e” does not find “é”. You can also make EagleFiler’s Find panel diacritic-insensitive so that “e” matches “é”, “ü” matches “u”, etc., as always happens with EagleFiler’s library search and Spotlight. This feature does not work in Web or PDF views.
- FixOwnershipWhenVerifying
- With this option enabled, when you use the Verify command EagleFiler will set all the files to be owned by the current user. With this option disabled (the default), EagleFiler will not change any file ownership except when necessary because you are editing a file.
- FixPermissionsWhenVerifying
- With this option enabled, when you use the Verify command EagleFiler will set all the files to have standard permissions. With this option disabled (the default), EagleFiler will not change any file permissions except when necessary because you are editing a file.
- FolderMailboxTitleSeparateFromFilename
- Normally EagleFiler will keep the titles of folders and mailboxes in sync with their filenames. You can also set it to allow the titles to be distinct from the filenames. This is potentially useful if you need to manage a folder structure using fixed filenames but you want to have longer, more descriptive titles in EagleFiler.
- HighlightSearchMatches
- Normally EagleFiler will highlight in the record viewer the words that match your search query. Disabling this feature will provide a speed increase.
- ImportLoneMessageAsMailbox
- Normally EagleFiler will import a single e-mail message as a .eml file. This makes it easier to view the message directly in the records list; multiple .eml files can later be merged into a mailbox if desired. You can also set EagleFiler to import a lone message as a mailbox file containing a single message. This makes it easier to merge it with existing mailboxes.
- ImportSpotlightKeywords
- EagleFiler normally ignores Spotlight keywords when importing files to avoid cluttering your tags list with irrelevant or incorrect entries. You can also set EagleFiler to import Spotlight keywords as tags if you generally like the keywords that are assigned to your files.
- ImportTextAsWebArchive
- When importing the selected text from a Web view (via drag and drop, the Service menu, or the Import Clipboard command), EagleFiler normally uses the Web archive format, as this preserves all of the original information. You can instead set it to import in RTF(D) format for easier editing. Some Web browsers don’t suppor the Safari Web archive format, and so EagleFiler will always use RTF, regardless of this setting.
- ImportTitleFromFileContents
- When importing a file, EagleFiler normally reads the file’s own metadata to find its title (e.g. one that was specified when creating a PDF or Word file) and sets the title in EagleFiler accordingly. You can also set EagleFiler to ignore the file’s own title, e.g. if you frequently download files with meaningless titles and would prefer to have EagleFiler show the filename.
- MarkNewRecordsAsUnread
- Normally EagleFiler will mark newly imported records as unread, but you can also tell it to leave them untagged. This does not affect the Capture With Options window, since that always suggests the tags from the previous capture.
- MaxEditableTextFileSizeInMB
- Normally EagleFiler will display the entire contents of a text file, even if it’s many megabytes. This can take a long time. You can speed it up by setting EagleFiler to only show the first 10 MB of a text file.
- MediaStyle
- If a Web page includes multiple stylesheets, you can choose whether EagleFiler displays it using the print stylesheet or the default stylesheet.
- MediaStylePDF
- If a Web page includes multiple stylesheets, you can choose whether EagleFiler creates a PDF using the print stylesheet or the default (screen) stylesheet.
- MJTUpdaterDeleteDiskImage
- Normally, the Software Update… feature will clean up after itself after downloading a new version. You can also set it to leave the disk image file in your Downloads folder.
- MJTWindowToolbarStyleUnified
- Normally on macOS 11 and later, EagleFiler uses the new unified window style where the window’s title and toolbar buttons are shown side-by-side. You can also switch to the old expanded style where the title is above the toolbar, which leaves room for more toolbar buttons extending to the left edge of the window.
- OldApplicationIcon
- If you prefer, you can use the old application icon from EagleFiler 1.0 through 1.4 rather than the new icon from EagleFiler 1.9. This setting only applies to the icon in the Dock while EagleFiler is running.
- OldApplicationIcon1.5
- If you prefer, you can use the old application icon from EagleFiler 1.4 through 1.8 rather than the new icon from EagleFiler 1.9. This setting only applies to the icon in the Dock while EagleFiler is running.
- OpenEagleFilerURLsInNewWindow
- Normally EagleFiler opens x-eaglefiler URLs in a an existing browser window. You can also set it to create a new browser window.
- PDFWebBackgrounds
- When you import a Web page in PDF format, EagleFiler usually preserves the background so that the page looks like it does in the browser. You can also set EagleFiler to use a blank page background. This is especially useful in combination with setting the MediaStylePDF to print.
- PlayCaptureSound
- When you press the capture key, EagleFiler can either play a sound or be silent.
- PrefersRichText
- Normally when you create a new file via the EagleFiler: Import service, Import From Clipboard, drag and drop, or New Record ‣ From Clipboard EagleFiler creates an RTF or RTFD file. You can instead set it to create plain text files.
- RecordsListHasAlternatingBackground
- This controls whether EagleFiler uses a solid white background or blue-and-white alternating row background colors in the records list.
- RecordsListShowToolTips
- This controls whether EagleFiler shows tooltips or not when you hover over an item in the records list.
- RecordsListLabelPreferTitle
- Normally, EagleFiler indicates a record’s label by showing a colored circle in the File column. You can also set it to use the Title column instead.
- RecordsListLabelUnderlineStyle
- Normally, EagleFiler indicates a record’s label by showing a colored circle in the File or Title column (like Finder does). You can also set it to additionally underline the filename and title, to make the color stand out more.
- RespectImageDPI
- When displaying images and rich text files, EagleFiler normally uses the resolution specified in each image file. Some images have an incorrect resolution setting (e.g. set to 300 DPI but intended to be 72 DPI), which can make them appear very small on screen. Therefore, EagleFiler lets you override the image’s resolution to display all the pixels. This can “fix” the display for incorrect image files, however it will make legitimately high-resolution images appear much too large. The best solution is to fix the resolution in the image files themselves.
- RevealInLibraryNewWindow
- Normally the Reveal in Library button in the Errors window selects the record in an existing window, which can be a lot faster if you’re going through lots of “Missing File” errors. You can also set it to open a new window, so that you don’t lose your place.
- RevealRecordInParent
- Normally when you open an x-eaglefiler link, EagleFiler shows the record in the Records source, to avoid disrupting your current view. You can also set it to select the record’s containing folder, which shows the direct context of the record but may cause multiple levels of folders to be expanded in the source list.
- ScanForNewFilesOnOpen
- EagleFiler normally scans for new files when the library is opened. You can turn this off so that it only scans for new files when you use the menu command.
- SendsWholeSearchString
- Normally EagleFiler updates the search results as you type. If you are a slow typer, it may do this after each letter, causing the search to take a long time. You can instead set EagleFiler to only do the search once, when you press Return.
- ShowImagesInMessages
- Normally EagleFiler will show images in HTML e-mails, but you can also tell it to not load them if you’re concerned about Web bugs.
- SourcesRowSizeStyle
- Normally EagleFiler will set the sources icon and font sizes based on the Sidebar icon size pop-up menu in the General tab of System Settings. You can also override it to always be small, medium, or large.
- TagCommentPrefix
- If a record is tagged unread and flagged EagleFiler will normally set the Spotlight comments to &flagged &unread. This allows for integration with other applications that follow this convention, and it lets you use Spotlight to search for files with particular tags. You can set it to use no prefix so that it instead sets the comments to flagged unread or set the prefix to “&” to go back to the default.
- TextInspectorBar
- Normally EagleFiler shows the text editing toolbar as needed. You can also set it to never show. This is the default on macOS 10.12.0–10.12.1 in order to work around a crashing bug.
- TextInspectorBarStayOpen
- Normally EagleFiler shows and hides the text editing toolbar as needed. You can also set it to stay visible if you prefer not to see the window resize when you view different types of records.
- UseOpenMetaRecentsForCompletion
- EagleFiler can use a global list of recently used tags to use for auto-completion. By default, however, only tags in the current library are offered as suggested completions.
- WordXRecordDisplayUsingQuickLook
- EagleFiler normally uses the system text engine to display .docx files, as this lets you select text and use the Find panel. You can also tell EagleFiler to use Quick Look in the record viewer, which may provide a more realistic preview for documents with complex formatting. (Quick Look is always available in a separate window, via the Quick Look menu command.)
Experimental Options
- PlainTextForegroundColor/PlainTextBackgroundColor
You can change the colors EagleFiler uses to display plain text files. For example, to get green text on a black background you could enter these commands into Terminal:
defaults write com.c-command.EagleFiler PlainTextForegroundColor -array 0 .4 .1 1
defaults write com.c-command.EagleFiler PlainTextBackgroundColor -array 0 0 0 1
The colors are specified as RGBA values. To return to the default colors:
defaults delete com.c-command.EagleFiler PlainTextForegroundColor
defaults delete com.c-command.EagleFiler PlainTextBackgroundColor
- NewPlainTextExtension
This lets you change the extension of new plain text files that EagleFiler creates on your behalf. For example, you could change it from the default txt to md to create Markdown files:
defaults write com.c-command.EagleFiler NewPlainTextExtension md
7 Extending EagleFiler
7.1 AppleScripting EagleFiler
EagleFiler has extensive support for AppleScript so that you can automate it and integrate it with other applications. The EagleFiler AppleScripts page has a collection of sample scripts that are useful in their own right and that can also be used as templates for developing your own scripts.
Running AppleScripts From EagleFiler’s Script Menu
By using macOS’s script menu, you can make AppleScripts available from inside EagleFiler as if they were built-in commands. To enable the script menu, open the Script Editor application in the Utilities folder. In the settings window, make sure that Show Script menu in menu bar is checked.
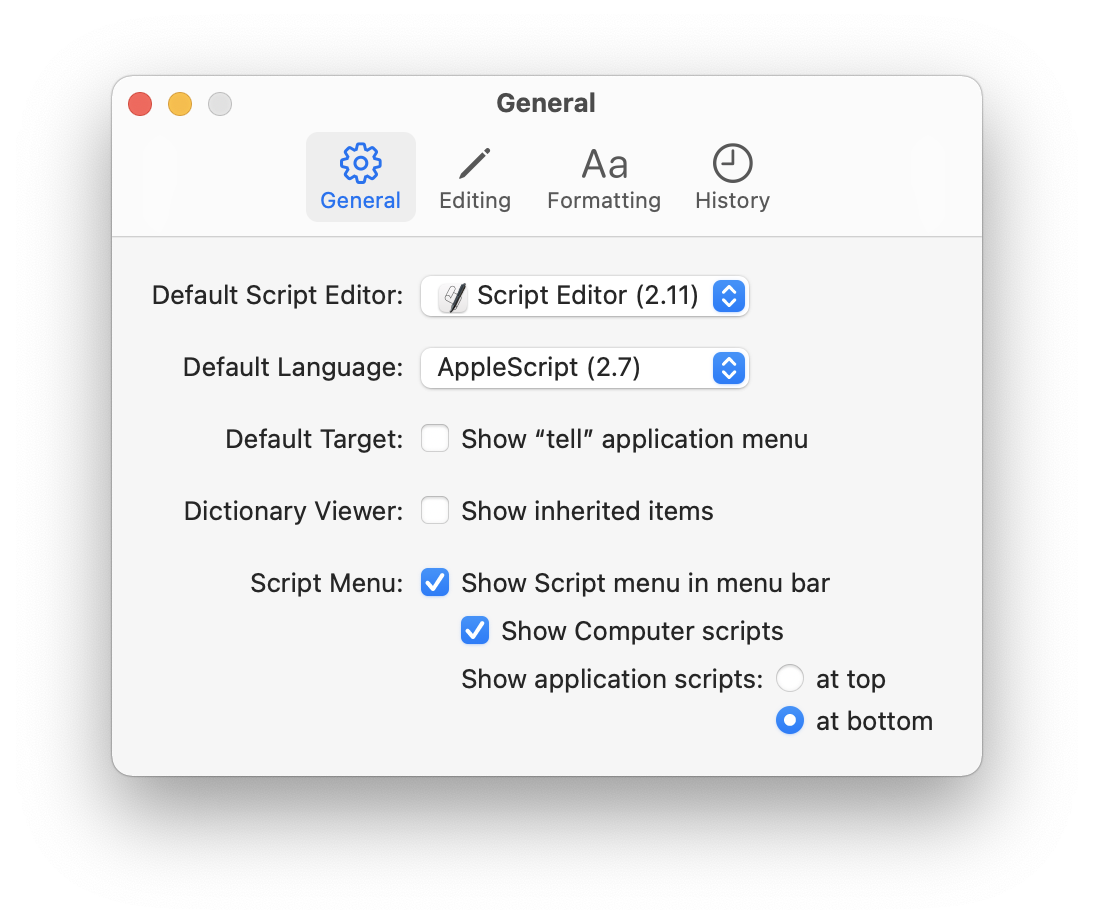
The menu will appear at the right side of your menu bar, near the clock. To add commands to the menu, switch to EagleFiler and choose Open Scripts Folder ‣ Open EagleFiler Scripts Folder. This will open a special folder in the Finder; every script file that you put in this folder will show up in EagleFiler’s script menu.
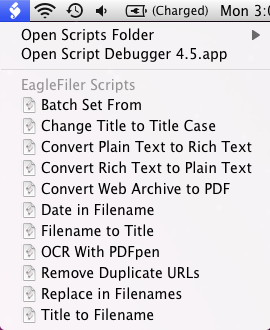
To run a script, just select the menu command with your mouse. If you need additional script menu features such as keyboard shortcuts, try Red Sweater Software’s FastScripts.
Leaning AppleScript
For more information about AppleScript, see Apple’s AppleScript Language Guide, AppleScript: The Definitive Guide by Matt Neuburg, or AppleScript 1-2-3 by Sal Soghoian and Bill Cheeseman.
7.2 Writing Capture Scripts
You can extend EagleFiler’s capture key to support additional applications by adding capture scripts to the folder:
/Users/<username>/Library/Application Support/EagleFiler/Capture Scripts/
(See How can I open the Library folder?.) A capture script is an AppleScript saved in compiled format. The name of the file is of the form <bundle identifier>.scpt, e.g. com.apple.Safari.scpt. You can determine an application’s bundle identifier by finding the CFBundleIdentifier in the Info.plist file inside the application’s package (which you can open using the Show Package Contents command when Control-clicking on the application).
The script should have a handler called capture that returns a list of AppleScript records. Each record in the list should have a |url| key (for a remote http URL) or a |path| key (for a full POSIX path). If no items are available for capture, the script can return the empty list, or it can return a record with a |error| key that provides an application-specific error message.
Other, optional, keys are:
- |deleteWhenDone|
- If the script creates a temporary file for the capture, it can include this key with value true so that EagleFiler will delete the temporary file after it has finished importing the file.
- |fromName|
- Overrides the From name that would be extracted from the file.
- |note|
- A string for the note text.
- |sourceURL|
- The URL that the document was downloaded from.
- |tags|
- A list of tag names.
- |tagsString|
- A Unicode string of space-separated tag names, which EagleFiler will parse.
- |title|
- Overrides the title that would be extracted from the file.
- |creationDate|
- Sets the creation date of the file.
- |modificationDate|
- Sets the modification date of the file.
- |webPageFormat|
- Overrides the format chosen in EagleFiler’s settings. Must be one of: html, pdf, pdfSinglePage, rtf, rtfd, txt, webarchive, webloc.
Example: NetNewsWire
The NetNewsWire 3 capture script looks like:
on capture()
    tell application "NetNewsWire"
        set _tabIndex to index of selected tab
        set _tagNames to {}
        set _title to ""
        set _note to ""
        if _tabIndex is 0 then
            if exists selectedHeadline then
                set _url to URL of selectedHeadline
                set _title to title of selectedHeadline
                try
                    get _title
                on error
                    set _title to ""
                end try
                if isFlagged of selectedHeadline then
                    set _tagNames to {"flagged"}
                end if
            else
                return {{|error|:"No URL is available to be captured."}}
            end if
        else
            set _urls to URLs of tabs
            try
                set _url to item (_tabIndex + 1) of _urls
                set _titles to titles of tabs
                set _title to item (_tabIndex + 1) of _titles
                try
                    set _note to do JavaScript "window.getSelection().toString()"
                end try
            on error
                return {{|error|:"EagleFiler could not access the current tab due to a bug in NetNewsWire. Please try closing any blank tabs."}}
            end try
        end if
    end tell
    return {{|url|:_url, tags:_tagNames, title:_title, |note|:_note}}
end capture
Example: Finder
The capture script for the Finder demonstrates how to capture multiple items at once:
on capture()
    tell application "Finder"
        set theSelection to selection as list
        set theResult to {}
        repeat with theFile in theSelection
            set theFile to theFile as alias
            copy {|path|:POSIX path of theFile} to end of theResult
        end repeat
        return theResult
    end tell
end capture
7.3 Writing Stationery Scripts
The New Record ‣ Open Stationery Folder section describes the basics of EagleFiler’s stationery feature. You can also write stationery AppleScripts to set the filename and metadata. This provides more control—for example, you can set a title that’s distinct from the filename. It also lets you set the metadata dynamically—that is, it can be determined when making new records from the stationery rather than when the stationery is first created. Therefore, the metadata can be based on the current date, the current user, the current iTunes track or chat status, or any other information that’s accessible via AppleScript.
Where to Put Stationery Scripts
To set the metadata via AppleScript, create a compiled script file next to your stationery file. If the stationery file is Journal Entry.rtf, the script should be called Journal Entry.efmeta.scpt. EagleFiler will automatically run the script when you create a new record from the Journal Entry.rtf stationery.
Example Stationery Script
Here’s an example script:
on metadata(_context)
    set _title to "Blog Entry"
    set _base to do shell script "date '+%A, %B %d, %Y'"
    set _systemInfo to system info
    set _from to long user name of _systemInfo
    set _tags to {"journal", "draft"}
    return {|title|: _title, |basename|: _base, |fromName|: _from, |tags|: _tags}
end metadata
This would set the title to “Blog Entry”, the filename would be based on the current date (e.g. “Tuesday, October 21, 2008.rtf”), the from would be the name of the user logged into the Mac (e.g. “John Appleseed”), and the tags would be “journal” and “draft”.
Stationery Script Details
The script should contain a handler called metadata with a single context parameter.
The context is an AppleScript record containing the following keys: |folderName|, |libraryPath|, |stationeryBasename|, |stationeryName|, and |stationeryPath|. The script can ignore the context, or it can use it to find out about the stationery file and where the record will be created.
The metadata handler should return an AppleScript record containing one or more of the following keys: |basename|, |fromName|, |note|, |sourceURL|, |tags|, |title|.
8 Frequently Asked Questions (FAQ)
8.1 How can I access my library from multiple Macs?
There are several different ways of sharing an EagleFiler library among multiple Macs. Most of these techniques will also work for sharing your files with a Windows PC or iOS device. You can either create a new library in the shared location or close your library and then move the entire library folder.
Rules for Shared Libraries
- Always copy or sync the entire EagleFiler library folder. This will ensure that your files and notes, and EagleFiler’s database and search indexes, are all shared.
- Only open the library in one copy of EagleFiler at a time. Multiple copies of EagleFiler simultaneously using the same database can damage it. (If this does happen, you can easily rebuild the library.)
- It’s safe to use the Finder and other applications to browse and edit the files in your library from multiple devices simultaneously. Just make sure that you follow the rules for library folders.
- You can add new files to the library from any device, without having to open EagleFiler. Just save the files into the The To Import Folder or The Files Folder.
- Some of the cloud services below do not preserve metadata such as file creation dates, labels, or Finder tags. Lack of support for tags is not a problem for EagleFiler because EagleFiler has its own tag storage and will restore any Finder tags that were lost. If creation dates or labels are important to you, you should choose a service that supports them or use an encrypted library.
Ways of Sharing That Have Been Tested With EagleFiler
You can store your library on a portable drive, e.g. a USB keychain drive, SD card, external hard drive, iPhone, iPad, or iPod. See also the How can I put my library on my iPhone? page.
Dropbox is a free service for sharing files between Macs and accessing them from the Web or an iPhone or iPad. It is the recommended cloud storage for use with EagleFiler.
After editing your library with one Mac, make sure that both it and the second Mac have fully synced with the Dropbox server (that is, the icon in the menubar no longer shows spinning arrows) before opening the library on the second Mac.
We recommend not using Dropbox’s Smart Sync feature, which avoids downloading all the files to your Mac, as this can cause extra indexing and syncing.
If you only want to put part of your library on Dropbox, see the Aliases and Symlinks part of the Library Folders section of the manual.
Note: Dropbox does not preserve the colored labels or creation dates of files unless you are using an encrypted library. It also places limitations on which filename characters you can use. It does preserve Apple (but not third-party) extended attributes.
Box is a Dropbox-like service. Like Dropbox, you must wait for it to finish syncing before opening a library or shutting down your Mac.
Note: Box does not preserve file metadata such as colored labels or extended attributes. Box places limitations on the filename characters you can use.
Google Drive (a.k.a. Google One) is a Dropbox-like service that also supports full-text searching. Like Dropbox, you must wait for it to finish syncing before opening a library or shutting down your Mac.
Note: Google Drive does not preserve file metadata such as creation dates, colored labels, or extended attributes. Google does not document which filename characters you can use.
iCloud Drive is a Dropbox-like service. Like Dropbox, you must wait for it to finish syncing before opening a library or shutting down your Mac. Unlike Dropbox, it is hard to know when syncing has finished because there is a separate progress indicator for each file, rather than one global menu. The iCloudStatus utility can help with this, but it is still possible to corrupt your library if you modify it before iCloud has finished syncing changes from another device.
Note: iCloud Drive automatically syncs the contents of the Desktop and Documents folders, unless you disable this in the iCloud pane in System Settings. If you do not want your EagleFiler libraries synced, disable that feature or move the libraries to another folders. Also, you should make sure that Optimize Mac Storage is unchecked. (On macOS 10.15 and later, this located in System Settings ‣ Apple ID ‣ iCloud.) Otherwise, the system may delete the local copies of some of your EagleFiler files, leading to errors and EagleFiler thinking that they are missing.
Note: iCloud Drive preserves file creation dates but not other file metadata such as colored labels or extended attributes (except for Finder tags). Apple does not document which filename characters you can use.
Microsoft OneDrive is a Dropbox-like service. Like Dropbox, you must wait for it to finish syncing before opening a library or shutting down your Mac.
OneDrive has severe path length and filename character limitations. We offer scripts to rename files with allowed characters and to shorten long filenames.
Note: OneDrive does not preserve file metadata such as colored labels or extended attributes. Thus, it is not recommended for use with EagleFiler.
OmniPresence is a Dropbox-like service that can also work with your own WebDAV server. Like Dropbox, you must wait for it to finish syncing before opening a library or shutting down your Mac.
Note: OmniPresence does not preserve file metadata such as colored labels or extended attributes.
OwnCloud and NextCloud are Dropbox-like cloud syncing services that you can host yourself.
Note: OwnCloud and NextCloud do not preserve file metadata such as creation dates, colored labels, or extended attributes.
Resilio Sync is a Dropbox-like service that can sync files between Macs without storing them in the cloud. It is recommended that you whitelist the com.c-command.eaglefiler.tags.sync-info xattr and set the folder Temporary Items.nobackup to be ignored.
Note: Resilio Sync does support extended attributes.
SugarSync is a free service for sharing files between Macs and accessing them from the Web or an iPhone or iPad. After editing your library with one Mac, make sure that both it and the second Mac have fully synced with the server before opening the library on the second Mac.
Note: SugarSync currently has limited support for Mac files. It do not support resource forks, extended attributes, bundle bits, or other HFS metadata. SugarSync does not support filenames containing : at the Unix level (/ in the Finder). EagleFiler does not require support for this metadata. However, you should be aware that if you set file labels or custom icons, these will be lost when syncing with SugarSync. Additionally, if you use EagleFiler to organize files that contain resource forks (such as some sound or font files, old NisusWriter files, etc.) they will become unusable after syncing. If you have detailed knowledge of what kind of metadata your files have, and whether it needs to be preserved, you can decide for yourself whether or not this is a problem for you. If in doubt, you should use an encrypted library (see below).
Sync is a Dropbox-like service with a focus on security.
Note: Sync does not preserve file metadata such as colored labels or extended attributes.
Transporter is a Dropbox-like service except that the data is stored on your own hardware. Like Dropbox, you must wait for it to finish syncing before opening a library or shutting down your Mac.
Note: Transporter has many metadata and filename limitations.
macOS’s built-in file sharing and Web sharing can be used to make your library available on other Macs. Just make sure that the library folder is stored in a folder that’s set up for file sharing (e.g. Public) or Web sharing (e.g. Sites) and that sharing is enabled in System Settings.
Accessing a library over the network via file sharing is generally slower than using an Dropbox.
You can use a non-cloud file syncing utility such as Synchronize! Pro X, ChronoSync, or SuperDuper. There is more information about this in the Syncing a Library Locally section.
Encrypted Libraries
If you use the New Library… command create an encrypted EagleFiler library, EagleFiler will wrap up your library and all its files into a disk image that preserves all the metadata. Be sure to eject the disk image after closing the library in EagleFiler. This causes the OS to save all the information to disk so that it can be synced properly. (You can use the Close & Lock command to do this in one step.)
Note: Encrypted libraries can only be accessed from a Mac, not from the Web or an iPhone or iPad.
8.2 How can I put my library on my iPhone?
EagleFiler stores your files in standard formats, and iOS can read most of them. There are several different ways to store your library so that it can be shared between a Mac, iPhone, iPad, and iPod touch:
Cloud Storage
You can store your EagleFiler library in the cloud. These apps let you access storage from a provider such as Dropbox or iCloud Drive, with support for many file types:
- Files (built into iOS 11) supports iCloud Drive and can connect to Dropbox and other services if those apps are installed. It lets you view files by tag and also assign and unassign tags to files. This works better with files in iCloud Drive than in Dropbox. Recommended.
- Readdle Documents can do full content searching of text, HTML, iWork, Microsoft Office, PDF, and RTF files. You can manually download select files or folders or set an entire library to automatically sync between the iPhone and the cloud. Recommended.
- Working Copy uses Git to synchronize with files stored on a cloud provider or your own server. It supports searching and editing of text files and can display lots of file types. Recommended.
- GoodReader can view many types of files and can search text and PDF files.
- If you have Dropbox for Business, the iOS app supports full text search without downloading all the files.
These apps focus on supporting plain text files:
- 1Writer is a Markdown text editor that can directly edit and search files in EagleFiler libraries that are stored in Dropbox or iCloud Drive. Recommended.
- iA Writer. Recommended.
- Editorial can do full content searching (as well as editing) of text files. Recommended.
- Byword
- Droptext
- Textastic
- See also the iOS Text Editor roundup.
These apps support editing rich text files:
- TextEditor
- RichTexture
- Apple’s Pages app can display RTFD files but will save them in .pages format if you make changes.
The How can I access my library from multiple Macs? section lists a variety of services such as Dropbox and Google Drive that provide both cloud storage and an iPhone app for viewing your files in the cloud.
Device Storage
You can store your EagleFiler library directly on the iPhone and share it with your Mac (via Wi-Fi) using one of these apps:
Other
- easySearch provides full text searching for a variety of document formats.
- SyncBook is a pair of Mac and iPhone apps for viewing and editing notes. It can integrate with EagleFiler via a symlink.
Importing From iOS to EagleFiler
Please see the Importing From iOS section.
Encryption
Note that encrypted libraries can be stored in the cloud but can only be natively accessed from a Mac, not from the Web, an iPhone, or an iPad. Many cloud providers do keep your files encrypted on their servers, however. There is a third-party app called Disk Decipher that allows access to encrypted libraries from iOS.
8.3 How can I encrypt my files?
EagleFiler supports encryption at the library level. You can have multiple libraries, each of which is either encrypted or not encrypted. An encrypted library works just like a normal library except that all aspects of it (the files, notes, metadata, search indexes, and temporary files) are unreadable until the proper passphrase has been entered. Each encrypted library can have a different passphrase.
When creating a New Library…, the Encrypt library using passphrase option lets you store the library on an encrypted disk image. The entire library (including all the files, notes, and indexes) will be stored in a disk image file that is encrypted using AES-128 or AES-256.
You can choose the format and encryption level of the disk image:
- Sparse Disk Image
- Creates a .sparseimage file that’s compatible with macOS 10.4 and later.
- Sparse Bundle Disk Image
- Creates a .sparsebundle package that requires macOS 10.5 or later, but which is much more efficient for backups. Note: macOS does not support sparse bundle disk images on certain volume types, so in those cases you would need to use a sparse disk image even if you have a recent version of macOS.
- 128-bit AES Encryption
- Compatible with macOS 10.4 or later.
- 256-bit AES Encryption
- Requires macOS 10.5 or later. It is slower but even more secure than AES-128.
Maximum Library Size
An encrypted library will only consume the amount of disk space needed to hold its files, indexes, and temporary files. However, you must set a maximum library size that controls how large the library can grow. The larger the maximum size, the more overhead there is for encryption. For example, a library with a 1 GB maximum size will have about 26 MB of overhead, while a library with 500 GB maximum size will have about 111 MB of overhead.
If your library reaches the maximum size, you can resize the disk image or create a new, larger library and copy all of the files to it by following the instructions in the How can I rebuild a library? section.
Opening an Encrypted Library
To access the library, double-click the disk image file and enter the library’s passphrase. The library will appear as a white icon on your desktop, and you can double-click the .eflibrary file to open it in EagleFiler. (You can also access all the files in the library directly from the Finder.) When you’re done with the library, close it in EagleFiler and eject the library from your desktop to lock it again. Now it can only be accessed by people who know the passphrase. For more information, please see the Open Library… section.
When you’re done using an encrypted library, choose Close & Lock from the File menu.
Changing the Passphrase
To change the passphrase of an encrypted library, first close and eject the library. The passphrase of the .sparseimage or .sparsebundle file can be changed using DropDMG’s Change Image Passphrase… command.
(There is also a Change Password command in macOS’s Disk Utility, but it doesn’t seem to work on macOS 10.14 through 11.0. The hdiutil command in Terminal does work.)
Compacting an Encrypted Library
If you’ve removed files from an encrypted library, you can reclaim space on your hard disk by using DropDMG’s Compact Image… command to on the .sparseimage or .sparsebundle file.
Multiple Users
If you want to access the same encrypted library from multiple macOS user accounts, you may want to set macOS to ignore file ownership. Use Finder to Get Info on the library’s mounted disk image and then make sure that Ignore ownership on this volume is checked.
Notification Center and Privacy
EagleFiler normally posts to the system Notification Center when it has finished importing a batch of files. If your encrypted library contains files with sensitive names, you may wish to disable this feature so that the filenames are not visible in Notification Center or stored in its database. For more information, see DisableNotificationCenter in the esoteric preferences.
8.4 Where is my EagleFiler library?
There is no standard location for EagleFiler libraries. The library is stored in the folder that you chose when you used the New Library… command. Most people choose their Documents folder.
Normally, you don’t have to manually open your EagleFiler library. If Remember open libraries between launches is checked in the settings, when you quit EagleFiler (with a library window open), EagleFiler will automatically reopen it the next time you relaunch EagleFiler.
You can also re-open recent libraries using the File ‣ Open Recent command, the pop-up menu in the Drop Pad, or The Dock Menu.
If you library does not appear in the list of recents, you can find all your libraries by doing a search in the Finder for:
filename:.eflibrary
To move your library, please see the Library Folders section of the manual.
8.5 How can I rebuild a library?
An EagleFiler library might not open because the database file was corrupted by a crash or hardware failure. Or, the library may open, but it may have lots of missing files due to not following the rules for library folders. In such cases, your files are still there, and your metadata is available in EagleFiler’s XML backup. It is a simple matter to create a fresh EagleFiler library:
Rebuilding a Regular Library
- Close the library in EagleFiler.
- In the Finder, rename the library folder that contains your .eflibrary file, putting Old at the end of the name. (To find your library’s folder, see the Where is my EagleFiler library? section.)
- Use the New Library… command to create a new library with the same name and location as the original library folder (so that the two library folders end up next to each other).
- Close the library in EagleFiler.
- In the Finder, copy (Option-drag) the old library’s Files folder into the new library’s folder, replacing the folder with the same name.
- Open the new library in EagleFiler and wait until it finishes scanning for new files. This may take several minutes.
- Close the library.
- In the Finder, copy (Option-drag) the old library’s Smart Folders folder into the new library’s folder, replacing the folder with the same name.
- In the Finder, delete the old library’s folder.
- When you re-open the new library, you can browse and view your files right away. It may take a while for EagleFiler to reindex all the files. (See the How does indexing in EagleFiler work? section.)
Rebuilding an Encrypted Library
- Close & Lock the library in EagleFiler.
- In the Finder, rename the library’s disk image (the .sparsebundle or .sparseimage file), putting Old at the end of the name.
- Open the old disk image file and rename the mounted volume, putting Old at the end of the name.
- Use the New Library… command to create a new encrypted library with the same name and location as the original library (so that the two disk images end up next to each other).
- Close the library in EagleFiler, but keep the disk image mounted.
- In the Finder, copy (Option-drag) the old library’s Files folder into the new library’s mounted disk image, replacing the folder with the same name.
- Open the new library in EagleFiler and wait until it finishes scanning for new files. This may take several minutes.
- Close the library.
- In the Finder, copy (Option-drag) the old library’s Smart Folders folder into the new library’s mounted disk image, replacing the folder with the same name.
- Eject the old library’s disk image in the Finder, and then delete the disk image file.
- When you re-open the new library, you can browse and view your files right away. It may take a while for EagleFiler to reindex all the files. (See the How does indexing in EagleFiler work? section.)
Symlinks
If you’ve replaced any folders in your EagleFiler library with symlinks to other folders, the linked folders’ contents will not automatically be imported when rebuilding the library as described above. You should first replace each symlink in Finder with an empty folder, rebuild the library, replace each empty folder with the desired symlink, and then choose Scan for New Files.
8.6 How can I run optical character recognition (OCR) on my PDFs?
If you’re trying to run a paperless office, the first step is getting your papers scanned into your Mac.
We recommend Fujitsu ScanSnap scanners as the easiest way to create a multi-page PDF from a stack of papers. The ScanSnap software has a built-in OCR feature, as described in the Importing From a Scanner section.
ExactScan and ViewScan also offer software that can perform OCR and works with many different types of scanners.
If your scanner software does not automatically do OCR, the second step is to use optical character recognition (OCR) to make the text in the scanned PDFs searchable and selectable.
On macOS 13 and later, EagleFiler automatically uses Live Text to make scanned text selectable and copyable.
You can also use third-party software to perform OCR and bake a text layer into the PDF. This will make the text selectable, copyable, and also searchable. There are many apps that can do this. We have some scripts to help automate the process:
You can also use apps such as PDF Gear and PDF Owl and the open-source Tesseract.
See also the Importing From a Scanner section.
8.7 How can I move messages between mailboxes?
In order to improve performance and make more efficient use of disk space, EagleFiler prefers to store e-mail messages in mailbox files (using the standard “mbox” format), and it does not allow them to be moved from one mailbox to another. Thus, it is best to organize messages into the mailboxes that you want (and to delete messages that you don’t want to save) before importing them into EagleFiler. Nevertheless, several organization options are available once your messages are in an EagleFiler library:
- You can merge multiple mailboxes into one. For example, if each month you import mailbox A into EagleFiler, you’ll end up with lots of A mailboxes in the library, each containing one month’s worth of messages. By merging all of the A mailboxes into one, you can reduce visual clutter and make EagleFiler run more efficiently.
- You can drag messages from mailboxes to folders. This deletes the messages from the mailbox and stores the messages as individual .eml files in the folder. This is not as efficient as storing one file per mailbox, but it allows for more flexible organization.
- You can organize messages (from different mailboxes) into tag sources. As with playlists in iTunes, each message can be in more than one tag source at a time.
- The easiest way to avoid storing duplicate messages is to delete messages in your mail program after you’ve imported them into EagleFiler. You can also delete individual messages from an EagleFiler mailbox, although this will not save disk space; it will only hide the messages from view.
8.8 How can I copy my tags to another library?
Once you’ve created some tags and set them up the way you want, it’s easy to use them in another library:
- Create a new RTF file and select it.
- Open the Tags window and check all the checkboxes to assign the desired tags to the file.
- Drag the file into the other library.
EagleFiler will transfer the tags (along with their abbreviations, colors, and hierarchy) to the other library. This is really just a special case of a general EagleFiler feature that metadata (tags, notes, titles, etc.) are preserved when copying files between libraries.
8.9 How do Finder tags work with EagleFiler?
macOS 10.9 and later have built-in support tags in the Finder and other applications. EagleFiler syncs its tags with the system automatically. Each file has the same tags in EagleFiler and the Finder, and the tags are searchable in Spotlight.
Tag Syncing
- When you import a file into EagleFiler, it imports that file’s Finder tags as well.
- If you assign or unassign tags in EagleFiler, the Finder tags update right away.
- If you assign or unassign tags in the Finder, the tags update in EagleFiler when you view the file or when you use the Backup Metadata command. EagleFiler also updates the tags automatically when you open the library and periodically after it’s open.
- If you rename a tag in EagleFiler, EagleFiler renames the Finder tags on each file.
- EagleFiler’s database acts as a backup for the Finder tags, which are somewhat fragile due to the way they are stored. If the Finder tags are lost (e.g. when transferring a file over a network, editing a file with an application that doesn’t support tags, or backing up using a product that doesn’t support extended attributes), EagleFiler will automatically restore the tags from the database the next time you open the library.
Differences Between Tags in EagleFiler and Finder
- EagleFiler tags are supported on macOS 10.7 and later. macOS 10.7 through 10.8 do not have built-in support for tags, but EagleFiler uses OpenMeta to share tags with other applications on those systems. Finder tags require macOS 10.9 or later.
- EagleFiler tags can be organized into a hierarchy; Finder tags are all at the same level.
- EagleFiler tags can have abbreviation symbols (including Emoji); Finder tags do not have abbreviations.
- Each EagleFiler library has its own list of tags, so that you only see tags that are relevant to the task at hand; Finder uses the same tags for the whole Mac.
- EagleFiler tags can have any color; Finder tags have a fixed set of seven available colors. EagleFiler does not sync its tag colors with Finder.
- EagleFiler has separate controls for setting a file’s colored label and its tags; Finder changes the label color when you change the tags.
- EagleFiler does not allow certain characters in tag names; any Finder tags that use such characters will be converted to valid EagleFiler tag names. Allowed characters include letters and numbers, spaces, and basic punctuation.
- EagleFiler lets you create multiple tags whose names differ only by case; Finder does not, so such tags will not be visible in the Finder.
- EagleFiler always shows tags in alphabetical order.
Disabling Tag Syncing
Some people prefer not to sync their EagleFiler tags to the Finder. Syncing takes time, which may not be worth it if you rarely use tags in other applications. Or, you may prefer not to see your EagleFiler tag names when adding tags in the Finder if you only use those tags in EagleFiler.
To disable tag syncing for all libraries, click here. To re-enable tag syncing, click here.
You can also disable tag syncing only for certain libraries by specifying their filenames (without the .eflibrary) using this Terminal command:
defaults write com.c-command.EagleFiler DisableTagSyncingForLibraryNames -array "MyLibrary" "SecretLibrary"
8.10 How does indexing in EagleFiler work?
EagleFiler maintains indexes in order to quickly search the contents of your library. EagleFiler can search thousands of records in a fraction of a second since it only needs to read the optimized index files, not the files for each individual record. The types of searches and their syntax are described in the Searching section. Normally, indexing is not something that you need to worry about, since EagleFiler handles it automatically. This section describes how indexing works in case you need to customize it or fix a problem.
What’s Indexed
EagleFiler indexes the text contents of all the files, e-mail messages, and notes in your library. This includes text that Spotlight wouldn’t see, such as files attached to e-mail messages, invisible Web content, PDF annotations, and Skim notes attached to PDF files. EagleFiler has built-in support for indexing common file formats. It also supports custom file formats via Spotlight importer plug-ins.
Index Storage
As shown in the Library Folders section, each EagleFiler library has a .eflibrary package. The indexes for the library are stored inside this package. This means that:
- If the library is encrypted, the indexes are as well.
- The indexes are always with the library. Unlike Spotlight, EagleFiler indexes do not need to be rebuilt when files are copied or synced from one Mac to another.
- The indexes do not need to be rebuilt when restoring from a backup.
- Searching is faster than with Spotlight since EagleFiler only has to search the index for your library, rather than the index for your whole hard drive.
You may prefer to exclude EagleFiler’s indexes from backups in order to save disk space or bandwidth. To exclude the indexes from Time Machine backups, use the ExcludeIndexesFromBackup option in the Esoteric Preferences. To exclude the indexes from other types of backups, set your backup software to skip files whose names end with .efindex or .efmailtoc.
Updating Indexes
In order for your searches to be accurate, EagleFiler needs to make sure that the index is updated whenever the contents of a file changes:
- When you import a new file, EagleFiler indexes it automatically.
- When you edit a file in EagleFiler, it automatically reindexes that file right away.
- When you edit a file in another application and view it in EagleFiler, it also reindexes the file.
Each time you open a library, EagleFiler scans all of the files to make sure they are up-to-date in the index. This allows EagleFiler to detect files that were modified outside of EagleFiler and also complete any indexing work that was in progress when you closed the library. Usually, most of the files were already indexed, so this scan does not take very long.
Mailbox files are not editable, so EagleFiler knows that the messages in them never change. Once a mailbox has been completely indexed, EagleFiler marks the mailbox as done. This speeds up opening the library, since EagleFiler will not have to check whether each message is up-to-date in the index. Additionally, the index file is treated as read-only so that it will not need to be recopied during a backup or sync.
Word vs. Phrase Indexing
When rebuilding an index (see below) you can choose (per-library) whether EagleFiler should index words or phrases. Indexing for word searches is much faster, but searching for multiple words will find all the documents that contain those words anywhere in the document. Indexing for phrase searches lets you search for a group of words that appear near each other in a document, however indexing will take longer and the index files will be several times as large. Phrase indexing is the default.
Rebuilding Indexes
If you hold down the Command and Option keys when opening a library, EagleFiler will show the Rebuild Indexes dialog. When you rebuild an index, EagleFiler deletes the old index file and builds a new one from scratch. This may take a long time, but it can be useful because:
- If the index was damaged, it will be replaced by a fresh index. A damaged index can cause indexing to hang, cause EagleFiler to crash when searching, or prevent searches from finding the records that they should.
- It compacts and defragments the index, which reduces disk usage and speeds up searches. This is especially useful if you’ve deleted a lot of files from the library.
- All the records will be reindexed using the latest version of EagleFiler. Newer versions of EagleFiler support more file formats and index the files more completely.
- It lets you switch between word and phrase indexing (see above).
Damaged Indexes
If EagleFiler is unable to open an index, it treats it as damaged. It will move the old index file to the Damaged folder inside the Indexes folder in the .eflibrary package and log the error to Console. Then it will create a new index file and begin rebuilding it.
If you believe that the index file was not actually damaged, you can close the library in EagleFiler and move the index file back out of the Damaged folder. Otherwise, you can delete the files in the Damaged folder to save disk space.
Excluding Files From Indexing
Occasionally, a file may be unreadable by EagleFiler or damaged such that it causes the indexer to hang or crash. To prevent such files from causing problems for the rest of your library, you can exclude them from indexing. You can exclude a file from indexing by assigning it the ef_noindex tag. If you assign a folder the ef_noindex tag, none of its files or subfolders will be indexed, either.
It is also possible to exclude certain filenames and extensions from indexing, to work around buggy Spotlight importers. For example, this command will exclude the file foo.xls:
defaults write com.c-command.EagleFiler SpotlightImporterSkippedNames -array-add foo.xls
and this command will exclude all .xls files:
defaults write com.c-command.EagleFiler SpotlightImporterSkippedExtensions -array-add xls
You can exclude files attached to e-mail messages from indexing by entering their names using Terminal. For example, the command:
defaults write com.c-command.EagleFiler UnindexedAttachmentNames -array "smime.p7s" "PGP.sig"
will tell EagleFiler not to index files named smime.p7s or PGP.sig. The command:
defaults write com.c-command.EagleFiler UnindexedAttachmentExtensions -array dwg
will tell EagleFiler not to index files with type .dwg. This can be useful for working around a slow or buggy Spotlight importer plug-in.
Either can also speed up indexing if you know that you will never want to search the contents of attachments with those names.
Troubleshooting
Hangs During Indexing
If EagleFiler hangs during indexing, you can use Activity Monitor to record what EagleFiler and its helper processes are doing. The eftexttool process is in charge of reading files to extract their text content. The efindextool process is in charge of updating the index files for your library. (These may appear in Activity Monitor as WashFramework.) Please see Sending in a “Sample” Report for more information. The information in the sample report will show what EagleFiler was doing and perhaps which file it was working on.
Reindexing Due to New Files Being Created
One case to be aware of is that if you copy your entire library (or sync it to a new Mac with Dropbox or restore it from backup) the filesystem will show that the files have been touched (the “attribute modification date” or “ctime” has changed), so EagleFiler will go through and reindex all of the files. However, the files will be fully searchable during this reindexing because the old index entries are still in place until they are updated.
To change the default behavior so that EagleFiler ignores the “attribute modification date” for indexing purposes, click here; or click here to restore it.
Unexpected Reindexing
If EagleFiler seems to be reindexing your files and you don’t know why, it may help to enable debug logging to Console. For example, the log may show that certain files had never been indexed or that they were in the index but had since been modified. It can also reveal when a particular file, or type of file, is taking a long time to index. To enable logging for file indexing, click here; to disable it, click here. To enable logging for message indexing, click here; to disable it, click here.
Disabling Indexing
If you want to entirely disable indexing for all files, click here; to re-enable it, click here.
Slow Searches or Indexing
Indexed searches in EagleFiler are normally very fast, but they can be slowed down by large numbers of mailboxes, certain unusual queries, or fragmented index files.
- To enable logging for checking how fast your searches are, click here; to disable it, click here.
- To enable logging for checking whether phrase indexing is active and how many documents are in each index, click here; to disable it, click here.
- To enable logging for checking how fragmented the index files are, click here; to disable it, click here. Note that having this option enabled will make it take longer to open or search a library. Index files can be defragmented using a utility such as Drive Genius.
- To record what EagleFiler is doing during a slow search, so that we can look into the cause of the slowness, please see the Sending in a “Sample” Report section.
Not Finding Files
If an indexed search is not finding a file that you think it should, first create a new test library and import the file into it. If the file is findable in the test library, you probably just need to rebuild the indexes of your main library. Otherwise, you can report the test library to technical support.
8.11 Why does EagleFiler import the wrong Web page when I press the capture key?
Some Web pages cannot be loaded only by URL. These pages require session state, e.g. entering a password, logging in, and then clicking a link to get to the page. When you try to capture one of these pages, EagleFiler will import the site’s login page, since that’s what the server produces when EagleFiler requests the URL. (An easy way to see that this has happened is to set Notification Center to show EagleFiler’s notifications as banners so you can see the thumbnail preview of each Web page that you capture, to check whether it looks right.)
To import these types of pages, see the Private Web Pages section.
8.12 How can I speed up EagleFiler?
Getting a faster Mac, a faster hard disk (or SSD), or more RAM would of course make everything faster, but there are also some less expensive ways to speed up EagleFiler:
- EagleFiler is designed to perform best when it is kept running, with a library open. It will be faster to leave it running (perhaps hidden) in the background than to open and close it each time you add a file to the library. You can easily hide EagleFiler by holding down the Option key as you click to switch to another application. Additionally, leaving EagleFiler running will allow you to use its capture key.
- Importing files by dragging them directly into the library’s Files folder and then using Scan for New Files is faster than other methods because it avoids copying the files. Also, this method (as well as the To Import folder) do not require you to wait for EagleFiler to launch and the library to open.
- EagleFiler is designed to support multi-gigabyte libraries with many thousands of files. However, as with all software, viewing a library (or folder) with fewer files in it will generally be faster than viewing one with many. (The sizes of the files don’t have much effect on EagleFiler’s performance.) EagleFiler lets you create multiple libraries, so one way to increase performance is to use several smaller libraries instead of one huge one. This can also provide an additional level of organization.
- Fewer large mailboxes are generally faster than many small ones. You can combine multiple mailboxes using the Merge Mailboxes command.
- Leave e-mail messages in their mailboxes rather than dragging them out into folders (which converts them to individual files). You can merge .eml files back into a mailbox using the Merge Message Files command.
- Emptying EagleFiler’s trash will reduce the number of records in the library, and thus speed it up.
- Importing files is faster when nothing is selected in the source list, as many sources as possible are hidden or collapsed, and the Activity window is closed.
- In order to enable quick searching, EagleFiler maintains indexes of all the files and e-mail messages in a library. By default, EagleFiler indexes for phrase searches. This allows the most flexible searching, but indexing can take a lot of time and disk space. If you don’t need to do phrase searches, you can rebuild the indexes for word searching. This will reduce the size of the indexes and speed up indexing going forward. The How does indexing in EagleFiler work? section has more information about speeding up indexing and searches.
- Viewing search results in large documents will be faster if you turn off search match highlighting.
- When EagleFiler opens a library, it checks to make sure all of the files are present, backs up the metadata, and copies the tags to the Spotlight comments. You can hold down the Shift key when opening the library to skip these steps, or click the × buttons in the Activity window to cancel them.
- Displaying and scrolling the records list will be faster if you tell EagleFiler not to calculate folder sizes.
- Opening a library will be faster if the selected source (when you closed the library) does not contain many files. For example, if you had Records selected, and it was sorted by modification date, EagleFiler would have to load all the files (and possibly all the e-mail messages) and look up their modification dates. If a subfolder (or no source at all) were selected, the library would open more quickly because EagleFiler would initially only have to load the contents of that folder.
- When creating a smart folder, put the most restrictive criteria higher in the list. Use the Search inside pop-up menu and checkboxes to restrict the search as much as possible.
- Searching is faster if you tell EagleFiler to search for whole words rather than partial words, i.e. uncheck Match Partial Words in the search menu.
- Searching is faster if EagleFiler’s index files (the .efindex files inside the .eflibrary package) have been defragmented using a utility such as iDefrag.
- Uncheck Copy tags to Spotlight comments.
8.13 Why doesn’t my serial number work?
You need to enter the serial name and serial number exactly as they appear on your order confirmation e-mail. If you no longer have this e-mail, you can look up the name and number. Launch EagleFiler and choose Purchase from the EagleFiler menu. Then click the Look Up My Serial Number button.
8.14 Should I download EagleFiler from this free site?
No. We only recommend downloading EagleFiler from https://c-command.com and from reputable download sites such as Apple and MacUpdate. The SHA-256 hashes for all our current apps are available on the Downloads page. The C-Command Store lists all the vendors that are authorized to sell EagleFiler. Downloads from other sites may include adware or viruses.
The following sites:
DropDMG.downloads4mac.com
DropDMG.install4mac.com
DropDMG.macsoftware.com
DropDMG.onFreeDownload.com
EagleFiler.downloads4mac.com
EagleFiler.install4mac.com
EagleFiler.macsoftware.com
EagleFiler.onFreeDownload.com
SpamSieve.downloads4mac.com
SpamSieve.install4mac.com
SpamSieve.macsoftware.com
SpamSieve.onFreeDownload.com
are not authorized to distribute our software. They have been a source of confusion because they often appear in ads at the top of search results for Bing, DuckDuckGo, and Yahoo. We do not recommend downloading from these sites. In many cases, they will say that they are offering an “official” copy of EagleFiler that is anything but. In fact, the installer asks for your administrator password, installs adware, and makes other changes that may damage your Mac.
We do not offer apps for download on github.com.
CNET’s Download.com offers a Direct Download Link, which is valid; however it also offers a more prominent Download Now Installer Enabled link, which we do not recommend. The CNET installer installs toolbar adware and changes browser settings. This page explains how you can remove the toolbar.
8.15 How can I open the Library folder?
The user library folder is stored at the path /Users/<username>/Library/. The way to access it is different depending on which version of macOS you are using:
macOS 10.12.3 and Later
The Library folder is hidden by default. To open it, click on Finder in the Dock. Click on the Go menu at the top of the screen, hold down the Option and Shift keys, and then choose Library. (Only one of Option and Shift is needed, but due to an OS bug, which one you need to hold down can vary. Thus, it is easier to hold down both.)
Another way to access the Library folder is to choose Home from the Go menu, then type Command-Shift-Period to show invisible files, and then open the Library folder.
Mac OS X 10.7 Through 10.12.2
The Library folder is hidden by default. To open it, click on Finder in the Dock. Click on the Go menu at the top of the screen, hold down the Option key, and then choose Library.
Another option is to go to your home folder, choose View ‣ Show View Options and then make sure that Show Library Folder is checked.
Mac OS X 10.6
Click on Finder in the Dock, click on the Go menu, and choose Home. This will show your home folder, and you can open the Library folder directly.
8.16 How can I back up my EagleFiler data?
All the information for an EagleFiler library is stored in the library folder that you created when you used the New Library… command. (See also the Where is my EagleFiler library? section.) Simply make sure that your backup software is set to include your library folder. There are also various ways that you can sync a library folder to the cloud.
Note: If you are using an encrypted library and want to back it up in encrypted form, you should instead back up the .sparsebundle or .sparseimage file and make sure that the library is locked/ejected when you do the backup.
Additionally, you should back up EagleFiler’s support files in the folder:
/Users/<username>/Library/Application Support/EagleFiler/
and its preferences file:
/Users/<username>/Library/Preferences/com.c-command.EagleFiler.plist
To access these items, see How can I open the Library folder?.
8.17 What information should I include when I report a problem?
It will be faster and easier to help you if your e-mail includes the following information:
- The version of macOS that you are using
- Click on the Apple menu and choose About This Mac.
- The version of EagleFiler that you are using
- Click on the EagleFiler menu and choose About EagleFiler. (Please do not say “the latest version,” as this is ambiguous.)
- Do you have the Mac App Store version?
- Click on the EagleFiler menu and choose About EagleFiler. It will say “Mac App Store” at the bottom of the window.
- Specific error information
- Please see Sending in an Error Report.
- If something isn’t working as you expect
- Please describe what you did, what happened, and what you expected to happen instead. If possible, take a screenshot or two that illustrate the problem (see Sending in Screenshots).
- If EagleFiler hangs or freezes
- Please see Sending in a “Sample” Report.
8.17.1 Sending in an Error Report
If an error window appeared on your screen, please include the exact text of the error message in your e-mail. (It may help to use Copy and Paste.)
Please also send in any errors that were reported in the system log:
- From EagleFiler’s Help menu, choose Save Diagnostic Report… at the bottom. (If you can’t launch EagleFiler to access its Help menu, see below.)
- Choose a location such as your desktop and click Save. Saving the report may take a minute or so.
- Create an e-mail to eaglefiler@c-command.com and drag the Diagnostic Report.tbz file into the e-mail message to include it as an attachment/enclosure. (Do not post it in the forum or in reply to a forum e-mail.) If the file is too large to e-mail, you can share a link using iCloud Drive or Dropbox or use the C-Command Forum to send it to us via private message.
If you can’t launch EagleFiler, you can access the log directly (if you’re using macOS 10.15 or later), rather than using the automated diagnostic reporter:
- Click on Finder in the Dock.
- Open the Library folder, as described in the How can I open the Library folder? section.
- Open the Logs folder.
- Open the “EagleFiler” folder.
- Find the App Log.log file and attach it to your e-mail message.
8.17.2 Sending in Screenshots
To take a screenshot, hold down the Command and Shift keys and press the number 4. Then use the mouse to select the area of the screen that you want to take a picture of. This will create a file called Screen Shot <date> at <time>.png on your desktop. Pressing the keys again will create Screen Shot <date> at <new time>.png, etc.
You can also take screenshots using the File ‣ Take Screenshot command in the Preview application.
To send in screeenshots, drag the files into your e-mail window to attach them to your message. If you’re using Apple Mail, be sure to set the Image Size pop-up menu at the bottom of the message window to Actual Size.
8.17.3 Sending in a “Sample” Report
If an app is slow, hangs (e.g. with a spinning beachball), or freezes, a “sample” report can record what your Mac was doing in order to locate the source of the problem. Depending on which app is slow or not responding, you may want to record samples from EagleFiler, Apple Mail, and/or another app.
- Click on Finder in the Dock.
- From the Go menu, choose Utilities.
- Double-click the Activity Monitor program.
- Select the app in the Activity Monitor window.
- Do whatever it is in the app that causes the slowness, hang, or freeze. Immediately, click on Activity Monitor in the Dock and choose Sample Process from the View menu.
- After Activity Monitor has finished taking the sample, click the Save… button in the “Sample of <App>” window. Save the file to your desktop and then include it in your e-mail message to eaglefiler@c-command.com as an attachment. (Please do not copy and paste the text from the Activity Monitor window.)
8.17.4 Sending in Crash Log Files
If EagleFiler itself crashes, the EagleFiler Crash Reporter window should automatically come up. Make sure that you enter a valid e-mail address and then click the Send Report button.
If your mail program (or a helper process such as eftexttool) crashes, you’ll need to send in the crash log file manually.
Crash logs are stored in the folder:
/Users/<username>/Library/Logs/DiagnosticReports/
First click on the Finder in the Dock, then click on the Go menu, and hold down the Option key as you choose Library. Open the Logs folder, then DiagnosticReports.
Once you’ve opened the DiagnosticReports folder, find the most recent crash log file for the app that crashed and add it to your e-mail message to eaglefiler@c-command.com as an attachment.
The crash log file’s name will end with either .crash or .ips. It may be in the DiagnosticReports folder or in the Retired folder inside of DiagnosticReports.
9 Legal Stuff
Copyright and Trademarks
EagleFiler and this manual are copyright © 2002–2026 by C-Command Software, LLC. All rights reserved.
EagleFiler is a trademark of C-Command Software, LLC. Mac is a registered trademark of Apple Computer. All other products mentioned are trademarks of their respective owners.
End User License Agreement
CAREFULLY READ THE FOLLOWING LICENSE AGREEMENT. YOU ACCEPT AND AGREE TO BE BOUND BY THIS LICENSE AGREEMENT BY DOWNLOADING AND INSTALLING THE PROGRAM. IF YOU DO NOT AGREE TO THIS LICENSE, THEN DO NOT DOWNLOAD AND INSTALL THE PROGRAM, AND REMOVE THE SOFTWARE FROM YOUR COMPUTER.
License Grant
“You” means the person or company who is being licensed to use the Software or Documentation. “We,” “us” and “our” means C-Command Software, LLC.
We hereby grant you a nonexclusive license to use one copy of the Software on any single computer, or on multiple computers only used by a single person. The Software is “in use” on a computer when it is loaded into temporary memory (RAM) or installed into the permanent memory of a computer—for example, a hard disk or other storage device.
Title
We remain the owner of all right, title and interest in the Software and related explanatory written materials (“Documentation”).
Archival or Backup Copies
You may copy the Software for backup and archival purposes, provided that the original and each copy is kept in your possession and that your installation and use of the Software does not exceed that allowed in the “License Grant” section above.
Things You May Not Do
The Software and Documentation are protected by United States copyright laws and international treaties. You must treat the Software and Documentation like any other copyrighted material—for example, a book. You may not:
- copy the Documentation,
- copy the Software except to make archival or backup copies as provided above,
- sublicense, rent, lease or lend any portion of the Software or Documentation.
Transfers
You may transfer all your rights to use the Software and Documentation to another person or legal entity provided you transfer this Agreement, the Software and Documentation, including all copies, updates and prior versions to such person or entity and that you retain no copies, including copies stored on computer.
Limited Warranty
The software is provided “as is,” without warranty of any kind, express or implied, including but not limited to the warranties of merchantability, fitness for a particular purpose and noninfringement. In no event shall the authors or copyright holders be liable for any claim, damages or other liability, whether in an action of contract, tort or otherwise, arising from, out of or in connection with the software or the use or other dealings in the software. No employee, agent, dealer or distributor of ours is authorized to modify this limited warranty, nor to make any additional warranties.
Term and Termination
This license agreement takes effect upon your use of the software and remains effective until terminated. You may terminate it at any time by destroying all copies of the Software and Documentation in your possession. It will also automatically terminate if you fail to comply with any term or condition of this license agreement. You agree on termination of this license to destroy all copies of the Software and Documentation in your possession.
General Provisions
- This written license agreement is the exclusive agreement between you and us concerning the Software and Documentation and supersedes any prior purchase order, communication, advertising or representation concerning the Software.
- This license agreement may be modified only by a writing signed by you and us.
- This license agreement is governed by the laws of the State of New Hampshire.
- You agree that the Software will not be shipped, transferred or exported into any country or used in any manner prohibited by the United States Export Administration Act or any other export laws, restrictions or regulations.
Components
The following open-source components are used in EagleFiler:
- Regular expression support is provided by the PCRE library package, which is open source software, written by Philip Hazel, and copyright by the University of Cambridge, England.
- CwlDemangle.swift is Copyright © 2017 Matt Gallagher and is available under the Apache License v2.0 with Runtime Library Exception.
- Thanks to Allan Odgaard for some code snippets that are used in the Software Update installer.
Canon DOS D30 (no focus).wav: Copyright © 2007 FreqMan, used under the terms of the Creative Commons Attribution License. Modified by Michael Tsai.
libffi: Copyright © 1996-2003 Red Hat, Inc.
Permission is hereby granted, free of charge, to any person obtaining a copy of this software and associated documentation files (the “Software”), to deal in the Software without restriction, including without limitation the rights to use, copy, modify, merge, publish, distribute, sublicense, and/or sell copies of the Software, and to permit persons to whom the Software is furnished to do so, subject to the following conditions:
The above copyright notice and this permission notice shall be included in all copies or substantial portions of the Software.
THE SOFTWARE IS PROVIDED “AS IS”, WITHOUT WARRANTY OF ANY KIND, EXPRESS OR IMPLIED, INCLUDING BUT NOT LIMITED TO THE WARRANTIES OF MERCHANTABILITY, FITNESS FOR A PARTICULAR PURPOSE AND NONINFRINGEMENT. IN NO EVENT SHALL CYGNUS SOLUTIONS BE LIABLE FOR ANY CLAIM, DAMAGES OR OTHER LIABILITY, WHETHER IN AN ACTION OF CONTRACT, TORT OR OTHERWISE, ARISING FROM, OUT OF OR IN CONNECTION WITH THE SOFTWARE OR THE USE OR OTHER DEALINGS IN THE SOFTWARE.
MailTagsImporter: Copyright © 2018 SmallCubed. All rights reserved.
PyObjC: Copyright 2002, 2003 - Bill Bumgarner, Ronald Oussoren, Steve Majewski, Lele Gaifax, et.al.
Permission is hereby granted, free of charge, to any person obtaining a copy of this software and associated documentation files (the “Software”), to deal in the Software without restriction, including without limitation the rights to use, copy, modify, merge, publish, distribute, sublicense, and/or sell copies of the Software, and to permit persons to whom the Software is furnished to do so, subject to the following conditions:
The above copyright notice and this permission notice shall be included in all copies or substantial portions of the Software.
THE SOFTWARE IS PROVIDED “AS IS”, WITHOUT WARRANTY OF ANY KIND, EXPRESS OR IMPLIED, INCLUDING BUT NOT LIMITED TO THE WARRANTIES OF MERCHANTABILITY, FITNESS FOR A PARTICULAR PURPOSE AND NONINFRINGEMENT. IN NO EVENT SHALL THE AUTHORS OR COPYRIGHT HOLDERS BE LIABLE FOR ANY CLAIM, DAMAGES OR OTHER LIABILITY, WHETHER IN AN ACTION OF CONTRACT, TORT OR OTHERWISE, ARISING FROM, OUT OF OR IN CONNECTION WITH THE SOFTWARE OR THE USE OR OTHER DEALINGS IN THE SOFTWARE.
-
- This LICENSE AGREEMENT is between the Python Software Foundation (“PSF”), and the Individual or Organization (“Licensee”) accessing and otherwise using this software (“Python”) in source or binary form and its associated documentation.
- Subject to the terms and conditions of this License Agreement, PSF hereby grants Licensee a nonexclusive, royalty-free, world-wide license to reproduce, analyze, test, perform and/or display publicly, prepare derivative works, distribute, and otherwise use Python alone or in any derivative version, provided, however, that PSF’s License Agreement and PSF’s notice of copyright, i.e., “Copyright © 2001, 2002, 2003, 2004, 2005, 2006 Python Software Foundation; All Rights Reserved” are retained in Python alone or in any derivative version prepared by Licensee.
- In the event Licensee prepares a derivative work that is based on or incorporates Python or any part thereof, and wants to make the derivative work available to others as provided herein, then Licensee hereby agrees to include in any such work a brief summary of the changes made to Python.
- PSF is making Python available to Licensee on an “AS IS” basis. PSF MAKES NO REPRESENTATIONS OR WARRANTIES, EXPRESS OR IMPLIED. BY WAY OF EXAMPLE, BUT NOT LIMITATION, PSF MAKES NO AND DISCLAIMS ANY REPRESENTATION OR WARRANTY OF MERCHANTABILITY OR FITNESS FOR ANY PARTICULAR PURPOSE OR THAT THE USE OF PYTHON WILL NOT INFRINGE ANY THIRD PARTY RIGHTS.
- PSF SHALL NOT BE LIABLE TO LICENSEE OR ANY OTHER USERS OF PYTHON FOR ANY INCIDENTAL, SPECIAL, OR CONSEQUENTIAL DAMAGES OR LOSS AS A RESULT OF MODIFYING, DISTRIBUTING, OR OTHERWISE USING PYTHON, OR ANY DERIVATIVE THEREOF, EVEN IF ADVISED OF THE POSSIBILITY THEREOF.
- This License Agreement will automatically terminate upon a material breach of its terms and conditions.
- Nothing in this License Agreement shall be deemed to create any relationship of agency, partnership, or joint venture between PSF and Licensee. This License Agreement does not grant permission to use PSF trademarks or trade name in a trademark sense to endorse or promote products or services of Licensee, or any third party.
- By copying, installing or otherwise using Python, Licensee agrees to be bound by the terms and conditions of this License Agreement.
-
Copyright (c) 2006, contributors to ShortcutRecorder. (See the contributors.)
All rights reserved. Redistribution and use in source and binary forms, with or without modification, are permitted provided that the following conditions are met:
- Redistributions of source code must retain the above copyright notice, this list of conditions and the following disclaimer.
- Redistributions in binary form must reproduce the above copyright notice, this list of conditions and the following disclaimer in the documentation and/or other materials provided with the distribution.
- The name of the contributors may not be used to endorse or promote products derived from this software without specific prior written permission.
THIS SOFTWARE IS PROVIDED BY THE CONTRIBUTORS “AS IS” AND ANY EXPRESS OR IMPLIED WARRANTIES, INCLUDING, BUT NOT LIMITED TO, THE IMPLIED WARRANTIES OF MERCHANTABILITY AND FITNESS FOR A PARTICULAR PURPOSE ARE DISCLAIMED. IN NO EVENT SHALL THE CONTRIBUTORS BE LIABLE FOR ANY DIRECT, INDIRECT, INCIDENTAL, SPECIAL, EXEMPLARY, OR CONSEQUENTIAL DAMAGES (INCLUDING, BUT NOT LIMITED TO, PROCUREMENT OF SUBSTITUTE GOODS OR SERVICES; LOSS OF USE, DATA, OR PROFITS; OR BUSINESS INTERRUPTION) HOWEVER CAUSED AND ON ANY THEORY OF LIABILITY, WHETHER IN CONTRACT, STRICT LIABILITY, OR TORT (INCLUDING NEGLIGENCE OR OTHERWISE) ARISING IN ANY WAY OUT OF THE USE OF THIS SOFTWARE, EVEN IF ADVISED OF THE POSSIBILITY OF SUCH DAMAGE.
-
Copyright (c) 2008, Christiaan Hofman and contributors
All rights reserved.
Redistribution and use in source and binary forms, with or without modification, are permitted provided that the following conditions are met:
Redistributions of source code must retain the above copyright notice, this list of conditions and the following disclaimer.
Redistributions in binary form must reproduce the above copyright notice, this list of conditions and the following disclaimer in the documentation and/or other materials provided with the distribution.
Neither the name of Christiaan Hofman nor the names of any other contributors may be used to endorse or promote products derived from this software without specific prior written permission.
THIS SOFTWARE IS PROVIDED BY THE COPYRIGHT HOLDERS AND CONTRIBUTORS “AS IS” AND ANY EXPRESS OR IMPLIED WARRANTIES, INCLUDING, BUT NOT LIMITED TO, THE IMPLIED WARRANTIES OF MERCHANTABILITY AND FITNESS FOR A PARTICULAR PURPOSE ARE DISCLAIMED. IN NO EVENT SHALL THE COPYRIGHT OWNER OR CONTRIBUTORS BE LIABLE FOR ANY DIRECT, INDIRECT, INCIDENTAL, SPECIAL, EXEMPLARY, OR CONSEQUENTIAL DAMAGES (INCLUDING, BUT NOT LIMITED TO, PROCUREMENT OF SUBSTITUTE GOODS OR SERVICES; LOSS OF USE, DATA, OR PROFITS; OR BUSINESS INTERRUPTION) HOWEVER CAUSED AND ON ANY THEORY OF LIABILITY, WHETHER IN CONTRACT, STRICT LIABILITY, OR TORT (INCLUDING NEGLIGENCE OR OTHERWISE) ARISING IN ANY WAY OUT OF THE USE OF THIS SOFTWARE, EVEN IF ADVISED OF THE POSSIBILITY OF SUCH DAMAGE.
vobject: Copyright (c) 2004-2006 Jeffrey Harris. All rights reserved.
Redistribution and use in source and binary forms, with or without modification, are permitted provided that the following conditions are met:
- Redistributions of source code must retain the above copyright notice, this list of conditions and the following disclaimer.
- Redistributions in binary form must reproduce the above copyright notice, this list of conditions and the following disclaimer in the documentation and/or other materials provided with the distribution.
- The end-user documentation included with the redistribution, if any, must include the following acknowledgment: “This product includes software developed by the Apache Software Foundation (http://www.apache.org/).” Alternately, this acknowledgment may appear in the software itself, if and wherever such third-party acknowledgments normally appear.
- The names “Apache” and “Apache Software Foundation” must not be used to endorse or promote products derived from this software without prior written permission. For written permission, please contact apache@apache.org.
- Products derived from this software may not be called “Apache”, nor may “Apache” appear in their name, without prior written permission of the Apache Software Foundation.
THIS SOFTWARE IS PROVIDED “AS IS” AND ANY EXPRESSED OR IMPLIED WARRANTIES, INCLUDING, BUT NOT LIMITED TO, THE IMPLIED WARRANTIES OF MERCHANTABILITY AND FITNESS FOR A PARTICULAR PURPOSE ARE DISCLAIMED. IN NO EVENT SHALL THE APACHE SOFTWARE FOUNDATION OR ITS CONTRIBUTORS BE LIABLE FOR ANY DIRECT, INDIRECT, INCIDENTAL, SPECIAL, EXEMPLARY, OR CONSEQUENTIAL DAMAGES (INCLUDING, BUT NOT LIMITED TO, PROCUREMENT OF SUBSTITUTE GOODS OR SERVICES; LOSS OF USE, DATA, OR PROFITS; OR BUSINESS INTERRUPTION) HOWEVER CAUSED AND ON ANY THEORY OF LIABILITY, WHETHER IN CONTRACT, STRICT LIABILITY, OR TORT (INCLUDING NEGLIGENCE OR OTHERWISE) ARISING IN ANY WAY OUT OF THE USE OF THIS SOFTWARE, EVEN IF ADVISED OF THE POSSIBILITY OF SUCH DAMAGE.
This software consists of voluntary contributions made by many individuals on behalf of the Apache Software Foundation. For more information on the Apache Software Foundation, please see http://www.apache.org/.
Portions of this software are based upon public domain software originally written at the National Center for Supercomputing Applications, University of Illinois, Urbana-Champaign.
10 Version History
- 1.9.20—March 16, 2026
- Worked around a change in the forthcoming macOS 26.4 that caused EagleFiler to crash at launch. If you’ve updated to macOS 26.4 before updating EagleFiler, you won’t be able to launch EagleFiler to use its auto-update feature, but you can download and install the update manually as described in the Updating From a Previous Version section of the manual.
- When launching EagleFiler on macOS 26.4 or later, macOS may show a “Support Ending for Intel-based Apps” notification. Currently, EagleFiler relies on Rosetta 2, which Apple has committed to supporting until macOS 28 in fall 2027. EagleFiler’s indexer has been ARM-native for a long time. The rest of the app relies on some third-party Intel-based libraries that will not be ported. We’ve been working on removing these dependencies and rewriting the app in Swift. This is a big project, but it should provide many advantages, both in performance and in a newer architecture that can serve as a foundation for many years to come. We expect to finish this and have EagleFiler running fully natively on Apple silicon before macOS 28 is released.
- Added the Import From Paperless script. This lets you import files from Mariner Software’s Paperless app (formerly called ReceiptWallet), which has been discontinued. The categories, collections, and other metadata will be translated to folders, tags, and notes in EagleFiler.
- When importing from Evernote, EagleFiler is better at handling attached files that have no filename extension and notes that contain an attached file but only whitespace for the note text.
- The capture key now works with the Apple Creator Studio versions of Keynote, Numbers, and Pages.
- Added the Append Current Date to Filename and Append Prior Month Date to Filename scripts.
- The Keywords header of e-mail messages is now indexed for searching.
- You can now change the name of a tag via AppleScript.
- Deleting a tag now deletes its child tags instead of just changing their parents.
- Added the Differing Message Counts Importing From Apple Mail section of the manual.
- Updated the following sections of the manual:
- Updated the Remove Duplicate Messages script to fix a problem where it could time out if EagleFiler was already very busy with other tasks.
- Worked around an issue with macOS Tahoe 26 where windows would still receive mouse clicks after they were closed, preventing them from going through to the app below EagleFiler.
- Worked around a macOS bug that could cause a crash when viewing a Web archive on a Mac with a Touch Bar.
- Made some changes to try to prevent a crash when displaying a table cell.
- Fixed an internal error that could occur when checking whether a record needed to be indexed.
- Fixed a bug where audio or video files could be left open after closing a library (thus preventing the volume from being ejected).
- Fixed an error that could occur when launching a second copy of EagleFiler at the same time.
- Fixed a regression where the diagnostic report didn’t include the error log.
- Updated to version 1.6.3 of the SkimNotes framework.
- 1.9.19—October 3, 2025
- The capture key now works with DEVONthink 4.
- The share extension can now import images with no associated file, e.g. from the Quick Look preview window after taking a screenshot.
- Fixed a bug where tag searches with negative conditions sometimes didn’t find any matches when Match Partial Words was unchecked.
- Worked around a Help Viewer bug on macOS 14.
- Updated the documentation for macOS Tahoe 26.
- 1.9.18—August 19, 2025
- EagleFiler is now compatible with macOS Tahoe 26. It’s best to update to EagleFiler 1.9.18 before installing Tahoe. Otherwise, EagleFiler may hang at launch when opening a library. (If this hang is preventing you from accessing the Software Update window to update EagleFiler, you can hold down the Shift key during launch to prevent EagleFiler from re-opening any libraries.)
- When running on macOS 26, EagleFiler now breaks the application icon out of “squircle jail” in the Dock, the about window, and elsewhere in the app.
- Text fields now disallow macOS 26’s Security Code AutoFill since it’s not relevant.
- The Merge Message Files command no longer marks the new mailbox record as unread if all the messages were already read.
- If you assign a folder the ef_noindex tag, none of its files or subfolders will be indexed, either. (Previously, only individual files could excluded from indexing.)
- Adjusted the behavior of the Drop Pad so that it can still migrate to the proper space but hopefully doesn’t show up on the wrong display of a multi-display setup.
- Added the Importing Mail From MailMaven section of the manual.
- Updated Firefox bookmarklet instructions to work around an issue where Firefox would clear the page when sending the URL to EagleFiler.
- Updated the following sections of the manual:
- Added the OCR With OCRmyPDF script.
- Added the Prefix Creation Date to Filename script.
- 1.9.17—June 4, 2025
- Pressing the capture key in the Orion Web browser now supports the same features as other browsers: importing from X/Twitter and capturing the selected text as notes.
- The current library (for capture key purposes) now updates when you minimize a window to the Dock.
- The Fonts panel now shows more sizes of the system font.
- When you open the Fonts panel, EagleFiler now ensures that it’s moved to the active space so that it doesn’t look like nothing happened.
- The Unread and Flagged columns in the records list work better with larger font sizes.
- If you are trying to create a new tag whose name matches the start of another tag’s name but has different case, the auto-completion now keeps the case as you entered it.
- Updated the following sections of the manual:
- Capturing from Safari no longer fails with an error if JavaScript is turned off.
- Worked around a macOS bug that could cause a crash when displaying the source URL for an e-mail message.
- EagleFiler no longer reports spurious errors when viewing a symlink stored in iCloud.
- Fixed a bug where phrase searches containing ^ might not find anything.
- Fixed a bug where closing or minimizing a library window could unminimize another library.
- Tried to work around a macOS bug that could cause it to incorrectly report the EagleFiler application file as damaged.
- Made some changes to prevent EagleFiler from triggering local network privacy prompts.
- When you click an esoteric preferences link to enable or disable debug logging, the change now takes effect immediately, without having to restart EagleFiler.
- Diagnostic report files are much smaller, as they no longer include excerpts from the verbose system console log, only from EagleFiler’s own log files.
- 1.9.16—November 21, 2024
- Improved the formatting of community notes and quote tweets when importing from X/Twitter.
- Worked around a bug in macOS 15 where sometimes the system help viewer wouldn’t open to the right help page. EagleFiler will instead open help files in the user’s Web browser.
- Fixed a bug where Merge Mailboxes/Message Files might fail if the files were stored in iCloud Drive but not downloaded to the Mac.
- Fixed a bug where EagleFiler might improperly recognize certain folders as mailboxes when importing.
- EagleFiler no longer triggers the “find devices on local networks” prompt on macOS 15.
- Made some changes to track down an issue where files stored in OneDrive on macOS 15 might be incorrectly reported as missing.
- Removed support for Growl, as all supported macOS versions now have Notification Center built-in.
- Removed various unused code.
- Fixed the broken help button in the Settings window.
- The diagnostic report now includes information about the app’s logs, the crash logs folder, and components that could cause AppleScript errors.
- EagleFiler is now built with Xcode 16 and the macOS 15 SDK.
- 1.9.15—August 20, 2024
- Improved EagleFiler’s support for importing from X/Twitter. When
you press the capture key, tweets are now imported as HTML files
rather than as plain text files.
- This works in Safari, Google Chrome, Brave Browser, and Microsoft Edge. Previously, only Safari was supported.
- This requires enabling JavaScript access in Web browsers.
- Extraneous text is removed, and the filename and title are also improved.
- When capturing a Web page in Safari, EagleFiler has long been able to preserve the selected text in the record’s note. This can be useful for recording that a certain part of the page is important but also storing the full context in which it appears. This now works with Google Chrome, Brave Browser, and Microsoft Edge, too.
- When viewing a PDF file in Two Pages mode, the first page is now displayed as the cover, with pages 2 and 3 being the first ones displayed as a pair.
- Updated the following sections of the manual:
- Made some improvements to EagleFiler’s detection of the current library when using the capture key.
- If macOS incorrectly reports that EagleFiler is damaged when installing or updating the app, we now have a Download Fixer tool to help.
- Fixed a problem where the name of the current Safari profile could be included in the filename when capturing from Safari. For best results, be sure to follow the Enabling JavaScript Access in Web Browsers instructions.
- Fixed a bug where indexing could be delayed if another library was busy verifying.
- Fixed importing of FastMail message files on macOS 15.
- Fixed a bug where the Activity window could look like it was indexing when indexing was disabled.
- Fixed a bug where capturing from Twitter didn’t work from the x.com domain.
- Added RevealRecordInParent to the esoteric preferences, which lets you control whether opening a record link shows the record in its containing folder rather than in the Records source.
- Improved the layout of 4th-level section headers in the PDF version of the manual.
- Updated to version 1.6.1 of the SkimNotes framework.
- Improved EagleFiler’s support for importing from X/Twitter. When
you press the capture key, tweets are now imported as HTML files
rather than as plain text files.
- 1.9.14—May 2, 2024
- Worked around a bug in Safari 17.4 that prevented the capture key from working.
- Worked around an issue where importing from Evernote could fail if the ENEX file contained a note with an invalid SVG file.
- Fixed an issue where the New Record ‣ From Clipboard command didn’t let you import by “pasting” a file after using Edit ‣ Copy in Finder.
- Updated the following sections of the manual:
- Fixed a bug where a phase search could incorrectly find a record where the search terms matched but not in the proper order.
- Fixed a bug where some files imported from Evernote could have truncated names or tags.
- Fixed a bug where importing from Evernote could fail if a note had multiple attachments with very long filenames that were similar.
- Fixed internal errors that could occur in the process of closing a library.
- 1.9.13—March 7, 2024
- Improved importing from Evernote. EagleFiler is better at detecting when a note contains only a single attached file, so that it can be imported directly rather than embedded in a rich text file, and in such cases EagleFiler now preserves any custom author information that you’d set in Evernote.
- Since version 1.9.2,
EagleFiler has used Nitter to import Web pages from Twitter, as it
did a good job of including media and related tweets. Twitter has
since blocked access for users who are not logged in. For a while,
Nitter was able to work around that, but now it is dead.
Thus, this version of EagleFiler removes support for Nitter. There
remain several ways to import from Twitter to EagleFiler:
- This version adds a new feature so that, if you use the capture key in Safari, EagleFiler will create a text file with the contents of the tweet. The source URL is preserved.
- You can use the EagleFiler system services to import the selected text.
- You can use the Save PDF to EagleFiler command to import the whole page.
- When using auto-completion to assign a tag to a record, EagleFiler will now pre-select a matching tag with differing case if there’s no exact match. This saves you the step of using the arrow keys to select the tag that you wanted if EagleFiler guessed correctly.
- Worked around a macOS bug that could prevent the content of .eml message files from being searchable. Previously imported .eml files will be automatically reindexed as needed.
- The ef_unscanned tag now works to suppress importing a subfolder when rebuilding a library.
- If you press the capture key in the Unread RSS reader, EagleFiler will now explain how to import from it.
- Worked around a macOS bug that could cause a hang when importing from Unread using the system service.
- Improved capturing from NetNewsWire when multiple articles are selected.
- Improved the fallback source URL generation for e-mail messages when EagleFiler encounters a macOS URL bug.
- Improved handling of empty Web archive data from drags and system services.
- Updated the following sections of the manual:
- Each help page now has a link to a Google translation so you can view it in a different language.
- Fixed a bug where EagleFiler could hang if you created a new file during a scan for new files.
- Fixed setting the From name when importing a downloaded URL.
- Fixed a file permissions issue when accessing a shared library.
- Fixed a timeout error when capturing from a very large mailbox in Apple Mail.
- Made various fixes and updates to prevent Cocoa from logging warnings.
- Fixed a bug where a bad source URL could prevent a record from being displayed.
- Fixed bug where an error could occur when generating a mailbox file to export the selected messages.
- Updated to version 1.6 of the SkimNotes framework.
- Removed defunct bundle resources to reduce the size of the app.
- 1.9.12—August 18, 2023
- Worked around a change in the forthcoming macOS 14 Sonoma that caused EagleFiler to crash at launch.
- The capture key now works with the Arc browser.
- Improved the display of HTML e-mail messages in Dark Mode.
- Improved the background color when editing RTF files in Dark Mode.
- Improved the VoiceOver descriptions in the source list.
- EagleFiler is better able to recognize the file types of e-mail attachments for indexing.
- Updated the following sections of the manual:
- Apple fixed the Ventura blank icons bug in macOS 13.4, so the EagleFiler workaround is no longer needed, and we recommend disabling it by clicking this link.
- Worked around a macOS bug that could cause a blank source URL for e-mail messages.
- Improved the error reporting when reading Finder comments.
- Improved the error handling when reading a note.
- Improved the error handling when searching using a damaged index.
- Worked a problem displaying Web archives of macscripter.net on macOS 10.14.
- Fixed a spurious error message when capturing an Apple Mail e-mail message that didn’t have any MailTags.
- Fixed an error that could occur when importing from Apple Mail if Mail’s data store had been transferred through a non-Mac file system.
- Fixed a memory leak when doing an indexed search.
- Fixed a crash that could occur when dragging and dropping files into EagleFiler.
- Fixed a crash that could occur when pressing a keyboard shortcut that uses a dead key.
- Fixed some incorrect single quote marks in code examples in the manual.
- 1.9.11—March 23, 2023
- The capture key works better with MarsEdit 5 and OmniFocus.
- Updated the following sections of the manual:
- Updated to version 1.5.5 of the SkimNotes framework.
- Added VenturaGenericIconsWorkaround to the esoteric preferences to help customers who are seeing the macOS 13 bug where PDF and movie icons are sometimes shown as blank.
- Worked around a macOS issue that could cause a crash when a hot key was pressed.
- Fixed a problem where auto-completion of tag names with diacritical marks could interfere with creating a new tag having different diacritical marks.
- Fixed an error highlighting PDF search matches.
- 1.9.10—December 7, 2022
- EagleFiler now supports Live Text, so that you can select and copy text in scanned PDFs without needing a separate OCR step (requires macOS 13).
- EagleFiler now skips importing Emacs auto-save and backup files.
- The notes field in the import options window now works better with Dark Mode.
- Scan for New Files will now update custom icons for folders in the source list, so it’s no longer necessary to close and reopen the library to see such changes.
- Improved the error reporting when MailTags data can’t be read due to missing Full Disk Access.
- EagleFiler is better able to figure out the source URL from some HTML files.
- The Delete Empty Folders script is much faster and can now delete folders that are not empty but which contain only other empty folders (as can occur if duplicate files are removed during import).
- Updated the Importing From iOS section of the manual.
- Worked around a macOS issue that could cause some HTML files to display as blank.
- Worked around a MailTags bug that could cause an error when importing some Apple Mail messages. (The bug has already been fixed in MailTags but may still affect previously saved files.)
- Fixed a crash that could occur when updating the source list.
- Fixed a crash that could occur when accessing system services from the contextual menu on the records list.
- Fixed a bug where sometimes the scroll position in a PDF would change when switching back to EagleFiler from another app.
- Fixed a bug where custom titles for .eml files were not indexed for searching.
- Fixed a bug where exact searches didn’t consider custom From values for .eml files.
- Fixed a bug where MailTags metadata might not be imported from Apple Mail in some cases where it had not cached the tag information in Mail’s data store.
- 1.9.9—October 17, 2022
- Made various code modernizations.
- Worked around a change in Apple News that prevented EagleFiler from showing up in the Share menu.
- The RTF viewer now supports clickable file links created by Nisus Writer Pro.
- Renamed Preferences to Settings for macOS 13.
- EagleFiler is better at detecting which part of a filename to select when renaming in the records list.
- Indexing e-mail attachments is faster.
- When an error occurs, EagleFiler no longer brings the Errors window to the front if it’s already visible.
- The Importing Mail From Airmail section of the manual now explains how to import multiple messages at once.
- Updated the How do Finder tags work with EagleFiler? section of the manual.
- Updated the Rename for Dropbox Windows script.
- EagleFiler now requires macOS 10.13 or later.
- Fixed a bug where an e-mail message could accumulate an extra newline when round-tripping through merging to a mailbox and then extracting to individual files.
- Fixed a bug where the Import From Apple Mail script could fail with certain message encodings.
- Fixed a bug where extracting an e-mail message could fail if the subject contained an emoji that was too new for the file system.
- Fixed a bug where the Remove Duplicate Messages script would sometimes report spurious errors if the Message-ID header was long.
- 1.9.8—June 22, 2022
- Added preliminary support for the forthcoming macOS 13 Ventura.
- Added support for displaying files from the Bike outliner.
- You can now drag and drop attached files from a record’s note or from an RTFD record to other apps, e.g. to Finder to extract them or to Mail to attach them to a new e-mail message.
- When a file is attached to a record (i.e. included in its note), you can now hover the cursor over the attachment’s icon to see a tooltip showing its filename.
- When you import messages exported from Gmail via Google Takeout, the labels are now searchable in EagleFiler.
- Improved EagleFiler’s search indexing, so that you can now find links in Web archives, find e-mail messages by Message-ID or Reply-To, and find records by their EagleFiler GUID.
- If a note is missing, when EagleFiler reports this in the Errors window, you can now use the Trash or Update Checksum button to suppress further error reports if you can’t or don’t want to restore the note file from backup.
- The format for metadata backups has been revised so that it is faster and more efficient in memory and on disk, particularly when there are many records in the same folder or there are notes with large attached files. The XML files are no longer updated with spurious changes, which is more friendly for libraries that are backed up, synced, or under version control. The new format also works around a macOS limitation where very large notes could not be backed up. EagleFiler will still read backups in the old format when importing or rebuilding, and you can click here to enable an esoteric preference if you want it to still write the old format for interoperability with previous versions of EagleFiler.
- A record’s title and its filename are no longer automatically linked when you set them to the same value, only when you set the title to be blank. This allows EagleFiler to better preserve your intent, i.e. that the title should stay at the current value even if the filename changes.
- The filename counter is now preserved when rebuilding a library. This means that markers like -1 and -2 will no longer double up (-1-2) if there are further filename conflicts, and they’ll go away entirely if the record is moved to a location where there is no filename conflict.
- The insertion point in the record viewer is easier to see in Dark Mode.
- Improved the display of certain Web archive files.
- Improved the speed of indexing e-mails with certain attachment types.
- Updated the Import From Instapaper via NetNewsWire script to accommodate a change in NetNewsWire.
- Updated the following sections of the manual:
- Updated the Read Me.
- You can now omit the library parameter in an x-eaglefiler link, which means that EagleFiler will look for the record in the current library.
- Record GUIDs in x-eaglefiler links are now purely alphanumeric for easier searching and double-clicking to select.
- Adjusted the toolbar layout of the Errors window to make it clearer what options are available for each error.
- Improved the error reporting when a record can’t be moved.
- Updated to version 1.5.3 of the SkimNotes framework.
- EagleFiler is better at handling and working around file system errors when creating a smart folder or editing a file.
- Worked around a macOS bug that could cause a crash when importing multiple Evernote files at once.
- Fixed a bug where a record’s preference for linking its title and filename was sometimes not preserved when rebuilding the library.
- Fixed a bug where the record viewer might not update its display when changing to a new record if you had just renamed the previous one.
- Fixed a bug that could cause an error backing up the metadata shortly after editing a record.
- Fixed a bug where the source list’s colored circle label indicator wasn’t positioned correctly when using the small sidebar icon size on macOS 12.3.1.
- Fixed a bug where a smart folder could get messed up if you tried to rename it to the empty string.
- Fixed a bug where EagleFiler showed the copy cursor when moving a tag to a different parent.
- Fixed a bug where phrase searches containing a colon might not find anything.
- Fixed a bug where accessing a record’s guid via AppleScript failed if one had not been previously assigned.
- Fixed a bug where some background operations could report an internal error after a record was deleted.
- 1.9.7—March 4, 2022
- EagleFiler now uses adaptive color mapping for rich text records and notes (in addition to plain text records and e-mails, as in previous versions) so that you automatically see light text on a dark background when your Mac is running in Dark Mode. This can be controlled using the DarkTextBackgroundInDarkMode setting in the esoteric preferences. The standard Light Mode colors are written to disk so that the files still display properly on other Macs and platforms.
- You can now use the Add Sketch… command to draw on your iPhone or iPad’s screen and import the image directly into EagleFiler without having to transfer a file.
- The forthcoming macOS 12.3 no longer includes the Python scripting language, so the sample AppleScripts that used Python have been updated to remove that dependency.
- Customers migrating from Gmail, e.g. after the announcement that free G Suite plans would be discontinued, can move their e-mail archive to EagleFiler as described in the Importing Mail From Webmail/Gmail section of the manual.
- The “new look” version of Outlook doesn’t yet support AppleScript. Thus, if you press the capture key, Outlook will incorrectly report to EagleFiler that no messages were selected. In such situations, EagleFiler will now offer to turn off “New Outlook” for you. You can then restart Outlook and proceed with the capture.
- When capturing from old versions of DEVONthink, EagleFiler can now preserve the URL, label, and tags. (This was already supported for newer versions.)
- You can now press the Delete key when Trash is selected in the source list as a shortcut for Empty Trash….
- If you delete the last folder or mailbox in the source list, EagleFiler now selects the previous source instead of selecting Trash.
- Improved the performance of the source list when using the RecordsListLabelUnderlineStyle setting in the esoteric preferences.
- The How can I access my library from multiple Macs? section of the manual now links to the scripts that help you rename files in accordance with Microsoft OneDrive’s restrictions.
- Updated the Importing Mail From Outlook section of the manual to work around an Outlook bug using saved smart folders.
- Updated the Applications That Support Capture section of the manual.
- Worked around a bug where WebKit could hang when cleaning up its preferences.
- Worked around a bug in Apple Mail that could prevent it from being able to import a message with an empty body. EagleFiler will now “fix” such messages when importing them, so that Mail will be able to import EagleFiler’s native mailbox file storage. If you already have such messages in EagleFiler, exporting the selected messages will create a new mailbox file that Mail can read.
- Worked around a WebKit bug that could cause importing certain sites to never complete.
- Fixed a problem where an AppleScript timeout could make importing messages with MailTags very slow.
- Fixed a regression (due to a macOS change) where opening a library from within the import options dialog didn’t work because the open panel would be behind the options dialog.
- Updated to version 1.5.2 of the SkimNotes framework.
- 1.9.6—November 10, 2021
- Worked around a problem where an Apple Mail error on macOS 12 could prevent the capture key from working.
- The EagleFiler ‣ Add command in MailMate now preserves the IMAP keywords of the selected messages as tags in EagleFiler.
- Improved the display of e-mail messages that have no plain text part.
- Worked around a macOS bug that caused the Set Filename/Title/etc. contextual menu commands from working with the selected text in a Web archive.
- The bookmarklets instructions now explain how to disable repeated permissions prompts in Firefox.
- EagleFiler now reports a better error when a message in Gmail’s All Mail mailbox can’t be imported due to Apple Mail’s optimized storage.
- The Open in Browser button in the Errors window can now work on multiple selected errors at a time.
- Worked around a problem where minor damage to EagleFiler’s database could prevent searches within a tag from working.
- Updated the crash reporter for macOS 12 Monterey.
- EagleFiler now declares notch compatibility for the new MacBook Pros.
- Fixed a bug that could cause a crash when dragging and dropping to the records list.
- Fixed a bug where EagleFiler would report an error when using a custom text highlight color.
- 1.9.5—July 13, 2021
- Worked around a change in the macOS 12 Beta that caused EagleFiler to crash at launch.
- The capture key now works with the Iron and Orion Web browsers and with beta and developer versions of Microsoft Edge.
- Improved the speed of the records list on macOS 11 when lots of e-mail messages are selected.
- The Copy Source URL command now puts the record title on the pasteboard, in addition to the URL, e.g. so that the title is preserved if you paste into Safari’s Bookmarks window.
- The Evernote importer is better at recognizing files that should be extracted as separate files rather than imported as text attachments.
- Improved the speed of extracting message files from mailboxes by reducing Spotlight overhead.
- The Copy command is much faster when lots of e-mail messages are selected.
- Worked around a macOS 11 issue where sometimes a custom folder icon or emoji tag abbreviation in the source list would be drawn as if the window were in the background, when it wasn’t. Also, they no longer dim when the window is only behind an inspector or another application’s floating window, such as OmniFocus’s Quick Entry.
- Made a change to prevent macOS from allowing the volume containing an open library to be ejected.
- Fixed a regression where built-in items in the source list could be incorrectly shown as editable.
- Fixed some regressions when renaming in the source list. Pressing Esc now discards the edit in progress. Changes are saved when you click away or close the window, not just when you press Return or Tab. In-progress changes are no longer lost when a background change occurs.
- Fixed a bug where PDF attachments in RTFD files could become invisible when using the RespectImageDPI esoteric preference.
- Fixed a bug where an internal error could occur when resizing images in an RTFD file for display.
- Fixed a bug where merging mailboxes or message files could import the new mailbox as the wrong type of file if one of the source files had an extension in its filename.
- Fixed an internal error validating the records list for deletion.
- 1.9.4—April 29, 2021
- Improved the Import ENEX File… command, particularly to handle
invalid XML generated by Evernote 10:
- If the ENEX file is invalid XML, instead of failing with an error, EagleFiler now tries to skip over the bad parts of the file to import as many notes as it can.
- The invalid sections of the file are saved as individual .enex files and imported into the Invalid Evernote Notes folder. EagleFiler also recovers what it can from each one and imports it as an RTF file.
- If the ENEX file is valid but the ENML for a particular note is invalid, instead of failing with an error, EagleFiler now tries to repair the XML. It saves the original XML in the Invalid Evernote Content folder, converts the ENML to RTF as best it can, and tags the RTF record with invalid_evernote_xml.
- If a note has an attachment with no file extension, EagleFiler now tries to infer one based on the file’s contents.
- Improved handling of images that cannot be resized.
- Fixed a bug where importing multiple notes having lone resources with the same name would only import one of them.
- Improved handling of libraries stored in iCloud Drive. We still
recommend turning off Optimize Mac Storage in System
Preferences ‣ Apple ID ‣ iCloud, as EagleFiler works best when
the files in your library are fully downloaded to your Mac.
However, it is now much better at handling files that have been
evicted to save space:
- EagleFiler automatically downloads evicted files and notes when you view them or try to move or rename them. Mailbox files are downloaded if needed to rebuild the list of messages they contain.
- It does not download files in order to index them. This allows you to search files that had previously been indexed without downloading everything just to make sure the index is up-to-date.
- When you open a library and EagleFiler checks to make sure there are no missing files, it no longer reports evicted files as missing. However, if you do a manual Verify it will report errors for any files that are not fully stored on your Mac, as their content cannot be checked for damage.
- When opening a library, EagleFiler fully downloads essential files like smart folders and metadata backups, so that they are available to you and to prevent the creation of duplicates due to conflicts.
- EagleFiler no longer reports an error when tagging an evicted file. Instead, it stores the tag locally in its database and applies it to the file the next time it’s downloaded.
- Improved importing of files stored in iCloud that were evicted from the Mac.
- Improved the Import Bookmarks… section of the manual.
- The source list can now display custom folder icons when running on macOS 11.
- The source list contextual menu now lets you paste custom icons onto smart folders, not just regular folders.
- EagleFiler can now import a .eml file with an empty name, as FastMail sometimes exports.
- Added MJTWindowToolbarStyleUnified to the esoteric preferences. This lets you return to the pre–macOS 11 window style where the title is above the toolbar, leaving room for more toolbar items.
- If you try to move or rename a record whose file is missing, EagleFiler now warns you and aborts the operation to preserve the library’s integrity. (You can still move missing files to the trash to get rid of them.)
- If there’s an error moving a record, EagleFiler now reverts the change to prevent the database from getting out of sync.
- If WebKit crashes while downloading a Web page, EagleFiler now applies a workaround and retries.
- Fixed a bug where records that were in the process of being imported could displayed in the records list before the import was complete, thus temporarily showing the wrong file size or date.
- Fixed a bug indexing an RTFD file containing a PDF file with incomplete metadata.
- Fixed a bug where importing a file with a label could cause the label to turn into a color-named tag in EagleFiler or Finder could show an extra color-named tag.
- Fixed a bug where some toolbar buttons could have their borders clipped when running on macOS 11 with Increase contrast enabled.
- Fixed a bug where, on macOS 11, sometimes the source list text and icon would be drawn as if the window were in the background, when it wasn’t.
- Fixed a bug where an Anywhere search containing a lone - would never find any matches if Match Partial Words was checked.
- Fixed a bug where invalid split view state could cause a window to open with a collapsed records list, which would confuse people because it would look like all the files were gone. (In fact, you could drag down the divider to show the records list.)
- Fixed a bug where a file that was in the process of being imported could be reported as missing if the library was being verified at the same time.
- Fixed a regression in EagleFiler 1.9.3 that could cause an error to be logged when emptying the trash if a record had a note, and could potentially leave forgotten records in the trash.
- Improved the Import ENEX File… command, particularly to handle
invalid XML generated by Evernote 10:
- 1.9.3—February 17, 2021
- The Merge Mailboxes/Message Files command now works on heterogeneous selections, e.g. so that you can add a lone .eml file to an existing mailbox. This will preserve any tags or notes that you’ve added.
- Improved importing of Web pages from various publications.
- When importing from Evernote, if you’ve added a title to a note that contains a single attached file, EagleFiler now preserves that title when unpacking the attachment.
- Made some optimizations to improve the performance of importing large numbers of small files at once.
- The capture key now works in Reeder 5.
- When capturing from Outlook, EagleFiler now helps you to download messages that were only partially downloaded from the server so that they can be fully imported into EagleFiler.
- If there’s an error capturing from Outlook, EagleFiler now reports which message was the source of the error.
- When capturing e-mail messages, EagleFiler now hides the progress window immediately when the capture is done.
- EagleFiler now maintains its own error log file, so you can still access information for troubleshooting when the macOS system log isn’t working properly.
- Added the Import From Apple Mail (Plain Text) script.
- The software updater reports a more useful error message if you try to update EagleFiler while running it from the disk image. This should prevent confusion where you continue running an old version despite telling it to update.
- Worked around an encoding bug in Apple Mail that could cause message data to be altered when using the Import From Apple Mail script.
- Fixed a bug where importing a folder would sometimes add tags from OpenMeta to the wrong files.
- Fixed a bug where tag syncing during an import could cause a hang.
- Fixed a bug that could cause metadata loss if you moved a record’s container while it was being imported.
- Fixed a bug where the record viewer could have the wrong width when opening the window at a small size.
- Fixed a bug where the source list outline view might be too narrow when re-opening a library.
- Fixed a bug where the source list width wasn’t always properly saved, which could mess up hiding and showing that pane.
- Fixed a bug where undoing extracting a message from a mailbox required two undos instead of one.
- Fixed an internal error when viewing a message in a mailbox whose file was missing.
- Fixed a bug where a damaged Microsoft Word file could cause EagleFiler to import some bad metadata that would prevent it from being able to save its database.
- Fixed a bug where EagleFiler would crash when trying to share a message from a missing mailbox file on macOS 11.
- 1.9.2—December 21, 2020
- Searches of RTFD files can now find links, embedded filenames, and the contents of embedded PDF files. This takes effect for newly imported files or if you rebuild your library’s index.
- The built-in tags now use standard system colors, which update based on whether your Mac is in Dark Mode or Light Mode or has increased contrast enabled.
- On macOS 11, tag names and abbreviation symbols in the source list now “fade out” in background windows to match the rest of the icons and text.
- On macOS 10.12 and later, EagleFiler will automatically update the unread, flagged, and note tags to use the latest abbreviation symbols so that your old libraries are consistent with new ones.
- Various additional Unicode symbols can now be used in tag names.
- EagleFiler now uses Nitter to import tweets due to Twitter shutting down an endpoint.
- Updated the toolbar icons for increasing and decreasing the font size.
- Improved indexing when EagleFiler can’t find or load the relevant Spotlight plug-in.
- It is now possible to exclude certain images from processing when importing from Evernote in order to work around a macOS crashing bug.
- Add the Evernote Bulk Export script.
- The Import Examples script now shows how to look up existing records by path.
- Added the Remove Quarantine script.
- Added RecordsListLabelPreferTitle to the esoteric preferences, which lets you show the colored label indicator in the Title column instead of in the File column.
- The indexer now runs natively on Apple Silicon Macs.
- Increased the maximum width of the source list.
- Worked around a macOS bug that could cause slowness or a crash when drawing the source list.
- Worked around a macOS bug that prevented the diagnostic report from working properly on Apple Silicon Macs.
- Fixed a bug where the source list didn’t update after renaming a tag to an invalid name.
- Fixed a regression with the window title when nothing was selected.
- Updated the Korean localization.
- 1.9.1—November 4, 2020
- If a record has a label, but the File column is hidden, EagleFiler now shows the label’s circular indicator in the Title column instead, so that you can still see that it’s labelled.
- EagleFiler’s viewer is now able to display the content of records that are alias files.
- When capturing from Evernote, if the selected notes came from more than one notebook, EagleFiler now puts them in folders named after their notebook. This makes it possible to Select All under All Notes and press the capture key to import everything from Evernote while preserving the folder structure.
- Evernote 10 no longer supports AppleScript, so if you press the capture key from it, EagleFiler will now show an error message that recommends a different way of importing.
- Showing an inspector window will now move it to the current space if it was already visible but on another space.
- Normally, EagleFiler indicates a record’s label by showing a colored circle in the File or Title column (like Finder does). You can now use RecordsListLabelUnderlineStyle in the esoteric preferences to make it additionally underline the filename and title, to make the color stand out more.
- Added the Download Apple Mail Messages script, which can help fully download messages so that they can be imported successfully.
- Added the Batch Set Creation Date script.
- Improved the error messages and Importing Mail From Apple Mail section of the manual to better handle messages that are only partially downloaded.
- The Importing Mail From Apple Mail section of the manual now includes a section on “Gmail and ‘All Mail’”.
- Worked around a sandbox bug in macOS 10.15.7 and 11.0 that prevented the Import Bookmarks… and Import ENEX File… commands from working.
- Worked around a bug in macOS 11 that could cause a crash when importing from an ENEX file containing a certain kind of image.
- Worked around a macOS bug where sometimes a newly imported folder would not show up in the source list (even though the disclosure triangle was updated).
- Added OldApplicationIcon1.5 to the esoteric preferences, for customers who prefer the previous EagleFiler application icon.
- Made several workarounds for a macOS bug that could cause a crash when drawing the source list.
- Fixed a bug where EagleFiler could incorrectly warn about opening a large number of selected records when the Share button was visible on macOS 11.
- Fixed an internal error that could be reported when dragging and dropping onto the records list.
- Fixed a bug where the insertion point could end up in the wrong place if you were typing quickly in a text or RTF file at the same time EagleFiler happened to auto-save it.
- Fixed a bug where capturing a large number of messages from Apple Mail could time out.
- 1.9—October 21, 2020
- Updated the user interface for macOS 11 Big Sur:
- Redesigned the application, document, and mailbox icons.
- EagleFiler uses the new inline title bar style on macOS 11, and information about the current source and search results is now shown in the subtitle.
- The toolbar defaults to icon-only mode and supports the new large icon style. The toolbar icons have been updated. EagleFiler uses the new system share button and the new search field, which automatically expands and collapses.
- The Info, Tags, and Tag Cloud toolbar icons now highlight when that inspector window is open.
- The source list icons have been updated.
- EagleFiler now colors the source list icon of a folder or mailbox to indicate its label.
- Improved the appearance of the records list columns menu.
- The source list now uses the system text and icon sizing, which can be configured in the General pane of System Preferences and overridden using SourcesRowSizeStyle in the esoteric preferences. The EagleFiler-specific font and icon preferences for the source list have been retired.
- The source list now indicates folder and mailbox labels with a colored circle. The toolbar and menus now show labels with circles instead of round rectangles, to match.
- The records list now shows labels using colored circles in File column instead of coloring the background of the whole row. This is consistent with Finder and works better on macOS 11 Big Sur.
- The capture key now works with Apple Mail on macOS 11.
- The capture key now works with the Microsoft Edge browser.
- If you use the Batch Change… command with only one record selected, EagleFiler now pre-fills all the fields based on that record. This makes it possible to use Batch Change as a modal editor for the record’s properties, tabbing from one field to the next.
- The To column now shows all the recipients of message, not just the first.
- You can now search by Any Address, e.g. to find messages sent to or from a particular address.
- You can now open the original copy of an e-mail in Apple Mail by using the Open Source URL command. (If the original e-mail has been deleted, you can still double-click to open EagleFiler’s copy of the message in Apple Mail.)
- You can hold down the Command key when dragging a record onto a tag in the source list to “move” instead of “copy” to that tag, i.e. assign that tag and unassign all others (inspired by OmniFocus).
- From the Info window, you can now use the Command-Shift-T keyboard shortcut to jump the Tags field.
- Arrow-keying through the records list is faster.
- A folder of smart folders now shows the merged contents of all the smart folders it contains.
- Improved importing of Web pages from Discourse forums, Stack Overflow, Twitter, and various Web sites that have pop-ups.
- When you import a duplicate file, the Reveal in Library button now shows the pre-existing file in its containing folder rather than mixed in with everything else under Records.
- When importing a message from Apple Mail that has a missing attachment, EagleFiler now adds the missing_attachments tag to the mailbox and mentions the missing file in the mailbox’s note, so that you can still find this information after closing the Errors window.
- Improved the following sections of the manual:
- EagleFiler now requires macOS 10.12 or later.
- Improved the Apple Help navigation bar coloring and layout.
- Records now have an is folder AppleScript property. This is faster and more concise than comparing the record’s universal type identifier property with public.folder.
- Added the Import From Specified Folders script.
- The Copy Notes to Spotlight Comments script now works with folder records that have notes.
- EagleFiler is better able to display and merge malformed .eml files.
- Worked around a bug in Safari 14 that prevents apps from receiving Web archive text or rich text when using the system service. EagleFiler will instead import the selected text as plain text.
- Worked around a problem where iCloud Drive would rename files out from under EagleFiler, causing it to lose track of them. This particularly happened with long filenames containing lots of Asian characters or emoji.
- When importing a file, EagleFiler will remove any stray quarantine information that would prevent macOS from opening it when double-clicked. For example, this can help when importing files that were saved to iCloud Drive from an iPhone.
- Worked around a change in Airmail that prevented importing messages via drag and drop. This once again works for single messages. Multi-message drags fail due to a macOS issue. On macOS 10.14, drag and drop from Airmail doesn’t seem to work at all (even to Finder) so EagleFiler shows an error that recommends you use the File ‣ Save command instead.
- Worked around a bug in Apple Mail that could cause a dragged-and-dropped message to import within a numbered folder.
- When initiating a search of a specific library via URL, e.g. from Alfred or LaunchBar (see the Searching From Other Applications section of the manual), EagleFiler now brings that library’s window to the front.
- Worked around a macOS bug where source list text was hard to read when esoteric font smoothing preferences are set.
- Worked around a bug in macOS 11 that prevented progress bars from being drawn.
- Updated to version 1.4.4 of the SkimNotes framework.
- Fixed a bug where, on macOS 11, sometimes a new plain text file wouldn’t be selected in the records list when created from the toolbar.
- Fixed a bug where exact searches and search match highlighting weren’t case-insensitive for certain non-ASCII characters.
- Fixed a bug that could cause a crash when opening the Quick Look window.
- Fixed a bug where file names and extensions excluded from Scan for New Files were only excluded when scanning the top-level folder.
- Fixed a bug where in rare cases a mailbox or subfolder could be added to a folder without this being reflected in the source list.
- Fixed a bug where a movie’s audio would keep playing if you switched to viewing another record without pausing it.
- Fixed a regression where negative search terms like -foo didn’t work (but !foo did).
- Updated the user interface for macOS 11 Big Sur:
- 1.8.14—June 10, 2020
- EagleFiler now shows a more detailed Kind for text files, e.g. Markdown document or Ruby Source instead of Text File.
- Improved importing from various Web sites, including the New York Times and Discourse forums, where sometimes the content would be truncated or overlaid.
- Worked around file errors caused by APFS’s strict handling of Unicode characters, e.g. not allowing emoji that were added in later versions of macOS. This could cause an import to fail when creating a new file based on a Web page or other user-generated content or when importing a file that had been saved on HFS+ or a newer version of APFS. EagleFiler will now escape any unsuitable characters so that the import can proceed without error.
- When importing from a Web view as plain text via drag and drop or the system service, EagleFiler will now save the source URL.
- When capturing from Apple Mail, the error messages about special mailboxes and IMAP path prefixes are more helpful.
- Added accessibility labels for the New Record toolbar buttons so that they work better with VoiceOver.
- EagleFiler is now localized in Russian.
- The To Import folder can now be replaced by an alias if you want to relocate it to another location (e.g. to work around a ScanSnap path length limitation).
- Improved recognition of bookmark files that are missing their filename extension.
- The Apple Mail importer is better able to reassemble messages in cases where Mail has saved duplicate copies of an attachment file in the same folder.
- The OCR With PDFpen script now removes the “NeedsOCR” tag after applying OCR.
- Improved the following sections of the manual:
- Worked around an issue that could cause RStudio files to have generic icons.
- Worked around a problem where EagleFiler would try to open a database file before it had been fully downloaded from iCloud Drive.
- Update to version 1.4.3 of the SkimNotes framework.
- Fixed a bug importing Apple Mail attachments where the attachment name in the message and the file on disk had different Unicode normalizations.
- Fixed a bug where capturing from Safari failed if JavaScript was disabled.
- Fixed a bug where the Trash button in the Errors window could be enabled when no errors were selected.
- Fixed a bug where entering invalid Unicode could lead to database errors.
- Fixed a bug where adding a lone - to an indexed search query could prevent it from finding any matches.
- 1.8.13—April 15, 2020
- When importing from Apple Mail, EagleFiler now sets the abbreviation symbols and colors for any colored flag tags.
- The capture key now works with DEVONthink 3 and preserves more metadata when importing.
- If you press the capture key in Leaf or News Explorer, EagleFiler now shows instructions for how to import instead of reporting an error.
- Updated the Import From Instapaper via NetNewsWire script for NetNewsWire 5. This script can also be used to import the unread articles from non-Instapaper RSS feeds.
- EagleFiler is better at importing the full content of Reddit Web pages that ask you to click a button to show more comments.
- Numeric sorting in the records list now works with numbers larger than 5 digits.
- Improved the speed of the records list when there are highlighted search terms.
- The text size in the Tag Cloud window now updates as you resize the window.
- Improved the following sections of the manual:
- Improved the handling of errors when creating a new library.
- Fixed a bug where EagleFiler could report an error when capturing a message from Apple Mail that had an attached file whose name was encoded in a particular way.
- Updated to version 1.4.1 of the SkimNotes framework.
- 1.8.12—February 4, 2020
- Improved capturing from MarsEdit. Posts are now imported as HTML instead of plain text, so they preview properly in EagleFiler’s viewer. (This can be overridden by changing the MarsEditCaptureFormat esoteric preference from html to txt.) You can now capture multiple selected posts at once. The filename is now based on the slug, if available, instead of the title. Tags are now preserved. HTML entities in the title, category, or tags are now decoded.
- Worked around a MailTags bug where tags might not be imported from Apple Mail when using a newer version of MailTags, capturing multiple messages at once, and the messages were stored locally.
- The new version of the Hook app has improved support for linking files with EagleFiler. EagleFiler customers can get a 20% discount on Hook with coupon code G11X8-G665N-EFR (good through 2020-02-15).
- Added the note RTF and note HTML scripting properties, which let you get and set the rich text contents of a record’s note.
- Added the Merge Records script, which lets you combine the text of multiple selected records into one.
- Improved the reliability of the MailTags importer.
- Improved the .emlx importer.
- Improved the display of e-mail messages that specify an incorrect text encoding for an HTML part, such as those generated by MailRaider.
- EagleFiler knows about more message attachment file types.
- EagleFiler will now skip importing files that look like Dropbox conflicts of its metadata files.
- Fixed a bug where importing a file whose name begins with a period might not treat it as the proper file type.
- Fixed a bug where contextual menu items would not be properly validated when Control-clicking on selected text in an HTML file or Web archive.
- Fixed a bug where an error loading a .eml file (e.g. because the file is missing) would cause the previously displayed message to be shown rather than an error.
- Fixed a bug where importing a folder when a folder already existed with the same name but different case would cause the newly uniqued folder name to have the wrong case.
- Fixed a bug where a narrow date column could display as empty instead of showing truncated values.
- Fixed a bug where saving a message as a .eml file would fail if the message’s subject contained a NUL character.
- 1.8.11—December 30, 2019
- The capture key now works in Brave Browser.
- There’s now an official PopClip extension for EagleFiler, which avoids the warning about the extension being unsigned.
- Scripts of the form get first library record where its file is _file are now optimized to quickly look up the record without having to check every record in the library. This can be useful if you have a Hazel script that receives a file and you want to do something with the corresponding record in EagleFiler.
- Records now have a last used date AppleScript property, corresponding to the last time the file was opened in an app.
- Records now have a missing AppleScript property to detect whether the file has been moved or deleted.
- Worked around a series of bugs in macOS 10.15 that could prevent images imported from Evernote from being sized properly.
- Worked around a change in macOS 10.15 that prevented certain OmniGraffle files from being displayed in the viewer.
- Improve importing of AudioNote files when AudioNote is not installed.
- Fixed a bug where importing an attached file from Evernote might not preserve its filename.
- Fixed a bug importing an Apple Mail mailbox that contained another mailbox with the same name.
- Worked around a macOS bug that could prevent launching EagleFiler after using AirPlay.
- Fixed a bug where e-mails containing HTML tags that were encoded with UTF-7 would not display properly.
- Fixed bug the viewer’s auto-save could cause pending tag changes to be saved prematurely, while the field was still in edit mode.
- Improved the following sections of the manual:
- The Activity window now uses the monospaced digits font to avoid jitter when indexing.
- The Slideshow button no longer causes an error to be logged.
- Modernized the localizations.
- 1.8.10—September 26, 2019
- When converting from Evernote to rich text (RTFD), EagleFiler makes images display at their intended sizes. (Previously, EagleFiler used the actual sizes of the image files it was given.) Very large images are scaled down to fit a reasonable page width. No image data is lost, as EagleFiler changes the logical image resolution rather than resampling the image.
- Searching using Match Partial Words now works better with queries containing the / character.
- When multiple records are selected in the viewer, EagleFiler now shows the overall count in addition to the breakdown by file type.
- Temporary files are now excluded from iCloud Drive syncing.
- Worked around a Spotlight bug in macOS 10.14 that could prevent indexing from making progress.
- Fixed various bugs in the Evernote-to-RTF converter: lines that would run together into one, extra line breaks and spaces, and text content that was missing or incorrectly formatted due to a macOS bug.
- Fixed a bug where EagleFiler would let you import a new file using the same name as an existing record whose file was missing. This could lead to the old record becoming linked to the new file.
- Fixed a bug that could cause a crash when a Software Update error occurred.
- Fixed a bug with the crash reporter window and Dark Mode.
- Fixed a bug where importing a Web page whose title was “.” could cause an error.
- Updated to Xcode 11.
- 1.8.9—August 20, 2019
- EagleFiler can now display multi-page Adobe Illustrator documents, and the text is selectable and searchable.
- Updated the Importing From a Scanner section of the manual.
- You can now rename a record and change its extension if the new extension is equivalent. For example, if you import a file as .jpeg you can now rename it to .jpg, but EagleFiler will still protect you from renaming it to something completely different that would prevent the file from opening.
- Optimized the toolbar to improve responsiveness.
- Fixed a bug where accented characters an ENEX file could be lost during import.
- Fixed a bug where importing an ENEX file could add an extra character after a link.
- Fixed a bug where a .eml file might not display properly after renaming it.
- Fixed a regression where some .eml files did not display the sender.
- Fixed a bug where sometimes EagleFiler would neither quit nor report an error if you tried to quit while an operation was in progress.
- Fixed a regression (due to no longer using QuickTime) where animated GIFs were not playable.
- Fixed a bug with the Replace in Filenames (Regex) script and some special characters.
- Fixed a regression where the Tag Cloud toolbar button was disabled when it shouldn’t have been.
- 1.8.8—June 26, 2019
- EagleFiler now requires macOS 10.9 or later.
- When dragging in an attached file from a rich text view (e.g. OmniFocus or TextEdit), EagleFiler now imports the file itself rather than creating an RTFD file with the attached file inside.
- The Batch Change… window remembers whether you had selected Append or Replace.
- Added support for indexing more types of files attached to e-mail messages.
- The keyboard shortcut for the EagleFiler: Import With Options service is now localized for German, so that the Command-Shift-Option-1 combination still works with the different keyboard layout.
- Pressing the capture key while in Reeder 4 now shows instructions for importing from Reeder to EagleFiler.
- The How can I put my library on my iPhone? section of the manual notes that EagleFiler works with 1Writer.
- Added preliminary support for macOS 10.15 (which is now in beta).
- EagleFiler now plays movie files using AVFoundation instead of QuickTime. This improves performance and offers compatibility with macOS 10.15, however some older files that use 32-bit codecs will no longer be playable. You may be able to use IINA or VLC instead.
- Worked around a change in macOS 10.15 that prevented EagleFiler browser windows from opening.
- The software updater now works on macOS 10.15.
- Brought back the old mailbox icon, as macOS 10.15 no longer has one built-in.
- Capturing from Apple Mail now works on macOS 10.15.
- Increased the maximum width of the # column so it doesn’t get truncated for mailboxes with very large numbers of messages.
- Increased the maximum width of the Size column to prevent truncation with large font sizes.
- Improved the property descriptions in the AppleScript dictionary.
- Improved the identification and display of mailbox files that have malformed headers containing NUL characters.
- EagleFiler now limits the amount of a text file to index, to avoid running out of RAM and hanging the indexing process if you have a file that’s hundreds of MBs.
- There’s now a 10-second timeout when accessing the text content of a record via AppleScript to prevent the user interface from hanging if PDFKit gets stuck. This is adjustable via the TextToolScriptTimeout esoteric preference.
- Worked around an AVFoundation bug could cause internal errors when viewing an old movie file.
- Improved reporting of Python launch errors.
- Fixed a bug where a Web archive could open an ad window in Safari.
- Fixed a regression where the toolbar buttons for creating new records were inappropriately disabled.
- Fixed a regression where the Mac App Store version of EagleFiler didn’t include the manual.
- Fixed an internal error when using the Drop Pad.
- Fixed a bug where importing a message with MailTags tags but no project could result in an empty tag being applied.
- Fixed a bug importing notes with very long titles from Evernote.
- Updated to Python 2.7.16 and PyObjC 5.2.
- 1.8.7—April 3, 2019
- You can now import to EagleFiler using the Share button in Apple News.
- The keyboard shortcuts for the EagleFiler: Import and EagleFiler: Import With Options services are now Command-Shift-1 and Command-Option-Shift-1 because the old shortcuts using the number 5 conflict with the new Screenshot and recording options command in macOS 10.14.
- When capturing from Microsoft Outlook or Entourage, EagleFiler now preserves the message’s to-do completed status as a tag.
- EagleFiler is better at reading malformed mbox files.
- Displaying AudioNote files is faster.
- When importing mail, if EagleFiler skips a message because it’s a duplicate or marked as deleted, it will add a note to the mailbox explaining this, so that you don’t wonder why the message count is different from what you saw in your mail program.
- When closing a library that has active operations in the Activity window, EagleFiler is better at waiting until they have been canceled, so it’s less likely that you’ll get the alert sheet about not being able to close the library because it’s busy.
- Improved indexing performance by skipping certain file types that could be slow and didn’t need to be indexed, anyway.
- EagleFiler now integrates with Hook.
- Updated the How can I put my library on my iPhone? section of the manual.
- The import text and import plain text script commands now let you create an empty document, e.g. if you want a blank file to send to another app for editing or to record some metadata.
- Improved the Tag PDFs that Need OCR script.
- Worked around a bug in macOS 10.14 that prevented EagleFiler from using Spotlight importer plug-ins, leading to Excel, OmniOutliner, and other document types not being indexed.
- Worked around a Spotlight change in macOS 10.14.4 that prevented indexing from working.
- Worked around bugs in third-party Spotlight importers that returned the wrong type of data.
- Worked around a Quick Look bug that could cause hangs when clicking to view a record.
- Worked around an issue where macOS would offer to Quick Look a link in an e-mail, but doing so would cause an internal error.
- Worked around a change in macOS 10.14 to restore the highlight ring when dragging and dropping onto the records list.
- Importing an ENEX file that references a missing attachment no longer causes an internal error.
- Tried to work around a macOS bug that could cause a crash when closing a library.
- When capturing from Microsoft Entourage, EagleFiler now picks a default folder name rather than failing if Entourage reports an error getting the folder name.
- EagleFiler now skips over damaged metadata files instead of halting the import with an error.
- EagleFiler now logs to Console if a file triggers slowness in a Spotlight importer, to help track down problem files and importers.
- Fixed the colors in the quick entry text view when using Dark Mode.
- Fixed an internal error when parsing an invalid e-mail date that could lead to a mailbox not being imported.
- Fixed a bug where some MIME text was not decoded properly.
- Fixed a bug where importing from MailTags 6 didn’t work.
- Fixed a bug where the capture key didn’t work with MarsEdit 4.
- Updated to Xcode 10.2.
- The Mac App Store version of EagleFiler no longer uses the hardened runtime, to work around an App Review code signing problem.
- 1.8.6—February 4, 2019
- When importing from Evernote, EagleFiler now attaches any Optical Character Recognition (OCR) results to the records as notes, so that you can search for printed and handwritten text that had been extracted.
- Improved EagleFiler’s support for Dark Mode in the records list, record viewer, source list, and options window.
- Bulk importing from the Files folder using Scan for New Files is much faster (than before and also compared with other import methods), as EagleFiler no longer wastes time reading Spotlight comments that don’t need to be copied. This is especially important on macOS 10.14, as its new security features seem to slow down Apple event processing.
- Made various changes to improve viewing and scrolling performance in the records list, particularly for large libraries with lots of media files that need to have previews generated.
- The source list is faster at displaying tags on macOS 10.14.
- EagleFiler now figures out the date if an e-mail message is missing the Date: header.
- Improved the following sections of the manual:
- Improved the error message when EagleFiler is unable to launch.
- Worked around a bug where Outlook didn’t correctly report which messages were selected, leading to no messages being imported by the capture key.
- Worked around a macOS bug that could make setting a file’s creation or modification date to earlier than 1970 set the wrong date.
- Worked around a bug in macOS 10.14 that could cause a hang when importing a URL from Safari via drag and drop.
- Worked around a problem where EagleFiler could import metadata that was invalid Unicode and thus would cause an error when saving the database.
- Error logging works better with long error messages that exceed the macOS limit.
- Error logging now works with strings that cannot be converted to UTF-8.
- Fixed a bug where a Web page with an illegal Unicode byte sequence in the title might fail to import.
- Fixed a bug where toolbar buttons would shift position when a label changed size, e.g. from “Read” to “Unread”.
- Fixed a bug where JavaScript in a Web archive could open a new window in your browser without any user interaction.
- Fixed a bug where the menu for hiding and showing table columns had an Import From iPhone item.
- Updated the screenshots in the manual.
- 1.8.5—December 20, 2018
- Improved EagleFiler’s importing from Evernote. EagleFiler now converts the notes to macOS’s standard Rich Text With Attachments (RTFD) format, preserving images and attached files, text formatting, and metadata (tags, title, author, source URL, dates). This is further described in the Import ENEX File… section of the manual. (In prior versions, importing created an uneditable HTML file, and the attachments were separate EagleFiler records in a sidecar folder.)
- EagleFiler now supports importing using Continuity Camera (requires macOS 10.14). This is described in the Import from iPhone Camera section of the manual.
- On macOS 10.14, you can import from Finder via a Quick Action. This is described in the Importing via a Quick Action section of the manual.
- The capture key now works with NetNewsWire 5.
- You can now use PopClip to import the selected text into EagleFiler, as described in the Importing via PopClip section of the manual.
- Plain HTML is now a supported Web page format for importing. This can be useful if you want to preserve the original HTML text content but don’t want the overhead of a Web archive or prefer to use a format that works in all browsers.
- The Convert for Editing command now works with HTML files (rather than just Web archives).
- EagleFiler now supports the Hardened Runtime on macOS 10.14.
- EagleFiler is now notarized by Apple.
- When importing via AppleScript, there is a new allowing duplicates option to temporarily override the application-wide Allow duplicate files in library preference.
- The Import Files… command now explains that you can also import files by moving instead of by copying.
- Added support for importing tags and notes from the forthcoming MailTags 6.
- Updated the following sections of the manual:
- Updated the Import Examples sample script.
- Opening the smart folder editor is faster.
- Importing pre-existing bookmark files is faster.
- Improved the responsiveness when typing.
- Improved the display of labels in Dark Mode.
- The About window now includes a link to the privacy policy and has an updated layout.
- EagleFiler reports a better error message when you are trying to manually import a mailbox from Mail and EagleFiler lacks Full Disk Access.
- EagleFiler now directly opens the Full Disk Access tab of System Preferences to make it easier for you to grant access.
- EagleFiler now includes a usage description when it requests Automation access on macOS 10.14.
- EagleFiler now stores damaged index files outside of its file package so that they easier to see and delete to free up disk space.
- When importing an entire volume, EagleFiler now skips various invisible folders managed by the system.
- Worked around a macOS bug that caused EagleFiler to get stuck importing certain Web pages and neither finish nor time out.
- Worked around a macOS change that could cause an internal error when trying to replace text in a PDF view.
- Improved the diagnostic report.
- Fixed a bug where status information in the viewer was sometimes displayed with the wrong colors in Dark Mode.
- Fixed a bug where column titles or sort indicators could appear drawn on top of the arrow for the table column pop-up menu in Dark Mode on macOS 10.14.
- Fixed a bug where EagleFiler would use the wrong text color in certain situations, e.g. white RTF text in Dark Mode on macOS 10.14 or black text instead of the custom plain text color.
- Fixed an inconsistency with tab width in new plain text files or when switching from editing a rich text one to a plain text one.
- Fixed a bug where, when using a newer version of WebKit, Web views didn’t unhighlight the old search terms when you changed the query.
- Fixed a bug where empty Markdown files were not imported as text files if you had an application installed that told the system they were not text.
- Fixed a bug where the EagleFiler Spotlight importer didn’t work with FoxTrot.
- Fixed a bug importing an Apple Mail .mbox folder via the To Import folder or the Files folder folder. (However, importing via those folders tells EagleFiler to import the files as-is. It’s generally better to use other import methods for such mailboxes to allow EagleFiler to convert them to the standard mbox format.)
- Fixed a bug where EagleFiler would capture the first tab from Vivaldi, rather than the active tab.
- Fixed a bug where EagleFiler would import some iCloud temporary files (and then later complain that they were missing).
- Fixed an internal error that could be reported during a background operation.
- Fixed an internal error that could occur when using the Copy Record Link command.
- Fixed a bug where EagleFiler could log an internal undo-related error when launching.
- 1.8.4—August 22, 2018
- macOS 10.14 has new data protection features that require the user to specifically grant applications such as EagleFiler access to do certain things. In general, you will want to grant EagleFiler Full Disk Access as well as Automation access for Finder, Mail, Safari, and other applications that you want to capture from. This is further explained in the Security & Privacy Access section of the manual.
- Added support for Dark Mode on macOS 10.14. The viewer for plain text files (and plain text e-mails) switches colors for dark mode, whereas RTF files and HTML e-mails do not because they may override the background color in ways that are hard to read with the dark color scheme.
- The capture key now works with Apple Mail on macOS 10.14.
- EagleFiler is able to import more Web pages successfully because it now ignores timeouts and certificate errors when loading subsidiary resources. Previously, a broken ad or tracker would cause importing to fail. Now, EagleFiler makes a best effort (like a Web browser) so that importing can succeed so long as the main page content loads without error.
- If you open an RTF file in TextEdit and add an image, TextEdit will convert it to RTFD format. When you view the file again in EagleFiler, EagleFiler will now detect this renaming instead of reporting the file as missing.
- Importing URLs in bookmark format is much faster.
- Bulk tagging operations from the Batch Change and Info windows and from the tags bar and tag sources are much faster.
- The capture key now works with the Vivaldi Web browser.
- Compiled AppleScript files are no longer imported as plain text files; instead, EagleFiler displays them as read-only, syntax-highlighted source code.
- EagleFiler now waits a bit longer after you open a library before starting the background operations, to improve responsiveness.
- The Import Bookmarks… command now skips over items in the bookmarks file with missing URLs, rather than failing with an error.
- Made various user interface refinements and fixes for compatibility with macOS 10.14.
- The Export CSV script now uses UTF-8, so it should work with metadata that uses any characters.
- Updated the following sections of the manual:
- Added the WebToolRTFDomains esoteric preference, as described in Importing Web Pages and URLs. This can help with importing from sites such as Twitter that don’t print properly.
- Added DisplayImagesWithQuickLook to the esoteric preferences for improved privacy control.
- EagleFiler will now log a more informative error if it can’t access the Spotlight comments due to not having Finder Automation access on macOS 10.14.
- Worked around a bug in macOS 10.14 that prevented the open libraries from being remembered.
- Worked around a bug in macOS 10.14 that prevented saving bookmark files.
- Worked around a change in macOS 10.14 that could cause a library to open with some of the source list items inappropriately collapsed.
- Worked around a bug in macOS 10.14 that prevented the selected source list item from being properly indicated.
- Worked around a macOS 10.13 bug that could prevent keyboard input after closing the Help menu.
- Worked around a macOS 10.13 bug that would cause a crash when indexing Excel or PowerPoint documents.
- Worked around a SearchKit bug that could cause files not to be indexed.
- Worked around a macOS 10.13 bug that could cause an internal error when locating EagleFiler’s data files.
- Removed the Open in Delicious command.
- Updated to version 1.3.12 of the SkimNotes framework.
- Fixed a bug where the capture sound didn’t play on macOS 10.13 or later.
- Fixed a bug where Scapple files would display as XML instead of showing a preview of the document.
- Fixed a bug where Option-double-clicking a large selection of records (such that confirmation was required) would open them in the external viewer instead of opening their source URLs.
- Fixed a bug where toggling text view options (such as spell checking) from the Info inspector’s contextual menu didn’t work.
- Fixed a bug creating bookmark files from certain URLs.
- Fixed a bug where some content in HTML e-mail messages might not be indexed for searching.
- Fixed a bug where EagleFiler could report an internal error when asked to import a file that was already in the library folder but which had not yet been fully imported.
- 1.8.3—March 28, 2018
- The capture key now works with the Evergreen feed reader.
- Evergreen’s Share button now works with EagleFiler.
- Added support for capturing from beta versions of Opera 51.0.
- Improved the responsiveness when displaying HTML e-mail messages with remote images.
- EagleFiler can now import Apple Mail messages with attachments that are stored as pre-expanded ZIP files. (Typically this happens when you send a message with a packaged document attached.)
- EagleFiler can now import malformed mbox files generated by Mail Archiver X.
- Changing the filename or other metadata via the contextual menu in the viewer is now more easily undone.
- The system Quick Look previewer no longer supports chat archives from Messages and iChat, so EagleFiler once again displays these using its own code.
- Added the Importing iMessages section of the manual.
- The Importing Mail From MailMate section of the manual now describes how to automatically import all messages added to a particular mailbox.
- Updated the Reveal in Finder section of the manual to mention third-party Finder replacements.
- Added logging to hopefully track down bugs with NSFileManager and NSTextView.
- Fixed a bug where View ‣ Message ‣ Rich Text was not shown as checked when it was in effect.
- Fixed a bug where a timeout loading a remote image could make the e-mail display without formatting.
- Fixed a bug that could cause EagleFiler’s Spotlight importer to leave temporary files around when it was invoked by FoxTrot.
- Fixed a bug where the collapsed state of the Tags source group was not restored.
- Fixed a bug where the accessory view when creating an encrypted library wasn’t centered.
- Fixed a crash reporter bug that could prevent some information from being logged.
- Improved the diagnostic report.
- 1.8.2—January 8, 2018
- Tag names can now contain spaces, which improves interoperability with Finder tags. The Search Query Syntax has been updated to support using quotation marks around tag names with spaces.
- Adjusted the way tag auto-completion works so that it’s easier to enter new tags whose initial characters are similar to existing tags but differ in case or diacritics. Previously, the system would sometimes alter the initial characters that you had typed, making certain strings impossible enter by typing (though you could paste them).
- The system Share toolbar button (which we had to remove in EagleFiler 1.6.5) is once again supported.
- Updated the following sections of the manual:
- EagleFiler no longer tries to import iCloud Drive temporary files.
- Updated to version 1.3.8 of the SkimNotes framework.
- The section names in the source list are no longer in all caps, to match the current system apps.
- Renamed the To/Cc search scope to Any Recipient.
- Worked around a macOS bug that could cause text in the records list to be unreadably condensed (with overlapping letters) when doing a search.
- Worked around a macOS bug where the paperclip icon for e-mail attachments didn’t always respond to clicks. Instead, the attachment names are now clickable.
- Worked around a PDFKit issue that could prevent ejecting an encrypted library.
- Fixed a bug where Reply to Message would use the From address instead of the Reply-To address.
- Fixed a bug where a misleading error message would be presented if a secure connection could not be made to the software update server.
- Fixed a bug where pressing Command-Delete while editing text in the records list would move the selected record to the trash instead of deleting the text to the beginning of the cell.
- Modernized some font selection code.
- 1.8.1—October 19, 2017
- EagleFiler is now 64-bit only and requires macOS 10.7 or later.
- Added support for HEIC images.
- Sketch files are now displayed using Sketch’s Quick Look plug-in instead of just showing the file icon.
- You can now paste Return-delimited tag names into the Tags fields. This can be helpful in concert with selecting a range of tags and using the Copy command, as that generates Return-delimited text.
- Increased the maximum width of the Title column.
- The How can I put my library on my iPhone? section of the manual now recommends the new Files app in iOS 11, which can view and sync the tags on your EagleFiler files.
- Updated the Edit Smart Folder… and Export… sections of the manual.
- Worked around a macOS 10.13 bug that caused crashes in Core Animation.
- Worked around a macOS 10.13 bug where importing an Apple Mail message via drag and drop could import an empty folder instead of the .eml file.
- Worked around a macOS bug that prevented large PDF files from displaying properly.
- Worked around an issue where macOS would add a color tag (which would then get synced into EagleFiler) when you assigned a label.
- You can now assign the ef_nometa tag to a folder to exclude it (and its subfolders) from metadata backups.
- Added the MJTURLSetModificationDateOnCopy esoteric preference to have EagleFiler try to repair lost file modification dates when importing to a NAS.
- EagleFiler no longer considers .7z message attachments to have unknown type.
- Improved the error reporting when importing a Web page.
- Worked around an internal error when opening a library window.
- When importing an Apple Mail message, EagleFiler no longer warns about missing message parts that are actually present but empty.
- Fixed a bug where the Drop Pad could show no current library if you closed a library window while EagleFiler was in the background.
- Fixed a bug where EagleFiler could report an internal error when Control-clicking on a row that now longer exists.
- Fixed an issue on macOS 10.13 that could cause a hang when searching.
- Fixed an issue on macOS 10.13 that could prevent closing the library or quitting.
- Fixed a regression where there was too much debug logging when importing a Web page.
- Updated the German localization.
- 1.8—July 24, 2017
- EagleFiler is now compatible with macOS 10.13 (currently in beta).
- On macOS 10.13, EagleFiler uses APFS’s cloning feature. This can make importing large files much faster and reduce the amount of disk space used, as the copies in EagleFiler’s library can share the same disk blocks as the originals.
- Added the Message ‣ Use Quick Look command to the View menu, which enables EagleFiler to display images that are attached to e-mails. Previously, only remote images were displayed; attached images could (and can still) be viewed in the separate Quick Look window and by double-clicking the message to open it in Apple Mail or another external viewer. The Message ‣ Plain Text and Message ‣ Rich Text options are still available. These use EagleFiler’s mail engine, which doesn’t yet support inline images but which provides more control over fonts and colors, as well as additional searching and text features.
- The keyboard shortcut for Reply to Message has been adjusted to allow the View ‣ Message shortcuts to be consistent.
- Added the Always Search All Records option to the search field menu. This lets you do a global search without having to first select the Records source. If you commonly want to search the entire library, enabling this option can save you that step as well as the step of re-selecting the sources that you were viewing before the search, should you want to go back to viewing them. This is described further in the Searching section of the manual.
- Importing Apple Mail messages is faster and requires less temporary disk space.
- It is now possible to use the records list and source list contextual menus without changing the selection. This means that, for example, while editing a record’s note you can copy and paste links to other records. (Previously, Control-clicking on the other record would change the target of the inspector, making the note disappear.)
- The Info inspector now remembers the scroll position and selection of the notes text view when you switch back and forth to another app.
- Updated the Quoted Text Colors presets to match the new colors that Apple Mail uses.
- On macOS 10.13, there is a new Show All Tabs command in the View menu.
- EagleFiler will now prevent you from creating files whose names are valid on APFS but not HFS+, as such files cannot be backed up via Time Machine or copied/synced to an HFS+ volume.
- Metadata in JPEG 2000 e-mail attachments is now indexed for searching.
- Made various performance improvements.
- Updated the following sections of the manual:
- When importing from Apple Mail, EagleFiler can now detect and warn if a message is marked as having separately stored attachments but EagleFiler didn’t find any references to them in the message headers.
- EagleFiler no longer imports DEVONtech_storage metadata files.
- The diagnostic reporter can now check whether the application package is damaged
- Removed a workaround for a PDF crash since the underlying bug seems to be fixed in macOS 10.13.
- Worked around a Web Kit change that prevented quoted text from being colored in rich text e-mail messages.
- Worked around an OS bug that could make only the first of a group of messages dragged from Outlook import into EagleFiler.
- Made various code modernizations.
- Fixed a bug where EagleFiler’s indexer could potentially get confused by the new nanosecond-precision dates in APFS.
- Fixed a bug where the Tags inspector would look like it would let you delete an undeletable built-in tag.
- Fixed a bug where certain types of Apple Mail mailbox hierarchies would cause EagleFiler would report that attachments were missing when they weren’t.
- Fixed a bug where EagleFiler sometimes reported missing Apple Mail attachments using the wrong path, so that it was not possible to open the message and get Mail to re-download the attachments.
- Fixed a bug where EagleFiler did not import an attachment from an Apple Mail message when the message’s only part was an image.
- Fixed a bug where column state changes made when a window was in full screen mode were not saved.
- Fixed a bug where no RTF file was created if you entered metadata but no text in the Quick Entry window.
- Fixed a bug where some text in the New Library… window was truncated due to OS font changes.
- Fixed a bug that could cause an internal error when trying to access the Open With menu while a library was opening.
- Fixed a bug where text could wrap onto an invisible second line in the tag abbreviation column.
- Fixed bug where YouTube videos in Web archives didn’t play. (Note that the video content is loaded on demand; it not saved in the Web archive file.)
- Fixed a bug that could cause an internal error when reporting errors.
- Fixed a bug that could cause an internal error when updating the Find panel.
- 1.7.6—April 18, 2017
- The x-eaglefiler custom URL scheme now supports a search option. The new Searching From Other Applications section of the manual shows how to use this to initiate an EagleFiler search from Alfred, LaunchBar, or other applications that support URL schemes. You can set up your launcher app to search the current EagleFiler library as well as create shortcuts to open and search specific libraries.
- Improved the Searching section of the manual.
- EagleFiler now follows the Match Partial Words setting when highlighting search matches in the records list and in text and e-mail records. In other words, if you were searching for a whole word, EagleFiler will no longer highlight instances of that word contained within another word. This should reduce confusion about what was actually being searched for.
- Worked around a bug in macOS 10.12 that could make the File ‣ Open command open the library behind an existing library’s window.
- Worked around a bug in OmniOutliner 5 that caused its compressed flat files to be imported as text files. (The change takes effect for newly imported files or if you rebuild your library.)
- Worked around a PDF bug in macOS 10.12.4 that could cause a crash when opening a contextual menu.
- 1.7.5—March 21, 2017
- For consistency with Finder, the New Browser Window command now always makes a new window. As before, when you open a library EagleFiler follows the system preference to decide whether it should be tabbed, and you can use the + button in the tab bar or the New Tab command to make another tab for an existing window.
- The Command-Up Arrow and Command-Down Arrow keyboard shortcuts no longer change the selection in the records list when their corresponding menu commands (Enclosing Record and Contents of Record) are disabled. This is consistent with Finder and should help prevent getting lost when you reach the top or bottom of the hierarchy.
- When opening a record link, EagleFiler now deminimizes the window from the Dock, if necessary.
- When a file in a subfolder of the To Import folder is skipped because it’s a duplicate, it’s now moved to the same relative location in the Unable to Import folder instead of the top level. This should make it easier to figure out where it came from.
- Updated the Importing From iOS section of the manual.
- The Capture Not Supported window no longer shows the Show Drop Pad button if the Drop Pad window is already visible.
- EagleFiler no longer tries to import metadata files for Dropbox’s Selective Sync feature.
- Acorn 5.6.4 fixes a problem that could cause Acorn to quit if it was launched as a result of EagleFiler asking it to open a file.
- Improved the error reporting when moving files.
- Documentation and Help menu links to c-command.com now use https instead of http.
- Added the DeleteRecordsWithoutCommandKey esoteric preference, which prevents the Delete key from accidentally moving records to the trash when the Command key is not down.
- Worked around a bug in Preview that could cause an internal error when importing a PDF page via drag and drop.
- Partially worked around a bug in macOS 10.12 that could prevent some text from being properly indexed for searching. If this was affecting you, you’ll need to rebuild the indexes to see a change for existing records.
- Fixed a bug where typing Command-Delete in a text editor or text field could move the selected record to the trash instead of deleting text to the beginning of the line.
- Fixed a bug where an internal error could occur if you emptied the trash while EagleFiler was generating an icon preview.
- Fixed a regression where EagleFiler would sometimes show records list columns that had been hidden.
- 1.7.4—February 27, 2017
- You can now capture entire mailbox hierarchies from within Apple Mail. To do this, select the topmost mailbox (or mailboxes), make sure that no messages are selected, and press the capture key. For more information, see the Importing Mail From Apple Mail section of the manual.
- EagleFiler now works with newer AudioNote files that are packages.
- Message display and indexing are faster, particularly for large .eml files.
- The Save Diagnostic Report… command in the Help menu now works with all versions of macOS that EagleFiler supports.
- Added the Replace in Titles script.
- The How can I access my library from multiple Macs? section of the manual has more information about Resilio Sync.
- Added the Share Extension section of the manual.
- EagleFiler no longer imports .sync or .ts folders, as they only contain metadata.
- EagleFiler now logs to Console when a message attachment is particularly slow to index, to help identify problem files or Spotlight importers.
- Added the IndexMessageAttachments esoteric preference so that you can skip indexing message attachments if Spotlight issues are causing indexing to get stuck.
- Added the UnindexedAttachmentExtensions user default, as described in the How does indexing in EagleFiler work? section of the manual.
- Fixed an issue where the EagleFiler Import command was not available in Preview’s Share menu.
- Fixed a problem where EagleFiler could lose track of a file if the library was stored in Dropbox and Dropbox renamed the file in accordance with its filename limitations.
- Worked around a WebKit error when importing certain Web pages.
- Worked around an OS bug that prevented table column state from being saved.
- Worked around an OS bug that could cause a crash when using the Touch Bar.
- Worked around an OS bug that could cause a crash when creating a diagnostic report.
- Worked around an OS bug that prevented importing Mail messages via drag and drop if the subject contained a # character.
- Worked around an OS bug that could cause an error when displaying a PDF file.
- Improved the workaround to prevent crashing due to a PDFView contextual menu bug on macOS 10.12.
- Made the task code more robust.
- Fixed a regression where some message attachments were not indexed.
- Fixed a bug that could cause an internal error when reporting an error.
- 1.7.3—January 10, 2017
- For new libraries created on macOS 10.12 or later, EagleFiler uses a different set of tag abbreviation symbols that are better suited for the Sierra fonts. You can use the Tag Abbreviation Style AppleScript to change the symbols in a pre-existing library and to switch between different sets of symbols.
- EagleFiler now supports the Touch Bar.
- Revised the toolbar icons for Unread and Read with a bullet and checkmark to make them more clear.
- Worked around a bug in macOS 10.12 that caused resizing glitches when using tabbed windows.
- The text inspector bar is once again available, thanks to a crashing bug fix in macOS 10.12.2.
- When you’re editing a file in the record viewer, EagleFiler now auto-saves it every minute, rather than only when you change windows or apps.
- SOHO Notes is no longer being developed, but you can import folders or individual notes from it by dragging and dropping them onto EagleFiler’s Dock icon or into one of your EagleFiler library windows. SOHO Notes customers can get a discount on switching to EagleFiler by e-mailing proof of their purchase.
- The new Save Diagnostic Report… command in the Help menu provides an easier way of recording error logs and other information to send to technical support (requires macOS 10.12).
- Improved the following sections of the manual:
- Added some esoteric preferences for changing the colors EagleFiler uses for displaying plain text files.
- Added NewPlainTextExtension to the esoteric preferences, which lets you change the extension of new plain text files that EagleFiler creates on your behalf. For example, you could change it from the default txt to md to create Markdown files.
- Added DefaultWebEncoding to the esoteric preferences.
- Work around various font metrics issues in macOS 10.12 to make tag abbreviation symbols display properly in the source list and records list.
- Enlarged the triangle in the table column pop-up menus.
- Improved the error logging on macOS 10.12.
- Fixed a bug where the Open With menu did not show all of the available applications for file types that some applications claim only by file extension, rather than UTI. For example, you can now open Markdown files with Byword and iA Writer.
- Fixed a bug where window tabbing was allowed for auxiliary windows.
- Fixed drawing glitch that could cause black lines to appear at bottom of the window (macOS 10.12 and later).
- Fixed a bug where files imported from Evernote might not display with the proper encoding.
- Fixed a bug where capturing messages from a local Apple Mail mailbox sometimes didn’t work if your Mac was not running in English.
- Fixed a bug where EagleFiler could incorrectly log an error about the Mac App Store receipt.
- Updated to Xcode 8.1.
- Updated the German localization.
- 1.7.2—October 17, 2016
- The Reveal button in the Errors window now works if multiple errors are selected. You can now hold down the Option key to open the files instead of revealing them; this is useful for loading attachments in Mail messages that were only partially downloaded.
- Added DisplayPDFsWithQuickLook to the esoteric preferences to let you work around bugs in macOS 10.12’s PDFView.
- Improved the following sections of the manual:
- Worked around a change in the macOS 10.12 font panel that could cause the wrong variant of the system font to be used when changing the font in the preferences.
- Worked around a bug in macOS 10.12 that could prevent the progress window from being centered.
- Worked around a badly worded OS certificate error when checking for a software update.
- Worked around a change in macOS 10.12 that messed up the positioning of tag abbreviations in the source list.
- Worked around a change in macOS 10.12 that could cause the ruler to be shown when editing a plain text file.
- Worked around an issue that prevented some errors from being logged to Console on macOS 10.12.
- Fixed a bug with the Apple Mail importer and the new mail store format on macOS 10.12 that led to Missing Apple Mail Message Attachment errors.
- Fixed a bug where capturing from an On My Mac Apple Mail mailbox on macOS 10.12 didn’t work if the Mac had not been previously running Mac OS X 10.11.
- Fixed a bug where the tab stops for the plain text editor didn’t auto-adjust for different fonts and sizes.
- Fixed a bug where the tag abbreviation font in the source list didn’t match the records list and Tags inspector.
- Fixed a bug where sometimes the Drop Pad or capture key would would incorrectly report that no library was open.
- Fixed a bug where image titles were sometimes not properly imported and indexed.
- If EagleFiler is unable to find the messages to import from Apple Mail, it now logs the folders it was looking for them in to aid in troubleshooting.
- 1.7.1—September 19, 2016
- EagleFiler no longer uses the text inspector bar on macOS 10.12, in order to work around a crashing bug in the OS. In the event that the bug is fixed, you can re-enable the text inspector using TextInspectorBar in the esoteric preferences.
- The system PDF view was rewritten in macOS 10.12, and there are still
some bugs in the GM release that affect EagleFiler:
- The PDF contextual menu is not available. This may be fixed in the official release of 10.12.
- Dragging to select PDF text sometimes selects the wrong range.
- Some longer PDF files display with blank regions when using Continuous Scroll mode.
- Worked around a bug in Mac OS X 10.11.6 that could cause internal errors and prevent the font picker in the preferences from changing to a non-system font once a system one had been set.
- The mbox writer guards against newlines in the From line.
- Improved the following sections of the manual:
- Updated to Xcode 8.
- Renamed “Mac OS X” to “macOS” throughout the app and documentation.
- Added the Sending in Crash Log Files section of the manual.
- Fixed a bug where search queries that included angle brackets could fail if Match Partial Words was enabled.
- Fixed a bug where some URL importing errors were not reported if the format was set to PDF, which led to the creation of blank PDF files.
- 1.7—August 12, 2016
- EagleFiler now supports tabbed windows (requires macOS 10.12). A single window can have multiple tabs for either a single library or for different libraries. You can show the tab bar from the View menu. There are commands to manipulate tabs in the Window menu. Clicking the + button in the tab bar creates a new tab for the current library, equivalent to the New Browser Window command.
- Added support for capturing from Apple Mail on macOS 10.12.
- The Remove Duplicate Messages script now works if you have selected mailboxes in the source list rather than the records list.
- Added the current records script property, which returns the selected records in the records list or the source list, depending on which list has focus.
- The guid property on records is now available from AppleScript.
- When you use the Export… command to generate a new mbox file for the selected messages, EagleFiler now uses Unix- instead of Mac-style linebreaks, since more e-mail products now support the former.
- Made various code modernizations.
- EagleFiler now shows an empty Container column when the file is directly in the Files folder, as this is more clear than showing Records.
- When reporting that a file is damaged, EagleFiler now shows the relative path rather than just the filename, to make it clearer which file has a problem.
- The Errors window is better at displaying filenames containing slashes.
- EagleFiler reports a better error message if it finds that an Apple Mail message file is empty.
- On macOS 10.12, EagleFiler no longer shows its Select Next Tab and Select Previous Tab menu items because they duplicate the new system ones.
- Made some changes to the way EagleFiler generates mbox files to prevent Thunderbird’s importer from getting confused.
- Improved the following sections of the manual:
- Renamed “Mac OS X” to “macOS” throughout the app and documentation.
- Tried to work around an OS issue where sometimes libraries were not added to the Open Recent menu.
- Fixed a bug reading messages that have DOS linebreaks, which could lead to exported mbox files not importing properly and could affect the display and indexing of certain messages.
- Worked around an OS bug that could cause files in the To Import folder not to be imported promptly.
- Fixed a bug where EagleFiler did not launch on macOS 10.12.
- Fixed a bug that caused EagleFiler to report an error when opening a library on macOS 10.12.
- Worked around an OS bug that caused problems for tag completion using composed character sequences.
- Added a workaround for a PDFView crashing bug in macOS 10.12. To enable it, click this link.
- Fixed a regression where tagging from the Record menu didn’t work.
- Fixed a bug where edits to a record’s tags could be lost if you moved it without the tags bar losing focus.
- The distribution disk image is now signed.
- 1.6.9—May 23, 2016
- The Applications That Support Capture section of the manual now describes how in Mac OS X 10.11.5 you need to check Enable JavaScript From Apple Events in order for EagleFiler to capture the selected Safari text as a note attached to the Web page.
- When importing from Apple Mail, EagleFiler will now report an error if some of the messages could not be found because they were missing from Mail’s data store. This could simply mean that Mail has not finished downloading those messages and that you should try again shortly.
- If a message’s date sent is not readily available, EagleFiler now uses the date received (rather than the current date) when generating the mbox file’s “From ” line.
- EagleFiler will now log an error in the unlikely event that it finds two records that reference the same file. This condition can be fixed by rebuilding the library.
- Made various code modernizations.
- Improved the following sections of the manual:
- Fixed a bug where messages in mailboxes could not be exported to .eml files via drag and drop.
- Fixed a bug where EagleFiler sometimes didn’t skip importing duplicate e-mail messages.
- Fixed a bug and worked around an OS issue that could cause unnecessary updating of EagleFiler’s metadata backup files, leading to extra storage use and network traffic.
- Fixed a bug that could cause EagleFiler to crash when indexing a message with malformed headers.
- Fixed a bug that could lead to leaking system pasteboard resources.
- Fixed a regression (perhaps due to an OS bug) where the Info and Tags toolbar buttons were inappropriately disabled.
- Fixed a regression where Option-clicking the Tags toolbar button did not open the Tag Cloud window.
- Fixed an issue where capturing from Safari didn’t work if Safari Technology Preview 1 was running at the same time.
- Fixed a bug where the “replied” and “sent” tags were not imported from Mailsmith.
- Fixed a regression where the fallback MIME text decoder didn’t work.
- Fixed a bug that could cause EagleFiler to report an error about an “EmptyViewer,” e.g. when importing.
- 1.6.8—March 10, 2016
- EagleFiler can now capture from Numbers and Microsoft PowerPoint.
- Capturing from Apple Mail is faster when you have a large mail store.
- EagleFiler now auto-hides and shows the ruler, like it does the text inspector bar, so that it’s not shown when you aren’t editing an RTF file. Among other benefits, this prevents the alignment and spacing buttons from moving back and forth between the ruler and the text inspector bar, depending on whether the latter was shown.
- You can now double-click a smart folder as shortcut for Edit Smart Folder…. Option-double-click to get the old behavior of opening a new window with that smart folder selected.
- When transferring the search query from the main window to the Find panel, EagleFiler now strips any * wildcard characters so that you can more easily use the Find Again command.
- Copying and pasting an e-mail message from EagleFiler to the Finder now creates a standard .eml file rather than a Mail-proprietary .emlx file.
- You can now improve the importing of certain Web pages (e.g. Twitter or Discourse-powered forums) by selectively disabling JavaScript for certain domains. This is described in the Importing Web Pages and URLs section of the manual.
- Added the Append Creation Date to Filename script.
- Improved the following sections of the manual:
- The record viewer no longer shows the text inspector bar when Allow Editing in Record Viewer is unchecked. This prevents unwanted shifting of the window content and works around a text selection problem.
- When importing from Apple Mail, EagleFiler no longer makes an unnecessary copy of each of Mail’s Attachments folders. This used extra temporary disk space and could cause the import to fail unnecessarily in the event of a file permissions problem.
- EagleFiler now skips importing all files whose names begin with ~$ because they are probably Microsoft Office temporary files.
- When capturing from Apple Mail, if there’s an error finding the mailbox on disk, EagleFiler now presents a more helpful error message.
- Improved the error reporting when a Mac App Store receipt cannot be found.
- Improved the error reporting for the Software Update… command.
- Worked around an OS bug that prevented changing the search highlight and quote colors on Mac OS X 10.10 or later.
- Fixed bugs where the iWork and Microsoft Office capture scripts didn’t work with the latest versions of those apps.
- Fixed a bug where EagleFiler couldn’t capture from local Apple Mail mailboxes on Mac OS X 10.11 if the Mail installation was fresh, rather than upgraded from a previous version of Mac OS X.
- Fixed a bug where text of the selected items in the source list could be hard to read when dragging and dropping onto another item.
- Fixed a bug where Mac App Store receipts would not validate if the Mac’s language was set to Hebrew.
- 1.6.7—January 22, 2016
- EagleFiler now waits to show the text inspector bar until you actually start editing an RTF document. This prevents it from repeatedly hiding and showing as you browse through a bunch of records.
- If you press the capture key in the Notes app, EagleFiler will now show some instructions for importing from Notes.
- If you press the capture key in Reeder, EagleFiler will now suggest how you can set up a hotkey in Reeder for importing into EagleFiler.
- EagleFiler’s metadata backup files are now named .EagleFiler Metadata.plist. The initial period prevents them from cluttering file lists in iOS and Web services that don’t respect the traditional Mac flag for marking files as invisible.
- Added the Importing From iOS section of the manual.
- Improved the following sections of the manual:
- Applications That Support Capture
- Copy tags to Spotlight comments
- How can I access my library from multiple Macs?
- How can I back up my EagleFiler data?
- How can I put my library on my iPhone?
- Importing Mail From Apple Mail
- Importing Mail From Webmail/Gmail
- Importing Web Pages and URLs
- Mac App Store
- Merge Mailboxes/Message Files
- Searching
- In the contextual menu for the record viewer, you can now hold down the Option key to change Set Filename to Set Filename and Title.
- If a file with a source URL is damaged or missing, you can now use the Open in Browser button in the Errors window to view the Web page (and perhaps import it again).
- The Quick entry command is now AppleScriptable.
- Added the Group Records script.
- Added the Date From yyyymmddhhmmss Filename script.
- Added the Import Some Safari Tabs script.
- The Convert Plain Text to Rich Text and Convert Rich Text to Plain Text scripts now demonstrate how to use the create temporary folder script command.
- The New Record and Label toolbar buttons now adjust if you choose the small toolbar size (requires Mac OS X 10.11).
- EagleFiler now preserves the creation date when importing a folder.
- EagleFiler no longer imports Prism files as text files.
- When setting the selected records via AppleScript, EagleFiler will now change the selected source if the specified records aren’t in the current records list.
- Faster indexing of media file e-mail attachments.
- Metadata backups now include a transientRecordID field.
- Improved the help message and error reporting when EagleFiler is unable to capture from Outlook.
- EagleFiler now logs to Console if doesn’t find all of the expected Apple Mail messages to import.
- Added RecordsListShowToolTips to the esoteric preferences.
- Added ImportTitleFromFileContents to the esoteric preferences.
- Added IndexingUsesAttributeModificationDate to the esoteric preferences.
- Worked around an OS issue that could cause an error when importing from Yoink.
- Worked around a rare problem where EagleFiler would sometimes erroneously report that there was no library open when you pressed the capture key.
- Worked around an OS bug that could cause problems (incorrect metadata or missing content) when importing multiple Web pages as PDFs in quick succession.
- Worked around a change in Mac OS X 10.11 that caused the .eml Spotlight importer to not import any text.
- Worked around an OS bug that could cause a crash when using the contextual menu when viewing a PDF.
- Worked around some issues with Outlook 2016 that could cause capturing to not work.
- Worked around an Xcode bug that could cause a table header drawing glitch on Mac OS X 10.10.
- Updated code for Xcode 7.2.
- Fixed a bug where importing text via AppleScript could cause duplicate imports and an internal error on Mac OS X 10.11.
- Fixed a bug in the URL importing error handling code.
- Fixed a bug where setting the filename from the contextual wasn’t undoable.
- Fixed a bug displaying a e-mail message with an empty HTML part.
- Fixed a bug where Mac App Store receipt validation used the current date rather than the receipt creation date.
- Worked around a Finder bug that could cause the disk image’s icons to be misaligned if the AppleShowAllFiles option was enabled.
- Fixed the size of the distribution disk image window.
- 1.6.6—September 29, 2015
- EagleFiler is now fully compatible with Mac OS X 10.11 El Capitan.
- The Fonts panel now has a menu for selecting the system font. This lets you use San Francisco on Mac OS X 10.11, even though it is not selectable in the regular system Fonts panel. If you select a system font using the new menu, EagleFiler will adapt to always use the system font for the version of the operating system that you’re currently running. In contrast, if you select Lucida Grande or Helvetica Neue, the font will stay fixed.
- The About, Software Update, and help windows now use the San Francisco font on Mac OS X 10.11.
- Modernized code for the Xcode 7 compiler and the Mac OS X 10.11 SDK.
- Added support for App Transport Security on Mac OS X 10.11.
- Added full support for indexing .ics and .vcf files attached to e-mail messages.
- Mac OS X 10.11 no longer includes the formail tool, so EagleFiler now includes its own copy. The Remove Duplicate Messages script has been updated accordingly.
- The capture key now works with Apple Mail on Mac OS X 10.11.
- You can now use the Find panel in the notes text view.
- Optimized indexing of .bmp files attached to e-mail messages.
- Added more message attachment file types that can be indexed.
- The Polish velarized L is now treated like other accented characters for the purposes of indexing and searching.
- EagleFiler no longer tries to extract text from unknown message attachment types. This should make indexing faster and speed up searching using Match Partial Words by not filling the index with junk terms.
- Refined the search index’s definition of terms to make searches more accurate and to reduce index bloat.
- Improved the following sections of the manual:
- When extracting a file’s contents for indexing, EagleFiler will now abort if it hasn’t finished after a few minutes, to work around a bug in Mac OS X 10.10’s PDF reader.
- Added some esoteric preferences to work around hangs and crashes caused by the OS’s built-in support for .docx files.
- Worked around an OS bug that could cause a single-page PDF to be initially scrolled down, when viewing in Continuous Scroll mode.
- Worked around a bug in Mac OS X 10.11 that could cause a crash during Software Update….
- Worked around a Tidy bug that could cause a crash when indexing HTML e-mails.
- Worked around a bug in Mac OS X 10.11 that could prevent EagleFiler from capturing from Apple Mail.
- Removed the application icon from the Open With menu title because it caused the text to appear too dark.
- Fixed a bug where menu items with attributed titles had the wrong font size.
- Fixed a bug where the sample text in the Preferences window’s font chooser text fields would sometimes get cut off.
- Fixed a bug where the contents of <NOFRAMES> tags could be displayed in HTML views.
- Fixed a bug where Software Update… would continue offering updates in the same session you had held down the Option key.
- Fixed a bug where including square brackets in a search query could prevent EagleFiler from finding the relevant records if Match Partial Words was enabled.
- Fixed a regression where indexing certain types of files didn’t work on Mac OS X 10.6.
- Fixed a bug where EagleFiler did not reindex a record’s source URL if you changed it via AppleScript.
- Fixed a regression that caused some mailbox files to be imported as text files.
- Fixed a bug where EagleFiler wouldn’t always rebuild a missing mailbox index file.
- 1.6.5—June 2, 2015
- General
- Made various optimizations so that EagleFiler is faster at viewing and searching large numbers of records.
- The Add Link…/Edit Link… command in the The Format Menu now has a keyboard shortcut of Command-K.
- On Mac OS X 10.10, Helvetica Neue is now the default font for the source list. This can be overridden in the preferences.
- Improved the fonts in the About and Software Update windows.
- The secondary sort in the records list is now always the date, which should be more useful and predictable.
- Added accessibility label in the Software Update new News windows.
- Updated and improved the following sections of the manual (among others):
- Mac OS X 10.10 removed support for the Share toolbar button, so now EagleFiler only displays it on Mac OS X 10.8 and 10.9.
- Updated the Close & Lock toolbar icon.
- Importing
- Improved importing of old Apple Mail mailboxes.
- EagleFiler no longer tries to import Libre Office lock files or NSData temporary files.
- TouchDraw files are no longer imported as text files.
- When capturing from Outlook, EagleFiler is better able to handle delays or failures of Outlook to return a message’s headers.
- When capturing from Preview, EagleFiler now reports a better error if the capture failed because the document had not yet been saved.
- When importing selected Web text via Services, if the source URL is a nonsensical value EagleFiler no longer sets it as the source URL or appends it to the RTF text.
- Added the CaptureNotSupportedJustBeep esoteric preference.
- AppleScript
- It is now possible to import from the clipboard via AppleScript.
- You can now get and set the current library (e.g. for capturing purposes) via AppleScript.
- Updated the sample AppleScripts to use universal type identifier instead of kind.
- The Import Examples script now shows how to create a PDF service.
- The Import From Outlook script now preserves flags and categories from Outlook as tags in EagleFiler.
- Added the Date From Filename script.
- Added the Delete Empty Folders script.
- Added the Tag PDFs that Need OCR script.
- Error Handling
- If the system fails to save the list of files to be opened, EagleFiler will now retry. This should fix a problem where you would tell EagleFiler to open a library and nothing would happen.
- If EagleFiler detects that one of its files is missing, i.e. that the application is damaged, it now presents a better error message.
- Improved the error reporting when a temporary folder cannot be created.
- Improved the error reporting when a metadata backup fails.
- EagleFiler will now automatically recreate the Trash folder if it is missing.
- If the The To Import Folder gets deleted after the library is already open, EagleFiler will now automatically recreate it.
- Improved the error handling when the system doesn’t provide the proper data for drag and drop.
- Better handling of memory errors when backing up metadata.
- Added logging to track down the source of an error when indexing files.
- EagleFiler now shows a better error message if you enter an invalid name when creating a new library.
- EagleFiler will now clear a library’s temporary items folders when opening the library, so that unneeded files don’t build up if the library was not cleanly closed.
- Reworded the “Forget” alert.
- Added esoteric preference to disable Growl in case of crashes.
- Bug Fixes
- Worked around a bug in Mac OS X 10.10 that could cause the name of the selected source to be unreadable when the source list didn’t have focus. (The name may still be unreadable if you toggle the Reduce transparency setting in the Accessibility preferences pane while your library window is open.)
- Worked around a toolbar button validation bug on Mac OS X 10.6.
- Fixed a bug where logged timings were inaccurate.
- Fixed a bug where some user interface text was shown in the wrong font on Mac OS X 10.10.
- Fixed a bug where Microsoft PowerPoint files (and some other files that did not have 64-bit Spotlight importers) were not indexed.
- Fixed a bug where importing via AppleScript and asking for options did not return the imported record when using the text, plain text, or stationery parameter.
- Fixed a bug on Mac OS X 10.10 importing selected text from Apple Mail via Services where importing took a long time, the Web archive was not directly viewable, and the filename was a UUID.
- Fixed a bug where some Markdown files were imported as mailboxes instead of as text files.
- Fixed a regression that could cause an error when emptying the trash.
- Fixed a bug where EagleFiler would incorrectly think that files with upside-down Unicode characters were missing.
- Fixed a bug checking volume case sensitivity.
- Fixed a bug redirecting text editing key commands to the record viewer.
- Date formatters now use the POSIX local where appropriate.
- 1.6.4—January 26, 2015
- Tagging lots of records at once is much faster.
- Emptying the trash is much faster.
- Updated the Web archive to PDF script for compatibility with EagleFiler 1.6.3 and later.
- Added improved instructions for installing and running supplemental AppleScripts.
- Updated and improved the following sections of the manual:
- If Outlook is slow to respond when capturing, EagleFiler now logs some information to Console to help diagnose the problem.
- Worked around a bug in Mac OS X 10.10 that could prevent changing fonts from the Preferences window.
- Worked around an OS bug that prevented bookmark files from being resolved.
- The About EagleFiler window now uses the new system font on Mac OS X 10.10.
- The About EagleFiler window now uses the system language names when crediting localizers, to reduce the number of strings that localizers need to keep up-to-date.
- Increased the font size in the Software Update… window on Mac OS X 10.10.
- Fixed a bug where setting a record’s tags via AppleScript didn’t always work properly for non-ASCII tag names.
- Fixed a bug capturing from Outlook when there were empty messages.
- Fixed a bug where capturing didn’t work with newer versions of Together and Yojimbo.
- Fixed a bug where temporary files from indexing were not cleaned up promptly.
- 1.6.3-November 17, 2014
- Added an EagleFiler Import command in the system Share menu for importing URLs to EagleFiler (requires Mac OS X 10.10). You can hold down the Option key to have EagleFiler bring up its options window before importing.
- Modernized lots of code and removed old code that’s no longer needed for compatibility with legacy OS versions.
- Made lots of optimizations to improve EagleFiler’s performance and
reduce its memory use. Some highlights are:
- Indexing e-mail messages is faster, particularly for messages containing attached files of common types.
- Indexing e-mail HTML messages is much less I/O intensive, which should make EagleFiler more responsive on Macs with spinning disks.
- Syncing tags with the Finder is faster.
- Optimized the date formatter to work around a performance regression in Mac OS X 10.10.
- EagleFiler now reports to Notification Center when it finishes an import.
- If you are importing a URL and specify a title in the options window, the title is now used for the filename as well.
- The Command-Tab switcher will now change you to the space containing the current main window, rather than staying on the current space if the Drop Pad was already visible there.
- Improved compatibility with MailTags.
- Improved compatibility with BitTorrent Sync.
- The Backup Metadata command now backs up the creation date, modification date, and file label. EagleFiler does not restore these, since they might be older than the values in the filesystem, but they are now in the backup to enable possible restores in the future when files are passed through a lossy cloud.
- EagleFiler is better able to import and merge malformed mbox files that have leading whitespace.
- EagleFiler is better able to recover from a variety of file ownership and permissions problems.
- If EagleFiler encounters empty messages when capturing from Outlook, there is now an option to skip all of them so that you don’t have to click a button for each message.
- It is now possible to disable tag syncing on a global or per-library basis. This is described in the How do Finder tags work with EagleFiler? section of the manual.
- Added the Copy Notes to Spotlight Comments script.
- The How does indexing in EagleFiler work? section of the manual now describes some new logging options that you can use to isolate the source of the problem if searching or indexing is slow.
- Added the following sections to section to the manual:
- Updated and improved the following sections of the manual:
- Added EnableJavaScriptForWebTool to the esoteric preferences.
- Esoteric preferences links are now directly clickable in the Apple Help and PDF manual.
- Re-rendered the library document icon so that it looks sharper and to work around a display bug on Mac OS X 10.10.
- Common types of tag syncing errors are now reported more concisely.
- Adjusted some of the toolbar icons for Mac OS X 10.10.
- Updated the disk image icon for Mac OS X 10.10.
- Updated Gatekeeper signature format.
- Adjusted the way the Purchase… window displays the remaining demo time to try to make it clearer.
- The Purchase… window now accepts serial numbers copied and pasted from a PDF of an order confirmation, after the browser has transliterated the dashes.
- Improved handling of localized strings when the application is damaged.
- Improved error reporting when EagleFiler can’t connect to the update server.
- The Software Update… feature is better at explaining what you can do if installation fails.
- Improved the crash reporter’s error reporting.
- Fixed a bug where the release notes in the Software Update… window were shown in the wrong font.
- Worked around a bug in Mac OS X 10.10 that could cause crashes when indexing HTML e-mail messages.
- Worked around a bug in Mac OS X 10.10 that could prevent changing the hotkeys.
- Worked around a bug in Mac OS X 10.10 that prevented the creation of encrypted libraries.
- Worked around a bug in Mac OS X 10.10 that could cause EagleFiler to freeze at launch.
- Worked around an Xcode bug that caused EagleFiler to complain in Console about missing images.
- Fixed a bug where capturing from Vienna 3 didn’t work.
- Fixed a regression where the Info window didn’t update if you edited a cell in the records list.
- Fixed a possible cause of an error when checking the locations of files in the library.
- Fixed a regression where the Info window didn’t look right if no browser window was open.
- Fixed a bug where EagleFiler could crash or be very slow when there were a lot of icon thumbnails to load.
- Fixed a bug where EagleFiler would try to import invisible Dropbox support files.
- Fixed a bug where smart folders could incorrectly include the containing folder in the list.
- Fixed a bug where the NonTextExtensions default didn’t work.
- Fixed several typos when capturing from Outlook.
- Updated the localizations.
- 1.6.2—May 14, 2014
- It is now possible to import via drag and drop when multiple tags are selected. EagleFiler will assign all of the selected tags to the imported files.
- EagleFiler now displays animated GIF files as videos, instead of showing the first frame as a static image.
- More image/photo metadata is now indexed and, thus, searchable.
- The Verify command can now detect and repair bad file permissions and ownership.
- EagleFiler now uses power assertions to prevent App Nap from slowing user-initiated operations when the window is in the background or blocked by the screensaver.
- Each library now has an independent queue of operations so, for example, a small import into one library no longer has to wait for another library’s large import to complete.
- Made further optimizations to the Open With menu to make EagleFiler more responsive during typing.
- When operations are in progress and you tell EagleFiler to empty the trash, it now waits a bit longer before aborting. This lets it successfully empty the trash if said operations were almost done.
- Opening a library whose search index has been reset or deleted is much faster.
- Movies and audio files are now indexed using AVFoundation rather than QuickTime.
- The characters '“”‘’ are now allowed in tag names.
- Modernized lots of code and removed old code that’s no longer needed for compatibility with legacy OS versions.
- Added the Import Safari Tabs and Shorten Path scripts.
- Added the How does indexing in EagleFiler work?, Where is my EagleFiler library?, How can I back up my EagleFiler data?, and Importing Mail From Mail Pilot sections to the manual. Updated the How can I access my library from multiple Macs?, How can I put my library on my iPhone?, and Importing Mail From Outlook sections.
- The images in the PDF manual and Apple Help are now Retina-resolution.
- Adjusted the font sizes in the PDF manual.
- Added AlwaysShowNewRecordSheet and DrawColoredLabelRowBackgrounds to the Esoteric Preferences.
- It is now possible to silently skip the capture warning when Apple Mail is busy.
- EagleFiler now skips importing MailMate’s .emlh files.
- If the indexer crashes due to a WebKit bug, EagleFiler now tries a second method of indexing.
- EagleFiler now restores the label if there’s an error setting the Finger tags.
- Made various improvements to EagleFiler’s error logging.
- Worked around an OS bug that could cause a crash when indexing certain Web archive files.
- Reduced RAM use when indexing Web archives.
- Fixed a bug where EagleFiler could erroneously think that a file was missing if it was imported via Scan for New Files and had certain non-ASCII characters in its name.
- Fixed a glitch with the Errors window toolbar when reporting certain types of mail import errors.
- Fixed a bug where Import Bookmarks… would sometimes import duplicate URLs where there were none.
- Fixed a bug where Import Bookmarks… would incorrectly skip importing some URLs when using the Bookmark Web page format if you had Allow duplicate files in library unchecked.
- Fixed a bug indexing PDF files that contained nil strings.
- Fixed a bug where capturing messages from Apple Mail sometimes created the mailbox inside an extra folder layer.
- Fixed a bug where a record being edited in the Info window could have its changes prematurely committed, resulting in its removal from the selected smart folder (if the changes made it no longer match the smart folder’s criteria).
- Fixed a bug where modification and creation dates older than 2000-12-31 were not properly displayed.
- Fixed a bug where tagging a large number of records was slow.
- 1.6.1—December 19, 2013
- EagleFiler now syncs tags with the system when running on Mac OS X 10.9 Mavericks. Tag changes made in EagleFiler show up in the Finder and in other applications, and vice-versa. This is described more in the How do Finder tags work with EagleFiler? section of the manual. The first time you open a library on Mavericks, EagleFiler will sync its tags to the Finder. This will mark the files as modified, which will trigger a one-time re-indexing of all the files (but not mail messages) in your library.
- The Characters button in the Tags window now opens the EagleFiler Tag Symbols Web page, which shows all the emoji and symbols in one place, rather than the system character picker.
- EagleFiler is faster at indexing folders, at searching, and at sorting records by tag.
- Improved the indexing of RTF, HTML, and plain text files attached to e-mail messages.
- TextExpander Fill-In Fields now work when editing the Title, File, or From in EagleFiler’s records list.
- EagleFiler is better at detecting database corruption in Microsoft Outlook and better at importing from damaged databases.
- EagleFiler will now try to repair damaged e-mail messages before importing or merging them, to ensure that you end up with a valid mailbox file.
- If you try to open a large number of files, EagleFiler now checks to make sure that’s what you meant to do (to avoid opening lots of unwanted windows).
- The Close & Lock and New Folder… commands are now available in the toolbar, rather than just in the menu bar.
- The Continuous Scroll, Single Page, and Two Pages are now available in the View ‣ PDF submenu, rather than just in the contextual menu.
- When using the Find panel in a PDF, EagleFiler now shows an animated indicator to draw attention to the matching text.
- The capture sound now plays using the output settings for sound effects.
- Improved the display and searching of newer-format AudioNote files.
- Added the EnableJavaScriptForMail esoteric preference so that you can work around WebKit crashing bugs when displaying HTML e-mails.
- EagleFiler will now report an error if you try to open a library and the volume is running low on free space (such that it might not be able to save the changes that you make).
- The Spotlight importer now works better with FoxTrot and Mac OS X 10.9.
- Crash reports for eftexttool now show which file it was working on.
- Worked around a bug in Mac OS X 10.9 that can cause a crash when indexing a Web archive.
- Worked around a Core Animation bug in Mac OS X 10.8.5 that could cause a black box to be displayed on top of PDFs.
- Worked around a bug in Mac OS X 10.9 that could cause PDFs to display partially scrolled down.
- Fixed a bug where ePub files could be imported as text files.
- Worked around OS bug that could cause a -600 error when opening a file in another application.
- Worked around a bug in Evernote that could cause files to be imported with question mark characters (U+FFFD) instead of tabs.
- Fixed a bug where using Scan for New Files to import a PDF file with no extension would create a duplicate record with a missing file.
- Fixed a regression displaying file sizes larger than 4 GB.
- Fixed a bug where some errors when opening a library were logged but not displayed to the user.
- Fixed threading bug when indexing that could lead to an internal error being reported.
- Fixed a bug where new files would not be indexed if you had created an ef_noindex tag but not assigned it to any files.
- 1.6—August 2, 2013
- Highlights
- The user interface is now optimized for Retina displays. Most of the icons have been enhanced or replaced.
- There are new toolbar buttons for creating plain text files, creating new files from stationery, setting a file’s label, opening the Tag Cloud window, and accessing the system Share menu. Various toolbar buttons have been combined into pairs.
- Made a variety of improvements so that the operations that happen after you open a library are faster and have less impact on foreground responsiveness. This includes loading file metadata, checking whether the indexes are up-to-date, checking for missing files, and copying tags to OpenMeta and Spotlight comments.
- Improved the display of the following file types: Microsoft Excel, Microsoft PowerPoint, Keynote, Numbers, Pages, OmniOutliner, podcasts, chats, SVG files, Pear Note documents, .emlx files, images, and more.
- When searching a selected folder or tag, EagleFiler now also searches the folders and mailboxes inside that folder, or the subtags of that tag. (The old behavior of only searching one level can be restored by unchecking Search Contained Folders/Mailboxes/Tags in the search field menu.)
- Added support for negative tag searches via the - or ! syntax. For example, you can do a Tags search for unread -flagged to find the unread records that are not flagged. Or you can do an Anywhere search for tag:!apple steve to find records containing the word steve that do not have the tag apple.
- When you create a new file inside a smart folder, EagleFiler now applies the smart folder’s actions to it (e.g. to assign tags, set the label, or move it to a particular folder).
- Importing
- EagleFiler’s capture key now works in Evernote. You can use the EvernoteCaptureFormat esoteric preference if you only want to capture a link to the Evernote items.
- The New Record ‣ From Clipboard command now works when the clipboard contains an image. In this case, it creates a PNG file instead of an RTF/RTFD file.
- The user interface no longer blocks while EagleFiler checks the To Import folder.
- When importing, EagleFiler will now correct PDF files that are missing their extension.
- EagleFiler will now detect if Microsoft Outlook doesn’t export the body data for a message, which can happen with messages imported from the Windows version of Outlook. You can choose to import just the message’s headers or to skip the message and import it in another way.
- Added support for AudioNote files.
- When importing a Web page fails, EagleFiler is better at reporting which resource was the problem.
- When fetching a URL that’s redirected (e.g. via a feed proxy) EagleFiler now stores the final URL as the source URL, as this is more meaningful.
- The Importing Web Pages and URLs section of the manual now explains how you can set EagleFiler to process Web pages using the Instapaper Mobilizer before importing them.
- Updated the instructions for making Preview scriptable.
- When importing, files with title “Untitled” are now treated as having no title, so that the title is linked to the filename.
- When you capture a single selected e-mail message, EagleFiler now imports it as a .eml file, rather than as a mailbox containing only one message. This can be changed via the ImportLoneMessageAsMailbox esoteric preference.
- The Remove Duplicate Messages script lets you remove duplicate e-mail messages from a mailbox.
- EagleFiler can now open e-mail messages with Sparrow.
- EagleFiler now shows a warning if you ask it to extract a large number of messages from a mailbox file to individual .eml files (as this is inefficient).
- If you capture a selection of messages that includes (exact) duplicates within the same mailbox, EagleFiler now skips them. (Since recent versions of Apple Mail hide duplicates, it may not be evident that you had any selected.)
- Improved the speed of capturing from Outlook, Entourage, Mailsmith, and PowerMail.
- When displaying a mailbox imported from a Mailman archive, EagleFiler can now undo Mailman’s anti-spam measures to display the proper e-mail addresses.
- Added the Import From Outlook script.
- If there’s an error importing the tags for a message in Outlook, EagleFiler now offers to option to skip the tags and import just the message itself.
- Viewer
- EagleFiler is much more responsive when you’re typing.
- The record viewer now restores its state (scroll position and insertion point location) if you edit the file in another application and then switch back to EagleFiler.
- EagleFiler can now repair certain damaged Apple Mail messages so that they display properly.
- The keyboard shortcut for highlighting text is now Command-Control-H (to match Preview).
- Source List
- Updated the source list appearance, added Show/Hide buttons for the groups, etc.
- The Records icon now shows whether or not your library is encrypted.
- The source list contextual menu now has a Paste Icon command to more easily set custom icons for folders.
- Added NetNewsWire-style arrow key support: press Right Arrow in the source list to go to the records list; press Left Arrow in the records list to go to the source list.
- Records List
- Dragging a record to another application now drags the record’s file rather than a link; if you need a link, use the Copy Record Link command.
- Icon thumbnails for images are now loaded in the background and cached for better performance.
- Added support for LaunchBar’s Instant Send feature.
- The File column can now accommodate longer filenames.
- When a window is in the background, EagleFiler no longer draws the label color for selected rows across the entire row.
- Added the CommandOToOpenRecord esoteric preference, which lets you swap the keyboard shortcuts for Open External Viewer and Open Library… so that.
- Errors
- If a file is missing after a Verify, you can now click the Trash button in the Errors window to delete it, without having to first reveal the record in the library.
- The Errors window now shows the full relative path for files that are missing.
- EagleFiler now reports separate errors for missing vs. damaged notes, and for a missing note it can now show and reveal the file where the note was expected to be.
- If there are records in the trash whose files are missing, EagleFiler will now offer to auto-delete them when opening the library.
- EagleFiler now updates the paths in the Errors window when you move a record.
- It’s now possible to Trash multiple records at once from the Errors window. You can no longer move files to the trash that are already in the trash.
- The crash reporter can now make recommendations for you based on the contents of the crash log.
- AppleScript
- If you import via AppleScript with no library open, EagleFiler will now report an error back to the script instead of just logging it.
- Capture scripts can now override the Web page format. (See Writing Capture Scripts.)
- Documents now have an element for their windows.
- Tag objects now have an element for the records with that tag. This is much faster than using an AppleScript whose clause.
- Querying the scripting properties of large numbers of records is much faster now.
- Added the create temporary folder script command, to make it easier to write scripts that process files.
- Added the add folder script command, which makes it easier to create a new, empty folder in a library.
- Miscellaneous
- EagleFiler now requires Mac OS X 10.6.8 or later.
- EagleFiler now tells the system that it can use the integrated GPU, which should reduce battery use on newer MacBook Pros.
- The progress bar for loading the library is now determinate. Eliminated the delay between when the progress bar was removed and the window was ready for use.
- Added preliminary support for tags on Mac OS X 10.9 Mavericks.
- When opening a library, EagleFiler now checks for missing note files, rather than just missing files.
- If you have a file that’s troublesome or slow for EagleFiler to read, you can tag it ef_noindex to prevent EagleFiler from trying to index it. There’s also a new UnindexedAttachmentNames default.
- When backing up metadata, the Activity window now shows the relative path of each folder, rather than just the name.
- When displaying folder names in menus, EagleFiler now colors them according to their labels.
- EagleFiler no longer changes a file’s modification date when you only modify the metadata.
- EagleFiler now remembers which type of date was selected in the Info window.
- EagleFiler now displays file sizes using the system standard style (requires Mac OS X 10.8 or later), and the file sizes themselves are more accurate.
- If an indexing process gets stuck, you can now see in Activity Monitor which file it was working on.
- Quick Look and scanning for new files work better with symlinks.
- The Read and Flag toolbar items now have a fixed width so they don’t cause the other buttons to move when the label changes.
- The Purchase window now shows a user icon that indicates whether it’s a single- or multi-user purchase.
- The disk image is now optimized for Retina displays.
- Made various improvements to the manual.
- Added a link to the forum in the Help menu.
- Improved the localizations.
- Bug Fixes
- Fixed a bug with the quoted text coloring for e-mails containing DOS-style line breaks.
- Worked around an OS bug that could cause EagleFiler to freeze when selecting a Web archive if a search was active.
- Fixed a bug importing from Apple Mail where EagleFiler would sometimes complain that no viewer window was open when the Mail Perspectives plug-in was installed.
- Fixed a bug capturing from Contacts.
- Fixed a bug where the Highlight button was enabled when it shouldn’t have been.
- Fixed a bug where the PDF toolbar buttons weren’t always enabled correctly.
- Worked around an OS bug that could cause various operations to fail if a folder contained a very large number of files.
- Fixed a bug where some information in the About EagleFiler window was displayed incorrectly.
- Fixed a bug where sometimes EagleFiler was unable to capture local Apple Mail messages when running on Mac OS X 10.8.
- Worked around a bug in Mac OS X 10.8 that could prevent EagleFiler from importing a large batch of messages from Entourage, Mailsmith, Outlook, or PowerMail.
- Automatic software updates no longer fail if Hazel is set to move files in the Downloads folder.
- Fixed a bug where the Spotlight importer would report errors when running on OS X 10.8.
- Fixed a bug where some OmniOutliner documents displayed as garbled text.
- Worked around a problem where Apple Mail could time out when importing lots of messages at once.
- Worked around a bug in Mac OS X 10.8.2 that could cause EagleFiler to freeze when importing a file or changing a tag.
- Fixed a bug where EagleFiler sometimes would not delete temporary files promptly when importing from Apple Mail.
- Fixed a bug where error logging didn’t always work properly on Mac OS X 10.8.
- Fixed a bug in reporting errors when opening a library.
- Worked around an OS bug that could cause Spotlight comments to be lost when using the To Import folder.
- Fixed a bug where it was possible to end up with two equivalent tags whose names had different Unicode normalizations.
- Worked around an OS bug that could cause EagleFiler to capture the wrong file from the Finder.
- Worked around some PDF and icon display bugs that were introduced in Mac OS X 10.7.4.
- Fixed a bug handling errors if the software update failed; if it succeeded, the .dmg file is now deleted.
- Fixed a bug where an error message when displaying a text or RTF file could be editable.
- Fixed a bug pasting tags into the fields in the Actions tab of the Edit Smart Folder… window.
- Fixed a bug where “Tags contains all” in smart folders could incorrectly find a record that was missing one of the tags (if that tag was not assigned to any records).
- Worked around an OS bug that could cause the records list to lose focus when hiding and showing EagleFiler.
- Fixed a bug where the source list sometimes had focus when using the contextual menu in the records list.
- Worked around an OS bug that could cause errors when auto-completing tag names.
- 1.5.10—May 9, 2012
- The contextual menu Set Filename/From/Title commands are better at handling line breaks.
- It is now possible to move records to the trash by pressing Delete when multiple tags are selected in the source list.
- The text fields in the smart folder editor make better use of the available window width.
- Improved the Importing Mail From Outlook section of the manual.
- Added the Importing Mail From MailMate section of the manual.
- Improved the What information should I include when I report a problem? section of the manual.
- Documented the TextInspectorBarStayOpen and UseOpenMetaRecentsForCompletion esoteric preferences.
- Added the Check for News… command to the EagleFiler menu of the Mac App Store version.
- Worked around a WebKit bug that could cause freezes when highlighting matching search terms.
- Worked around a bug in Apple Mail that could lead to importing two copies of certain messages.
- Worked around a problem where broken Mac OS X installations couldn’t report full error information.
- Fixed a bug that could cause uncommitted changes in the tags bar to be lost.
- Fixed a bug that could cause an error when the Quick Look window was open.
- Fixed a bug where an incorrect error message could be displayed when capturing from Apple Mail.
- Reduced the memory use of the Spotlight importer.
- Improved the reporting of file permissions errors.
- Worked around an OS bug that could cause a crash in Curio.
- Worked around bugs in Mac OS X 10.7.4 that could cause smart folders and PDFs to not display properly.
- 1.5.9—February 21, 2012
- Improved the error message that EagleFiler displays if you try to capture from Apple Mail when it’s busy. You can now click Capture Anyway if you’re sure that Mail is not busy with the messages you’ve asked EagleFiler to import.
- EagleFiler can now capture from Hibari.
- EagleFiler is now code-signed using a Developer ID certificate for Gatekeeper.
- When printing a text or RTF file, fixed the font size and fixed a bug that could result in an extra blank page being printed.
- Fixed a slowdown and crash that could occur when opening a library with lots of tags.
- Fixed an error when using the Quick Look panel if the toolbar had been collapsed into a menu.
- Fixed a bug where EagleFiler would report an internal error if there was a problem reading a text attachment.
- Fixed a bug where the Info and Tags toolbar buttons would be disabled under rare circumstances.
- Fixed a regression that could lead to logged error messages about setting OpenMeta tags on a non-existent note file.
- Fixed a bug where sometimes EagleFiler would rename the main thread.
- 1.5.8—January 24, 2012
- EagleFiler can now import rich text copied or dragged from Firefox and Google Chrome.
- Made various optimizations to improve the responsiveness of the user interface, particularly when resizing the main browser window.
- Searches by Filename, Title, From, and To/Cc, as well as matching in smart folders, are now diacritic-insensitive. For example, you can now search for resume and find résumé. (Anywhere and Notes searches have always been diacritic-insensitive.)
- Added the Copy Filename, Copy File Path, and Copy File URL AppleScripts.
- Added support for Growl notifications via GNTP (requires Mac OS X 10.7 or later).
- When printing an image, EagleFiler will now center it and scale it down, as necessary, to fit the paper.
- The Import From Apple Mail script now works in Full Screen mode on Mac OS X 10.7 Lion.
- EagleFiler now skips importing temporary files for Microsoft Excel and invisible files from IntegrityChecker.
- Tried to work around a bug in Mac OS X 10.6 that could cause EagleFiler to open multiple copies of the same library.
- The update checksum script command is now synchronous, and it gains an optional for parameter that takes a list of records. This is much faster for bulk operations.
- When rebuilding a library, EagleFiler now restores all the tags, not just the ones that were in use.
- EagleFiler is better at checking fallback locations when reading OpenMeta tags.
- EagleFiler is better at handling errors when setting OpenMeta tags.
- Fixed a bug where EagleFiler could crash after a token field malfunction.
- Fixed a bug importing the selected Web text from newer versions of Safari Reader.
- Fixed a bug displaying e-mail messages when the Source URL column was shown.
- Fixed a bug where the color of newly created tags could be set to white instead of black.
- Fixed a bug where the wrong tag could be applied if you clicked a checkbox in the Tags inspector while renaming a tag.
- Fixed a bug that could lead to a tag temporarily not showing in the source list after changing its position in the hierarchy.
- EagleFiler’s reporting of unexpected errors is now more detailed and more robust.
- The Importing Mail From Outlook section of the manual now explains how to use a smart folder to capture mail from multiple Outlook folders at once.
- The manual now specifically recommends telling iWork applications to include previews with their documents.
- The direct build of EagleFiler is now code-signed, too.
- Cache folders for EagleFiler’s helper tools now have a reverse domain name prefix.
- The preferences for the Apple Mail capture script are now stored in the main EagleFiler preferences file.
- Launched applications no longer inherit EagleFiler’s Python environment variables, which could cause problems if they also used Python.
- 1.5.7—December 7, 2011
- Added support for Growl 1.3.
- Added support for importing hierarchies of mailboxes from Apple Mail on Mac OS X 10.7 via drag and drop from the Finder.
- The Import From Instapaper via NetNewsWire script lets you quickly import all your new Instapaper articles into EagleFiler.
- The Replace in Filenames (Regex) script lets you batch-rename files using regular expressions.
- On Mac OS X 10.7, EagleFiler supports emoji tag abbreviation pictures.
- Various operations, such as arrow-keying through the records list, are faster and more responsive.
- EagleFiler can now display previews for OmniGraffle documents that are internally compressed.
- Added the PrefersRichText esoteric preference, which can be used if you want the EagleFiler: Import service, Import From Clipboard, and New Record ‣ From Clipboard to create plain text files instead of rich text files.
- The commands in the Go menu now bring the focus to the source list for more predictable keyboard navigation.
- Improved capturing of large batches of messages from Microsoft Outlook.
- The Info inspector can now be opened via Command-I as well as Command-Option-I.
- Records now have a universal type identifier scripting property, which should make certain kinds of AppleScripts much easier to write.
- Pressing the Esc key will now cancel editing in the source list or records list (for consistency with Finder).
- Clarified the error message when importing non-standard-format archive mailboxes from Apple Mail.
- You can now use the ImportSkipFilenamePattern default to specify a regular expression. When EagleFiler imports a folder, any files whose names match the pattern will be skipped.
- EagleFiler no longer maintains the same default note text between multiple invocations of Capture with options. This behavior can be reversed via the RememberCaptureNotesState default.
- Fixed a bug where, in rare cases, files imported via the To Import folder were incorrectly thought to be duplicates if they had the same names as files that had been previously imported and recently moved.
- Fixed a bug where an AppleScript would hang if it tried to start a scan for new files while another scan was already in progress.
- Fixed a bug where EagleFiler sometimes thought that files whose names ended with a period were missing.
- Fixed a bug reporting Spotlight importer errors.
- Fixed a bug where the contents of the Quick Look window weren’t always updated before it was shown, leading to flicker.
- Fixed a bug importing locally stored Web pages.
- Fixed a problem with saved view state and Full Screen mode.
- Fixed a bug that could cause a crash if there was an internal error launching a helper tool.
- Fixed a bug where the = character wasn’t always treated as a word separator in phrase searches.
- Added logging to help track down tag completion errors.
- Updated the French localization.
- Added a 1024×1024 application icon.
- 1.5.6—October 2, 2011
- Adjusted the fonts, styles, and colors in the Tag Cloud window so that it’s easier to read.
- EagleFiler’s viewer displays more information for vCard files: categories, notes, phonetic/maiden/related names, related dates, social network profile URLs, etc.
- Added the Remove Duplicate Files script.
- Added the Import From Scanner script. Save this script as an application and set it as the target of your scanner software (e.g. the Fujitsu ScanSnap Manager). When you scan a file, EagleFiler will prompt you to enter a title and other metadata and then import the scan into your library.
- EagleFiler’s capture key now works with Opera 11.50.
- It is now possible to empty a library’s trash via AppleScript.
- When editing plain text or RTF files on Mac OS X 10.7, EagleFiler no longer uses atomic (a.k.a. safe) saving because this exposes bugs in Lion’s file versioning feature, causing interoperability problems with applications such as TextEdit if you’re editing the same file in more than one application at a time.
- EagleFiler now takes you out of search mode when you click on a different source. You can restore the old behavior via the ClearSearchWhenChangingSources esoteric preference if desired.
- Added the PDFWebBackgrounds esoteric preference, which can be used to prevent EagleFiler from drawing colored backgrounds when importing a Web page in PDF format.
- Added the ErrorsOpenForDuplicates esoteric preference. Normally, EagleFiler will open the Errors window when a file has been skipped during an import because it’s a duplicate. However, you can also set EagleFiler to log the error without opening the window, for example if you expect there to be duplicates and don’t care to see them reported.
- Added the TextToolSkippedNames esoteric preference so that it’s now possible to skip indexing of files that cause Core PDF to hang.
- EagleFiler is better at closing a library while operations are in progress.
- Worked around an OS bug so that EagleFiler is once again able to capture from smart mailboxes in Apple Mail.
- EagleFiler’s Spotlight importer plug-in works better with FoxTrot.
- The default plain text font is now Menlo 11 rather than Monaco 10.
- Fixed a problem where the window title would be too long if you had a large number of sources selected.
- Fixed a bug where the update checksum scripting command did not work recursively on folders.
- Fixed a bug that could in rare circumstances cause EagleFiler to create two records for a single file.
- Fixed a bug importing a legacy/archive Apple Mail .mbox package via Scan for New Files.
- Fixed a bug where EagleFiler wouldn’t give up on rebuilding a mailbox when the file didn’t exist.
- Updated various screenshots and documentation.
- 1.5.5—August 4, 2011
- Fixed some bugs that could prevent EagleFiler from capturing messages from Apple Mail under Mac OS X 10.7 Lion (particularly if Mail contained a large number of messages or an IMAP path prefix was in effect).
- Added text editing toolbar for setting the font, style, size, etc. when editing rich text documents (requires Mac OS X 10.7 Lion).
- EagleFiler is now able to capture from Apple Mail when it’s in Full Screen mode. However, due to limitations of the OS, capturing will not work in Full Screen mode if you have multiple Mail viewer windows open.
- Updated the Using EagleFiler’s Capture Key From Preview instructions for Mac OS X 10.7 Lion.
- Added the Refetch Web page script, which can be used to convert bookmarks to Web archives (or other formats), to download the latest versions of pages that may have been updated, and more. Any existing metadata that you’ve added is transferred to the new files.
- The Word Count script now shows the number of words in the current selection, as well as the total number of words in the document.
- Added the MediaStylePDF esoteric preference so that it is now possible to override the stylesheet that EagleFiler uses when saving a Web page as a PDF.
- It is now possible to replace a library’s Files folder with an alias to redirect it to another location.
- When opening a large batch of files in Preview, they now appear in a single window, and this also avoids a -1712 error that Preview would report when told to open the files individually.
- The Import Bookmarks… command now works with format-html files from Pinboard that have no file extension when downloaded by certain browsers.
- When creating a new mailbox file, EagleFiler now assigns it HFS type 'TEXT' so that Entourage and Outlook will know that they can import it.
- Updated the Export… instructions for Outlook.
- Removed NOT from the documented search syntax, since it doesn't work with Match Partial Words. Instead, you should use - or ! to exclude matches that contain a particular word.
- When using Reveal in Library in the Errors window, the relevant browser window is now brought to the front.
- EagleFiler no longer adds a list of recent libraries to its Dock menu when running under Mac OS X 10.7 Lion, since this is now a built-in feature of the Dock.
- Improved the indexing of Microsoft Office documents.
- Improved various error messages when capturing.
- Fixed a bug where the Import Bookmarks… feature would create a tag with a blank name if the bookmarks did not have any tags.
- Fixed a bug where the contextual menu in the Tags window didn’t work under Mac OS X 10.7 Lion.
- Fixed a bug where capturing from NetNewsWire didn’t work if the item had no title.
- Fixed a bug with smart folders that use source URL criteria.
- Reduced EagleFiler’s memory usage by removing a workaround for a PDF bug that seems to have been fixed in the final release of Mac OS X 10.7 Lion.
- The manual now explains how to open the Library folder on Mac OS X 10.7 Lion.
- Fixed a bug where EagleFiler’s Spotlight importer for .eml files didn’t work properly under Mac OS X 10.7 Lion. Now, it works, although its functionality is limited due to sandbox restrictions.
- Fixed a bug with re-personalizing via an x-eaglefiler URL.
- 1.5.4—June 23, 2011
- Added the Import Bookmarks… feature, for importing from Delicious, Pinboard, and browsers such as Safari. EagleFiler will preserve the tags, titles, and descriptions that you’ve set, as well as the original bookmarking date.
- EagleFiler can now capture from the Cruz Web browser.
- EagleFiler can now capture the current tab from the NewsRack RSS reader. It saves the selected text in a note.
- When capturing from NetNewsWire, the selected Web page text is now saved in a note.
- EagleFiler now works in full screen mode on Mac OS X 10.7 (Lion).
- When importing from Safari Reader (via drag and drop or the service), EagleFiler can now detect the proper URL for the original page.
- Made some changes so that Web pages imported as PDFs no longer have duplicate copies of certain dynamic elements such as ads.
- Importing Web pages as PDFs is faster.
- You can now type Command-Return (or Enter, as before) to dismiss the Capture with options, Quick entry, and Batch Change… dialogs.
- Added keyboard shortcuts for switching between the tabs in the Capture with options and Quick entry windows.
- When dragging from the records list or the source list to the Finder, EagleFiler now copies the file by default. You can hold down the Command and Option keys before starting the drag in order to create an alias (the old behavior); this can be useful when assembling a burn folder.
- Added instructions for importing individual messages from Postbox and Thunderbird.
- Added the Rename for Dropbox/Windows script.
- Wrote the Change Rich Text Font script for changing the font across multiple existing RTF or RTFD documents.
- The Scan for New Files feature now supports the UnscannedFilenames default so that you can set certain filenames that will always be ignored by scans.
- Pressing Return in the source list now edits the name of the selected item, rather than opening it in a new window.
- Added the RespectImageDPI esoteric preference, which can be used to improve the display of images that do not have the correct resolution set, thus making them appear way too small.
- The Reveal in Library button in the Errors window now selects the record in an existing window instead of opening a new one. This makes it much faster to deal with “Missing File” errors. The RevealInLibraryNewWindow esoteric preference is available for those who prefer the old behavior.
- The viewer pane now displays custom icons for bookmarks, which is useful if you’ve used setWeblocThumb.
- It is now possible to set the Date Added via AppleScript.
- It is now possibly to specify the Web page format when importing a URL via AppleScript.
- EagleFiler now caches file attributes for longer, which should speed up some smart folders and sorting operations.
- Improved compatibility with Mac OS X 10.7 (Lion).
- Improved responsiveness when dragging and dropping text into EagleFiler.
- EagleFiler now allows the colon character in tag names.
- Improved the display of messages that erroneously declare themselves to be both HTML and plain text by treating them as HTML.
- It is now possibly to exclude certain filenames and extensions from indexing if this is necessary to work around buggy Spotlight importer plug-ins. This is controlled by the SpotlightImporterSkippedNames and SpotlightImporterSkippedExtensions defaults.
- If there is a crash while importing a folder from the To Import folder, EagleFiler will now “resume” importing it into the same folder the next time the library is opened. Previous versions would instead import the remaining files into a second folder, leaving you with two partial hierarchies instead of one complete one.
- Made various improvements to EagleFiler’s error logging.
- If you try to move a file into a folder that no longer exists, EagleFiler now reports a regular “Missing File” error for the folder, rather than an internal error.
- Adjusted the help page titles to fit better in the menu and search results.
- Made an optimization so that menus pull down more quickly. (More work in this area is in progress.)
- Worked around a WebKit bug that could (in rare cases) cause EagleFiler to save the content of a Web page before it had completely finished loading.
- When capturing from Apple Mail, EagleFiler now reports a better error when no messages are selected.
- Fixed a problem where EagleFiler would not detect certain captured messages in a mailbox if Entourage or Outlook had exported them with malformed headers.
- Fixed a bug where the Close & Lock command sometimes mentioned the name of a library that had already been closed.
- Fixed a small memory leak when indexing .eml files.
- Fixed a bug where the EagleFiler: Import With Options service would sometimes import as plain text instead of rich text.
- Fixed a bug where EagleFiler sometimes didn’t completely close a library after its last window was closed.
- Made various changes to try to work around a crash that could occur when there’s an error emptying the trash.
- Fixed a bug where the Info window might not load correctly if it had been open the last time EagleFiler quit and no library was open.
- Fixed a bug where the browser window was sometimes not brought to the front when re-opening recent libraries.
- 1.5.3—March 17, 2011
- Choosing Print now always prints the contents of the record viewer, even if it doesn’t have focus, since this what most people want most of the time. To print the source list or records list, hold down the Option key.
- Improved EagleFiler’s responsiveness when indexing e-mail attachments.
- Optimized various operations when selecting and dragging large numbers of records.
- When importing a hash-bang URL, EagleFiler is better able to save the dynamically loaded content into the Web archive.
- Improved the display of Web archives that use JavaScript to load and format their content.
- Improved compatibility with pre-release versions of Apple Mail.
- Improved the speed and accuracy of searching large numbers of mailboxes.
- Added the EnableJavaScript esoteric preference, which can be used to turn off JavaScript when displaying Web pages.
- The Verify section of the manual now has some advice for how to recover from errors.
- EagleFiler now logs its errors to the system log database rather than a separate log file.
- Added another workaround to prevent crashes when importing or indexing due to a bug in Mac OS X 10.6.
- To avoid duplicates and infinite loops, EagleFiler no longer follows folder symlinks when importing.
- Fixed a bug where multiple copies of a library could be loaded if you clicked several x-eaglefiler links before EagleFiler had launched.
- Fixed a bug where Scan for New Files could start importing a folder and growl before all of its contents had been imported.
- 1.5.2—January 25, 2011
- Made some optimizations so that typing in the viewer and in text fields is more responsive.
- Made some changes to hopefully work around a bug in Mac OS X 10.6 that, for some users, had been causing intermittent crashes when importing lots of files.
- When importing due to Scan for New Files or the To Import folder, EagleFiler now skips symlinks. This prevents accidentally referencing files outside the library folder.
- Added the Reload OpenMeta Tags AppleScript.
- Worked around a problem with the eDrawings Viewer Spotlight importer plug-in that could cause indexing to hang.
- Added accessibility titles to the Preferences window.
- Improved the German localization.
- EagleFiler is now code-signed.
- Fixed a bug where changes in the tags bar could be lost if you were viewing a Web archive and moused over a link.
- Fixed a bug where file sizes in the records list were not displayed using base-10 megabytes when running on Mac OS X 10.6.
- Fixed a bug where setting the basename property via AppleScript wasn’t undoable.
- Fixed a regression where EagleFiler could not import a file whose name contained a colon unless it was running on Mac OS X 10.6.
- Fixed a bug where the scan for new files script command returned before it was actually possible to close the window.
- Fixed a bug where EagleFiler would let the JavaScript in a Web archive close the window.
- Fixed a bug where clicking on a tag toolbar button or in the Tag Cloud discarded changes made in the Info window’s tags field.
- Fixed a bug where the tagging toolbar buttons didn’t work if certain fields in the Info window were in edit mode.
- Fixed a regression where fields in the Info window could be incorrectly enabled when there was a multiple selection.
- EagleFiler will now note in the log if a file was modified in the future, as this can prevent indexing from completing.
- Common types of errors when setting OpenMeta tags are now logged more concisely.
- No longer logs errors when Quick Look fails to generate a preview.
- If a damaged index file prevents a search from completing, EagleFiler now shows the search results that are available and logs an error, rather than confusingly making it look as though you weren’t searching at all.
- The build number is now available as a tooltip on the version number in the about box.
- Fixed a bug where the Spotlight indexer didn’t work for .eml files with CRLF linebreaks.
- Worked around a Finder problem that could prevent capturing from MarsEdit.
- Fixed a bug where the Open With contextual menu item didn’t work when EagleFiler was in the background.
- Fixed a regression where capturing didn’t work with Safari 3.
- 1.5.1—December 15, 2010
- EagleFiler no longer tries to import cache folders created by beta versions of Dropbox.
- Fixed a bug where tag winnowing didn’t work properly with no folder selected.
- The progress text field below the source list now has a tooltip so that you can read it when the text is truncated.
- Fixed a bug where uncommitted changes to the Info window’s tags field weren’t saved when switching to another application, if multiple records were selected.
- Fixed a bug where changing the tags sometimes didn’t take effect if you were concurrently editing in a tags field.
- Fixed a bug where tag changes in the Info window didn’t take effect if you closed the inspector before doing anything else.
- Fixed a bug where tag auto-completion in the Info window didn’t work when multiple records were selected.
- Fixed a bug that could prevent renaming to a long filename containing a period.
- Added a warning log message if the CTLoader haxie is installed, as it can cause imports to freeze.
- Fixed a bug where EagleFiler would always show the introductory help if you had created exclusively encrypted libraries and none were accessible when launching the application.
- Fixed a bug where an AppleScript would hang if you asked it to show the options dialog and then clicked the Cancel button.
- Fixed a regression where the Batch Change… window sometimes didn’t set the tags properly.
- Worked around changes in Together so that it’s once again possible for EagleFiler to import tags and notes via the capture key.
- EagleFiler now skips importing InDesign lock files (.idlk), so it no longer complains about them being missing when InDesign releases the lock.
- Fixed a bug where invalid Spotlight URL metadata from SiteSucker could prevent EagleFiler from importing a file.
- 1.5—November 22, 2010
- Highlights
- The new Quick entry hotkey lets you create a new RTF or text file from from within any application. You can enter the contents of the file, choose which library and folder it’s saved in, and set metadata such as the tags, label, and notes.
- When importing via drag and drop or Save PDF to EagleFiler, you can now hold down the Option key to have EagleFiler show the options dialog (which was previously only available when capturing). This lets you set the destination folder, tags, label, notes, etc. There is also a new EagleFiler: Import (Ask for Options) system service, which presents the options dialog when importing the selected text or file from another application, and the options dialog is also available for bookmarklets.
- You can now perform quick tag “searches” by selecting multiple sources (folders, smart folders, mailboxes, tags) at once (holding down the Command key). Previously, EagleFiler displayed the union of all the records in the selected sources. Now it displays the union of the records, but only those that have all of the selected tags. This makes it possible to easily winnow records by tag without typing a search query. For example, to see the flagged files in a folder, select the folder and the flagged tag. To see the records that are both flagged and unread, select both the flagged and unread tags.
- The main window now displays much better previews for iWork documents than what Quick Look provides. For Keynote, Numbers, and Pages documents that were saved with an embedded preview, EagleFiler can now display full-size previews with multiple pages and highlighted search result text. This also works for OmniGraffle documents, and it works on Mac OS X 10.4 (where Quick Look is not available).
- Double-clicking a folder or mailbox in the records list now opens it in the same window rather than making a new window. This should make browsing faster. If you do want a new window, you can Option-double-click or use the Open in New Window command.
- There’s a new Move To command in the Record menu and the contextual menu, which lets you quickly move records to a different folder.
- You can now add files directly to EagleFiler’s library folder (or a subfolder) in the Finder. When EagleFiler scans for new files (which it does when you open the library or use the Scan for New Files command), it will automatically import any files that it did not previously know about. You can turn off the ScanForNewFilesOnOpen esoteric preference if you don’t want EagleFiler to automatically scan when the library is opened.
- EagleFiler can now index and search files that are attached to e-mail messages. This includes text, RTF, PDF, and Word files, as well as file types that have Spotlight importers.
- Smart folders that search for “contains any/all tags” are about 10 times faster than in EagleFiler 1.4.
- There’s a new Web page format called PDF (Single Page), which creates PDF files that are optimized for on-screen viewing in a single, continuous page.
- Added the OCR With PDFpen and OCR using UNPDF scripts, which let you perform optical character recognition on PDF files in EagleFiler. For more information, see the How can I run optical character recognition (OCR) on my PDFs? section.
- The tags bar can now be used to assign (or remove) tags from multiple selected records at once. This also works in the Info inspector. (If the records have differing tags, EagleFiler shows the Batch Change… button, as before.)
- Add the Close & Lock command, which closes an encrypted library and also locks it (by ejecting the disk image) so that accessing library’s contents requires the passphrase.
- Source List
- The Go menu contains new commands to quickly jump to Records (to search the whole library), the built-in smart folders, flagged, and unread, along with some commands that were previously in the the View menu.
- You can now use Copy Record Link to create URLs that, when clicked, select particular folders, smart folders, or tags in the source list.
- Choosing Select All while the source list has focus now selects all the records, which is more useful than the previous behavior of selecting all the sources.
- Records List
- The new Open With submenu lets you view a file or mail message using a particular application rather than the default. You can use Always Open With to change the default application that’s used when you double-click.
- The New Record ‣ From Clipboard command lets you create new files in EagleFiler by “pasting” (the shortcut is Command-Shift-V) text snippets into the records list.
- You can now drag and drop onto individual folders in the records list. This works for importing files from other applications, moving records within a library, and copying files from other EagleFiler libraries.
- You can now three-finger swipe left or right on a multi-touch trackpad or Magic Mouse to go to the previous or next record in the list.
- There are new columns for Notes, Source URL, flagged, and unread.
- Tooltips now show more information: the kind, size, relative path, source URL, tags, and notes.
- The icon column now has a title in the hiding/showing menu.
- The new Merge Message Files command lets you recombine e-mail messages stored as individual .eml files into a single mailbox file. This lets EagleFiler store the messages more efficiently and allows for interoperation with other applications that can read mbox files.
- When importing a .eml file, EagleFiler now changes the file’s dates to match those of the contained e-mail message.
- Apple Mail is pickier than it used to be about which mbox files it will import. When importing and exporting messages, EagleFiler is now more aggressive about normalizing the message formats so that Apple Mail will accept them.
- EagleFiler can now import mailboxes that were exported by Apple Mail’s Archive Mailbox… command. However, it’s still best to capture the messages directly from Mail. The archive mailboxes use a non-standard mbox format, and EagleFiler cannot read the message status flags or MailTags metadata from them.
- When merging mailboxes, the date added is now set to that of the newest mailbox instead of the current date.
- When converting e-mail messages to .eml format, EagleFiler now exports the tags to OpenMeta.
- If you’ve set Entourage or another mail program as the default opener for .eml files (rather than Apple Mail), EagleFiler now shows the appropriate application name and icon in the Record menu when an e-mail message is selected.
- EagleFiler can now import .rssmbox folders from Apple Mail. Capturing RSS messages from Mail does not work, however, due to limitations of Mail’s AppleScript support.
- Viewing and Editing
- You can now open the Quick Look window by pressing the Spacebar or clicking a toolbar button.
- The new Slideshow command (and toolbar button) opens a full-screen Quick Look view of the selected record or records.
- Added Replace, Replace All, and Replace and Find commands to the Edit ‣ Find menu. The menu commands are probably less convenient than opening the Find panel, however you can use System Preferences to assign them keyboard shortcuts, to make text editing much faster.
- Added to the Edit ‣ Spelling and Grammar menu: Check Grammar With Spelling and Correct Spelling Automatically. EagleFiler remembers these settings per-window.
- Added commands in the Edit ‣ Transformations submenu: Make Upper Case, Make Lower Case, and Capitalize.
- Added options in the Edit ‣ Substitutions menu: Show Substitutions, Smart Copy/Paste, Smart Quotes, Smart Dashes, Smart Links, Data Detectors, and Text Replacement. EagleFiler enables these features by default when editing, and it remembers per-window how you’ve configured them.
- Added the Strikethrough command to the Format menu.
- Improved the quality of the thumbnail images when EagleFiler displays a record in the inline viewer using Quick Look.
- Searching
- Added a Spotlight importer plug-in so that the contents of .eml files (messages that you’ve dragged out of their mailboxes into folders) can be searched outside of EagleFiler.
- Indexed searches can now find text from additional e-mail header fields such as Bcc and various sender and mailing list fields. This change takes effect for newly imported mail, or if you hold down the Command and Option keys when opening a library and tell EagleFiler to rebuild its indexes.
- Added label text to the smart folder editor that explains how to create new Any/All/None criteria.
- Note files are now given the associated record’s tags so that they can be searched by tag via Spotlight.
- EagleFiler is now able to search invisible content in Web archives: link titles, image alt text, and hidden elements (e.g. spoiler text). Previously imported Web archives will be reindexed the next time you open the library.
- EagleFiler is much faster at indexing Web archives.
- Capture
- When capturing a Web page from Safari, EagleFiler now stores the selected text in a note.
- EagleFiler can now capture from Google Chrome, DEVONthink Pro 2, and Microsoft Outlook 2011.
- When capturing from Journler, EagleFiler now preserves the category (as an EagleFiler tag) and assigns tags to any subsidiary resource files that it imports (rather than just to the main file).
- EagleFiler now plays the capture sound after running the script, rather than before, so you can use the sound as an indicator that it’s OK to close your Safari window or NetNewsWire tab.
- The source items for a capture are now displayed on a separate tab, since they usually didn’t fit in the single-line text field.
- Improved the error reporting when capturing from Entourage and Firefox 3.6.
- Added the PlayCaptureSound esoteric preference so that it is now possible to make EagleFiler silent when you press the capture key.
- Documentation
- Added the “How can I run AppleScripts from EagleFiler’s script menu?” and How can I run optical character recognition (OCR) on my PDFs? sections to the manual.
- If you’re launching EagleFiler for the first time or it looks like you don’t have any libraries, EagleFiler will open the (revised) Basics section of the manual to help you get started.
- Added an About Stationery and Scripts item to the New Record submenu to make it easy to open the relevant documentation.
- Updated the How can I put my library on my iPhone? and How can I access my library from multiple Macs? sections of the manual with additional information about Dropbox and other sharing software.
- Updated the Importing Mail section of the manual with instructions for importing IMAP mail from Postbox and Thunderbird.
- Added a warning that SugarSync does not support filenames containing : at the Unix level (/ in the Finder).
- Added commands to the Help menu for displaying the keyboard shortcuts, example AppleScripts, and opening the bookmarklets information page.
- AppleScript
- You can now get the viewer’s selected text via AppleScript.
- Added the asking for options argument for the import script command so that you can show EagleFiler’s options dialog when importing.
- It is now easier to set the source URL when importing via AppleScript.
- Added the basename property for records, which should simplify many common AppleScripts.
- Added the text content property for records, which is useful in circumstances where AppleScript’s contents doesn’t work.
- You can now initiate a capture or capture with options via AppleScript.
- Changing the source URL of a bookmark via AppleScript now writes the new URL into the bookmark file.
- Tag abbreviations are now settable.
- Added the load OpenMeta tags command, which lets you write AppleScripts that bring changed tags from OpenMeta to EagleFiler, rather than the reverse (which EagleFiler does automatically).
- Interface Tweaks
- EagleFiler now shows the spinning progress indicator for all types of activity (not just imports and merges), and next to the spinner it describes one of the more important things it’s currently doing. This should make it much easier to see what’s happening without having to open the Activity window, although you can still do that by clicking the progress indicator.
- The notes text view now accepts click-through, so it’s smoother to switch to it and begin typing.
- You can now Tab (and Shift-Tab) between the source list and the records list without having to hold the Control key.
- When running on Mac OS X 10.6 or later, EagleFiler now displays file sizes using base-10 megabytes (to match the Finder).
- The default behavior is now to open x-eaglefiler links in an existing window if possible. You can use the esoteric preferences to make it create a new window instead.
- The Info inspector now shows a proxy icon in its title bar for the file being inspected, and you can Command-click on it to show a path menu.
- The new Edit Notes menu item (Command-Shift-E) opens the Info inspector and gives the notes keyboard focus. This makes it easier to quickly add notes to a record.
- When importing a single record, EagleFiler’s Growl notification now shows a thumbnail of it instead of the EagleFiler icon. This can help you see whether a Web page was imported correctly or whether it depends on session state that is not available to EagleFiler (requires Mac OS X 10.5 or later).
- The text view options (e.g. whether Check Spelling While Typing is enabled) are now synchronized between the viewer and the Notes view in the Info inspector.
- Added the CaseSensitiveTagCompletion esoteric preference, which makes it easier to type new tag names that are similar to existing tags but with differing case.
- Removed Contents of Record from the default toolbar because most of its functionality is now available by double-clicking.
- Enabled undo in various text fields (this requires Mac OS X 10.6 due to a bug in previous OS versions).
- To reduce clutter, the Activity window is now hidden by default. (If you open it via the menu or by clicking the progress spinner, EagleFiler will remember to re-open it.)
- Moved the Close commands higher in the File menu.
- Improved the design of the Software Update… and Purchase… windows.
- Improved the progress icon for metadata backups.
- Updated the disk image layout.
- Miscellaneous
- When importing a file that it downloaded itself, EagleFiler has always stored the source URL. Now it also tries to store the source URLs for files downloaded by other applications.
- EagleFiler is better at displaying and opening alias files.
- Various non-downloadable URLs are now always imported as bookmarks.
- EagleFiler’s metadata backup files now use relative rather than absolute paths. This makes syncing libraries between multiple Macs more efficient.
- The date added is now restored from metadata backups.
- EagleFiler does a better job of cleaning up the title when importing a file.
- Added ! as an allowed tag character.
- Added « and » as allowed tag name characters.
- Improved EagleFiler’s error reporting when opening search index files.
- Improved EagleFiler’s error reporting when a mailbox file is missing.
- EagleFiler is faster at creating bookmarks from non-Web URLs.
- Made some improvements to the crash reporter.
- EagleFiler can now import plain text notes from metadata backup files that are missing the RTFD data.
- Bug Fixes
- EagleFiler now reports an error rather than hanging when you ask it to import an x-eaglefiler URL.
- Made a change to prevent Zooom/2 from causing an internal error when resizing the source list.
- Fixed a bug where EagleFiler would sometimes quit when coming out of trial mode.
- Fixed a bug in which EagleFiler would let you try to rename a file using an invalid name.
- Fixed an internal error when formatting file sizes.
- Fixed a bug where setting the title/filename/from/tags from the selection in the viewer didn’t work if the field in question was currently being edited in the Info inspector.
- Fixed a bug where changing the filename in the Info inspector didn’t update a linked title.
- Fixed a bug where EagleFiler would sometimes report an error when displaying an e-mail message.
- Fixed a bug with tag auto-completion and non-ASCII characters.
- Fixed a bug where EagleFiler could hang when importing non-Web URLs.
- Worked around a bug in Firefox that could prevent EagleFiler from importing dragged images.
- Fixed a bug where EagleFiler stripped a trailing period from the name when importing a folder.
- Worked around some OS bugs that caused slowness and prevented EagleFiler from displaying Web archives created from Safari Reader.
- Fixed a bug where a smart folder that searched for an empty From didn’t work.
- Fixed a bug where PDF files that are unreadable by Preview could not be imported into an EagleFiler library.
- Worked around an OS bug that could cause crashes when indexing Web archives.
- Fixed scaling when printing PDF files.
- Fixed a bug where choosing Actual Size when viewing a PDF didn’t make the change stick.
- Fixed a bug where EagleFiler would re-save metadata property list files that hadn’t changed, which could lead to incorrect folder modification dates and sorting.
- Fixed a bug displaying non-Roman Finder label names (requires Mac OS X 10.6 or later).
- Fixed a bug where the scroll position of a .eml file could get reset when switching applications.
- Fixed a bug where certain long filenames would be imported with hexadecimal abbreviations.
- 1.4.14—January 22, 2010
- Fixed a regression that sometimes caused errors when opening a library window when running on Mac OS X 10.4 or 10.5.
- 1.4.13—January 21, 2010
- Improved EagleFiler’s responsiveness with libraries containing many files.
- Updated the instructions for how to make EagleFiler’s capture key work with Preview on Mac OS X 10.6. EagleFiler will automatically show this when you try to capture from Preview.
- Google Chrome does not have sufficient AppleScript support to work with EagleFiler’s capture key, so EagleFiler will now display a message that tells how you can add an EagleFiler button to Chrome’s toolbar.
- Added the Convert Plain Text to Rich Text script.
- Added # as a word character for indexing, so that you can search for preprocessor directives and hashtags. This will take effect for new libraries or if you rebuild your indexes by holding the Command and Option keys when opening a library.
- Added the Drag and Drop section of the manual and expanded the Importing Mail and The Edit Menu sections.
- Improved the styling of the Apple Help.
- Fixed a bug searching for certain terms with Match Partial Words enabled.
- Fixed a regression where EagleFiler wouldn’t launch on a PowerPC G3–based Mac.
- Fixed a bug dragging iChat files.
- Fixed a bug where messages didn’t sort properly by Date Created.
- Fixed a bug where some closed windows still showed up via AppleScript.
- Fixed a bug where EagleFiler would crash when processing certain invalid URLs.
- Worked around a bug in Mac OS X 10.6 that could cause inconsistent font sizes in the contextual menus.
- 1.4.12—December 8, 2009
- EagleFiler is faster at building a mailbox’s table of contents after importing it.
- You can now use the characters []{}=#. in tag names.
- The Date Created for e-mail messages now shows the date from the message’s headers rather than the creation date of the mailbox file.
- Added the ViewEMLOnTiger esoteric preference, which is useful for people who want to use Microsoft Entourage as their external mail viewer on Mac OS X 10.4.
- Tweaked the spacing in the source list to match Mail.
- Tweaked the positions of the tag icons in the source list when it’s set to large icon mode.
- The New Record ‣ Open Stationery Folder command now opens the folder instead of revealing it.
- EagleFiler is now more robust with respect to errors when importing mail from Entourage, Mailsmith, and PowerMail.
- Fixed a bug where read records might be tagged as unread when restoring from a metadata backup.
- Fixed a bug where, in some circumstances, EagleFiler could display an error message or crash when undoing too many times in the record viewer.
- Fixed a bug where the Tag Cloud didn’t immediately update after changing the font in the preferences.
- Fixed a bug where Command Up/Down didn’t move the insertion point in a text document when the viewer had keyboard focus.
- Fixed a bug opening files in MacVim.
- Fixed a bug where EagleFiler didn’t show the alternating row background colors after a failed search.
- Fixed a bug capturing from Flock when using Mac OS X 10.4.
- Fixed a bug capturing large amounts of mail from PowerMail at once.
- Fixed a regression where some icons in sheets were drawn as dimmed.
- Fixed a bug where New Record ‣ Open Stationery Folder and Reveal in Finder didn’t work if TableText or another old application was running.
- 1.4.11—November 12, 2009
- The EagleFiler: Import service (for importing the selected text, URL, or files) is now enabled by default on Mac OS X 10.6. You may still need to log out and log back in for the system to recognize it, however.
- Worked around a change in Mac OS X that could make EagleFiler report an error when opening a library.
- Fixed a regression where sometimes EagleFiler didn’t open files in the proper external viewer/editor application.
- 1.4.10—November 10, 2009
- EagleFiler can now capture from Microsoft Exchange mailboxes in Apple Mail.
- Updated the How can I put my library on my iPhone? section of the manual with a link to the Dropbox iPhone application.
- You can now double-click an embedded file in the viewer or notes to open it in a separate window for viewing.
- Improved the instructions for importing mail from Thunderbird.
- The script for quickly creating new text files from LaunchBar will now let you enter tags as well.
- If a bug in Mac OS X 10.6 has erased the OpenMeta tags for a file that EagleFiler is importing, it will now look under kMDItemOMUserTags, which Spotlight may have preserved.
- Deleting a tag now removes it from the shared list of recent tags, so that it doesn’t appear to still be hanging around.
- Worked around a change in Flock so that EagleFiler can capture from it again.
- EagleFiler now displays image files according to the orientation information in their metadata (requires Mac OS X 10.6 or later).
- EagleFiler now writes the tags to kMDItemOMUserTags (and sets kMDItemOMUserTagTime) for compatibility with newer versions of OpenMeta.
- EagleFiler now gives priority to the org.openmetainfo extended attributes if they’re present and have more recent timestamps. This will make it possible to transition away from keys in Apple’s domain.
- Added the RecordsListHasAlternatingBackground esoteric preference for people who prefer a solid white background color in the records list.
- When you ask it to create a new file, EagleFiler no longer replaces / in the filename with -.
- To avoid confusion with the single-selection case, pressing Return in the records list no longer opens multiple selected records externally.
- Fixed a bug where the keyboard shortcut for New Record ‣ Plain Text File didn’t work under non-English localizations.
- Fixed a bug in the URL colorer that prevented some message bodies from being displayed.
- Fixed a bug that could result in empty tag names after renaming.
- Worked around a suspected bug in Mac OS X that could prevent EagleFiler from restoring the correct window position and size when opening a library.
- Fixed a bug where some individual message files didn’t sort properly by title.
- Fixed a bug with the French localization when creating a new file.
- Changed the way the Software Update… feature finds the downloads folder on Mac OS X 10.5 and later because sometimes the one that Internet Config returned would be invalid or unwanted.
- Improved EagleFiler’s error handling when it can’t read a metadata backup file due to a disk error.
- Modernized the code.
- 1.4.9—September 4, 2009
- When using Mac OS X 10.6, you can use the Keyboard pane in System Preferences to add EagleFiler’s import service to contextual menus in your other applications.
- Added the OpenEagleFilerURLsInNewWindow esoteric preference, which can be used to make EagleFiler open record links in an existing window rather than creating a new one.
- When dragging from the records list, EagleFiler now makes x-eaglefiler URLs available (instead of titles) when the receiving application expects plain text. This makes it possible to, e.g. drag and drop to Things to create a link to an EagleFiler record.
- EagleFiler now preserves the flagged state when capturing from Yojimbo.
- Updated the How can I put my library on my iPhone? section of the manual to reference Quickword, which allows editing of plain text and Microsoft Word documents from the iPhone.
- Added a note saying that accessing EagleFiler’s Dock menu (e.g. to open a recent library) requires a right-click or a Control-click under Mac OS X 10.6.
- Added a workaround for an error logging bug in the OS.
- Improved number entry in the smart folder editor.
- Fixed an appearance glitch when dragging from the records list.
- Worked around a bug in Mac OS X 10.6 that could cause EagleFiler to crash when indexing.
- Worked around a bug in Mac OS X 10.6 that could prevent some files from being indexed.
- 1.4.8—August 24, 2009
- Capturing a bookmark from NetNewsWire, OmniWeb, Safari, and WebKit Nightly is much faster because EagleFiler no longer goes online to download the contents of the page.
- The records list now supports click-through. This means that it no longer takes two clicks to select a different record when one of the inspector windows has focus.
- Added an optimization so that image files with custom icons can be displayed in the records list without having to ask Quick Look to generate a thumbnail.
- Improved the library opening speed by reducing the time spent building the action menu.
- The How can I access my library from multiple Macs? and How can I put my library on my iPhone? sections of the manual now discuss SugarSync.
- Updated the How can I put my library on my iPhone? section of the manual to add a link to Apple’s new MobileMe iDisk app.
- The Errors window now appears on all spaces.
- EagleFiler no longer auto-opens the Errors window at launch if it was open at quit.
- The crash reporter works better with pre-release versions of Mac OS X 10.6 (Snow Leopard).
- The software updater now supports two-digit version numbers like “1.4.10”—just in case.
- Made the progress window wider so that the text fits better.
- Updated the links for Mailsmith’s new home.
- Fixed a bug where EagleFiler’s auto-conversion from an RTF file to RTFD (e.g. when you pasted in an image) could overwrite a pre-existing RTFD file.
- Fixed a bug where the Reply to Message command didn’t work properly with Entourage.
- Fixed a bug where EagleFiler sometimes didn’t let you type a space in the Capture with options window.
- Fixed a bug where the fields and text view in the Info inspector would lose keyboard focus when switching to another application.
- Fixed a bug where editing in the records list wasn’t committed before switching to an inspector.
- Fixed a bug where importing a .webloc file via drag and drop didn’t set the proper source URL.
- Fixed a bug where the record viewer would not remain collapsed when resizing the window.
- Fixed a bug where double-clicking on a column header in the records list would open the selected records.
- Fixed a bug where, for the first Capture with options for a library, EagleFiler would suggest the “unread” tag even if the preferences were set not to mark new records as unread.
- Fixed a bug where EagleFiler would report an error when importing an empty message from Apple Mail.
- 1.4.7—July 28, 2009
- EagleFiler now copies tags into the extended attributes for Spotlight searchability and interoperability with applications that use OpenMeta (requires Mac OS X 10.5 or later). EagleFiler also integrates with OpenMeta’s list of recent tags and (since version 1.4.5) imports tags that were assigned using OpenMeta. As with previous versions, EagleFiler’s primary tag store is its database, so you won’t lose any metadata if you store, edit, or copy files in a manner that discards extended attributes, or if you restore from a Time Machine backup. Once a file is in EagleFiler, the tags must be edited using EagleFiler. The Copy tags to Spotlight comments option still works, but since OpenMeta support makes it largely redundant it is no longer recommended except for use on Mac OS X 10.4 and for interoperability with non-OpenMeta applications.
- EagleFiler now displays thumbnail icon previews of image files (requires Mac OS X 10.5 or later).
- Improved EagleFiler’s capture support for Journler. It now preserves the tags, comments, images, and resources, and it omits the entry header.
- Revealing a message in the Finder now reveals a .eml file instead of an .emlx file. You can use File ‣ Get Info on this file to make Entourage the default message viewer.
- When exporting messages, EagleFiler now adds a .mbox file extension so that Entourage will recognize that it can import from the file.
- Improved the Web archives that EagleFiler imports from pages served as XML.
- Now shows Growl notifications when using drag and drop to copy files from one library to another.
- EagleFiler now shows a library’s spinning progress indicator for all types of user-initiated operations, not just imports.
- Improved the parsing of invalid e-mail addresses.
- Increased the default capacity of encrypted libraries.
- Fixed a bug where EagleFiler allowed editing of locked files and then didn’t save them properly (due to a suspected OS bug).
- Fixed a bug where some auxiliary frame content wasn’t saved into Web archives.
- Fixed a bug where tags and notes were not preserved when dragging a bookmark from one library to another.
- Fixed a bug where Control-Tab didn’t work with Web views.
- Fixed a bug where certain Web pages wouldn’t import from Safari via the bookmarklets.
- Fixed a bug where the search field lost focus after pressing Return/Enter.
- Fixed a bug updating the search field label.
- Fixed a bug where some file URLs wouldn’t import via bookmarklets.
- Fixed a bug creating Web PDFs from non-conforming URLs.
- Fixed a bug importing messages with X-From_ headers.
- Fixed a bug importing messages from Entourage with Mac linebreaks and unescaped “From ” lines.
- Fixed a bug indexing notes for libraries inside non-ASCII-named folders.
- Fixed a bug where EagleFiler highlighted search operators in the viewer.
- Removed a Web archive workaround that’s no longer needed due to a bug fix in Safari 4.
- Updated the French localization.
- 1.4.6—June 1, 2009
- The Drop Pad window now appears on all spaces.
- When creating a Web archive, EagleFiler now uses the proper page title for Web sites such as gmane.org that change the title using JavaScript.
- Added +$*/~()|%^& as characters allowed in tag names.
- The search fields are now scrollable.
- The ruler is now shown by default for editable rich text files.
- Added keyboard shortcuts for showing, copying, and pasting the ruler.
- Updated to version 1.1.7 of the SkimNotes framework.
- Updated the instructions for changing an encrypted library’s passphrase to work around a bug in Disk Utility.
- Improved the display of messages containing invalid Base64 content.
- No longer adds a useless x-msg URL to the bottom of text imported from mail messages as RTFD.
- Worked around a bug in the Safari 4 beta that could cause some images not to be saved into Web archives.
- Fixed a bug where the search wasn’t cleared when opening a folder in a new window with the ClearSearchWhenChangingSources esoteric preference enabled.
- Fixed a bug where changing the plain text font didn’t change the font of newly typed text.
- Fixed a bug where the raw source for a message would sometimes show one extra character.
- The crash reporter works better with pre-release versions of Mac OS X 10.6 (Snow Leopard).
- The crash reporter now warns before sending a report without an e-mail address.
- You can now press Enter to click the Send Report button in the crash reporter.
- Updated Korean localization.
- 1.4.5—March 24, 2009
- When capturing from Apple Mail, EagleFiler can now directly import messages that are selected in smart mailboxes and in special “merged” mailboxes such as Inbox.
- When you do a library search for a phrase, EagleFiler now removes the quotation marks when transferring the query to Preview or Skim.
- EagleFiler now imports tags that are stored in a file’s extended attributes under com.apple.metadata:kOMUserTags by applications such as Tags, TagIt, and Default Folder X.
- Improved compatibility with pre-release versions of Mac OS X 10.6 (Snow Leopard).
- Added the assigned tag names AppleScript property, which can make writing scripts less verbose.
- Added the ExcludeIndexesFromBackup esoteric preference to exclude EagleFiler’s index files from Time Machine backups.
- Added the FindPanelDiacriticInsensitive esoteric preference.
- Worked around bugs in Microsoft Excel and Word that could cause EagleFiler to import the wrong document.
- EagleFiler’s temporary files are now excluded from Time Machine backups.
- Worked around a bug in the Safari 4 beta that could make Convert For Editing not preserve images.
- Worked around a change in Safari 4 that could cause problems when displaying or indexing Web archives.
- EagleFiler now closes files immediately after you’re done viewing them.
- Fixed a bug where the Errors window did not transform filenames for display.
- Fixed a bug where EagleFiler didn’t show Growl notifications after importing certain files via AppleScript.
- Fixed a bug where sometimes changes to a text or RTF document were not saved before opening the file in an external editor.
- Fixed a bug with the date format in mbox files.
- Fixed a bug where EagleFiler did not follow aliases in the Stationery folder.
- 1.4.4—February 11, 2009
- Streamlined capturing from Apple Mail. EagleFiler no longer asks whether you want to capture the selected mailboxes or the selected messages; now it always captures the selected messages. Also made other changes to reduce the number of dialog boxes.
- You can now use Command-Down-Arrow (Reveal in Container) with a message or file selected to have EagleFiler select it inside its containing mailbox or folder in the source list. This is useful if you had originally selected the message or file in Records, a tag source, or a smart folder and you want to see it in its original context.
- When you ask EagleFiler to import a file (e.g. by dropping it onto EagleFiler’s Dock icon or choosing Open With ‣ EagleFiler) that’s already in the current library, EagleFiler now opens the file for viewing rather than complaining that it’s already in the library.
- EagleFiler now uses non-modal notification windows (Growl, where available) to display the progress when capturing from a mail program.
- EagleFiler now uses its own Find panel everywhere, not relying on the system Find panel, in order to avoid having two separate windows and to improve the interaction with the search field.
- Added the SendsWholeSearchString esoteric preference, which lets you control whether EagleFiler updates search results as you type.
- When you search for a phrase, EagleFiler now tries to highlight the whole phrase in the viewer, rather than the constituent words.
- The Find panel works better with Spaces.
- Items in the Services menu can now read the selection from EagleFiler’s records list.
- You can now use the capture key to import New York Times Web pages that are in printer format, without having EagleFiler download the screen format instead.
- When importing Web pages as RTF(D), EagleFiler now stores the URL in the file’s Subject field.
- When you do a library search for a phrase, EagleFiler removes the quotation marks when transferring the query to the Find panel.
- When creating PDFs from Web pages, EagleFiler no longer inserts your username into the PDF metadata.
- When you press the capture key, EagleFiler now bounces its Dock icon once. This makes it easier to see that the capture has begun if the Dock was hidden or the sound was turned down.
- When creating a new plain text file with the File column hidden, if you enter a filename with an extension into the sheet, EagleFiler uses that extension instead of .txt.
- When merging mailboxes that are selected in the source list, EagleFiler no longer maintains the selection when the mailboxes are moved to the trash.
- Deleting multiple errors at once is much faster.
- You can now use Page Setup to change the orientation and scaling when printing.
- When printing a text view, no longer scales down the width unless it’s necessary to fit it on the page.
- The print job title now shows the title of the document being printed, rather than the name of the library.
- If a file wasn’t downloaded from the Internet, its source URL is now empty rather than being a file: URL.
- If there’s an error capturing from Firefox, EagleFiler now suggests uninstalling Default Folder X to work around a bug in Firefox.
- Tooltips in the Errors window now show the full path rather than just the name of the file.
- Worked around an OS bug that could cause problems when importing text from Apple Mail via services.
- Better error reporting when EagleFiler encounters an AppleScript bug in NetNewsWire.
- Improved handling of long library names.
- Improved the error reporting when capturing from DEVONthink.
- Fixed a bug where EagleFiler would start importing a file that was copied into the To Import folder while the copy was still in progress.
- Fixed a bug where indexing could hang if analyzing the file produced a large number of errors.
- Fixed a bug where some Boston Globe Web pages were downloaded as HTML files instead of as Web archives.
- Fixed a regression that could prevent MailTags from being imported from Apple Mail if the message also had annotations.
- Fixed a bug where files that didn’t have notes could be imported with the note tag if it was in the Spotlight comments.
- Fixed a bug where the URL wasn’t properly set when importing Web page text as RTFD via drag and drop.
- Fixed a bug where, when importing IMAP messages from Apple Mail, EagleFiler would sometimes incorrectly report that attachments were missing.
- Fixed a bug where the tags bar was hidden when it shouldn’t have been.
- Fixed a bug where the scroll arrows for the notes text view didn’t work.
- Fixed a bug handling errors when importing Web archives.
- Tried to work around a URL cache problem that could cause imports to stall.
- 1.4.3—November 20, 2008
- EagleFiler can now display Skim notes attached to PDF files.
- Added an esoteric preference to make EagleFiler import the selected text from a Web view in RTF(D) format rather than as a Web archive.
- Added an esoteric preference to control whether EagleFiler displays images in HTML e-mails, for those concerned about Web bugs.
- The color list tab is now available in the color panel.
- In the records list, pressing Return now edits the filename rather than opening the file.
- EagleFiler now preserves filesystem metadata when editing a smart folder’s .plist file.
- PDF annotations are now indexed for searching.
- The metadata backup files are no longer touched unnecessarily, for more efficient backups and syncs.
- Improved error reporting when emptying the trash.
- Fixed a regression where some files couldn’t be deleted.
- Fixed a bug where tag searches with partial word matching didn’t work with non-lowercase tag names.
- Fixed a bug where EagleFiler did not report unexpected errors when viewing files.
- Fixed a bug displaying property list files that were not dictionaries.
- Fixed a bug in the German localization for smart folders.
- Fixed a bug where text could be truncated when printing.
- Fixed a bug displaying Web archives created from Mail.
- 1.4.2—October 30, 2008
- Fixed a regression where the + button in the source list didn’t work.
- Fixed a regression where phrase searches found records that didn’t match.
- 1.4.1—October 28, 2008
- The Tag Cloud window now supports tagging/untagging multiple records at once.
- You can now setup a stationery file’s Spotlight comments so that new records created from that stationery have certain tags and/or notes.
- EagleFiler now supports metadata AppleScripts to customize what happens when you create a new record from stationery. For example, for a journal entry a script could set the From to the name of the current user and set the filename based on the current date. This is described in the New Record ‣ Open Stationery Folder section of the manual.
- The Quick Look window now works more like in the Finder. Instead of multiple windows, there’s now a single window whose content changes depending on what’s selected.
- Added some toolbar shortcuts: Option-click the New RTF button to create a new plain text file, and Option-click the Tags button to open the Tag Cloud window.
- EagleFiler can now display Scalable Vector Graphics (SVG) images.
- EagleFiler now displays XHTML files as rendered HTML rather than as XML source.
- Faster tag searching in Anywhere searches.
- EagleFiler now understands .url files.
- Made some AppleScript improvements: creation and modification dates are now settable, the import command now has an option for importing a named stationery file, you can update record checksums, and you can set the contents of the search field. An example script shows how to initiate an EagleFiler search from LaunchBar.
- When you click to edit in the File column, EagleFiler no longer selects the file extension. (Previously, this only worked when pressing Enter.)
- When importing a selection of text via the Services menu, EagleFiler now stores the source URL if the text was in a WebKit-based view (requires Mac OS X 10.5). Due to a bug in Mac OS X 10.4, dragging and dropping text onto EagleFiler’s Dock icon now requires Mac OS X 10.5.
- For consistency with the Finder, the Label column of the records list now shows “--” instead of “None” and sorts by name instead of number.
- Now uses “&” as the default prefix when copying tags to the Spotlight comments.
- Improved reporting of unexpected errors.
- Undo now works when the Tag Cloud window is in the front.
- Changed the zooming keyboard shortcuts so as not to conflict with the ones for Universal Access. (You can still use Command-- and Command-+.)
- Fixed spacing of Set Title in contextual menu.
- Added Help button to the Software Update window.
- Removed extra space in contextual menu.
- Fixed a bug trying to open the Find panel when EagleFiler was displaying an image.
- Fixed a bug where some toolbar icons didn’t load if you weren’t running under an administrator account.
- Fixed a bug where the Find panel didn’t always pick up the query from the search field.
- Fixed a regression where messages in mailboxes could not be opened in Apple Mail when running on Mac OS X 10.4.
- Fixed a regression where Spotlight comments on files weren’t preserved when importing, if you had Copy tags to Spotlight comments unchecked.
- 1.4—October 14, 2008
- Highlights
- You can now create custom smart folders, which can contain an unlimited number of criteria, optionally using nested Any/All/None criteria. Creating and editing smart folders requires Mac OS X 10.5; however, once created, the smart folders can be used with Mac OS X 10.4.
- Smart folders can now be organized into folders.
- You can define actions to occur when you drag a record onto a smart folder. For example, you could make a smart folder that shows records with a certain combination of tags, and that will assign those tags to dragged records.
- You can now create any type of new file from within EagleFiler. To do this, choose New Record ‣ Open Stationery Folder from the File menu. Whichever files you put in the Stationery folder become available as templates in the File ‣ New Record menu.
- You can now drag messages out of mailboxes to convert them to freestanding .eml files. It’s less efficient to store messages individually rather than in mailbox files, but there are also several advantages: the messages can be stored alongside other types of files, they can be freely moved between folders, and they are searchable by Spotlight.
- Added a Tag Cloud window, which shows a compact listing of all the tags. You can click on a tag to toggle whether it’s assigned to the selected record.
- Added a Find panel for searching within PDFs and Web archives.
- Added a preference to control which format Web pages are imported in. The supported formats are: Bookmark, PDF, Plain Text, Rich Text, Rich Text With Images, and Web Archive (the default).
- Added a preference to control what happens to Spotlight comments when importing. This is useful, e.g. if you had already used another application to tag your files or if you had entered notes from the Finder. If you tell EagleFiler to Import as tags, each word is imported as a tag. If you tell it to Import as notes and tags, EagleFiler extracts tags (prefixed by & or marked using Punakea’s format) and imports the remaining comments text as notes.
- Added commands to the contextual menus (Assign Tag, Set Filename, Set From, Set Title) so that you can quickly turn the selected text into metadata.
- File Formats
- Added New Record ‣ Plain Text File command.
- EagleFiler can now display Microsoft Word 2007 (.docx) files (requires Mac OS X 10.5).
- EagleFiler can now display and edit OpenDocument Text (.odt) files (requires Mac OS X 10.5).
- EagleFiler can now display and search XML and binary property list (.plist) files.
- Now imports .webloc files as-is rather than converting them to Web archives.
- EagleFiler now imports .eml files as-is rather than converting them to single-message mailboxes.
- Bean documents are now imported as a separate file type rather than as RTFD.
- Interface
- Added Quick Look command, which opens a Quick Look preview of the selected records in a separate window (requires Mac OS X 10.5).
- Added an Enclosing Record command in the View menu. Replaced the Select Source command with the similar but more useful Contents of Record command in the View menu. As a result, you can now use Command–Up Arrow and Command–Down Arrow to navigate up and down the hierarchy of folders and mailboxes.
- Added Search for Selection contextual menu command.
- When you mouse over a link in a Web view, EagleFiler now shows the URL at the bottom of the window.
- Revised the toolbar icons and simplified the default toolbar configuration.
- If there are no matches for a search, EagleFiler draws the records list background in yellow.
- Adjusted the unread and flagged menu item titles and toolbar labels for consistency with Mail.
- Increased the resolution of the Dock badges.
- The viewer now shows some helpful text describing the “note” tag.
- Moved Show Inspector and Show Tags from the Record menu to the Window menu and renamed Show Inspector to Show Info.
- Capture
- Can now capture from Entourage, and preserves the message flags, categories, and projects. If you want EagleFiler to skip a message, you can assign it the category “OmitFromArchive”.
- Can now capture from PowerMail, and preserves the message status and label.
- Can now capture from Preview, if you make it scriptable.
- Can now capture from Together, and preserves the tags, comments, labels, and ratings.
- When capturing from Mailsmith, EagleFiler can now import individual messages (before, only mailboxes were supported), and it now preserves the message status, label, and notes.
- When capturing from Camino, EagleFiler now reads the URL of the current tab rather than the first tab.
- In the Capture With Options window, if you edit the tags and then choose a different library, EagleFiler no longer overwrites the tags with the default ones for the new library.
- Importing
- You can now import Web pages using bookmarklets.
- Empty files and files that contain only a resource fork (such as font suitcases) no longer count as duplicates.
- Added an esoteric preference for importing Spotlight keywords as tags.
- When you try to import a file that’s already inside of the library folder, EagleFiler can now reveal the file in the browser window.
- If a connection times out while EagleFiler is importing a Web page, it will now retry twice.
- When importing bookmarks from a Web browser, EagleFiler now uses the titles you’ve assigned rather than fetching them from the Web.
- Miscellaneous
- Encrypted libraries can now be created as sparse bundle images, for more efficient Time Machine backups (requires Mac OS X 10.5).
- Encrypted libraries can now use 256-bit rather than 128-bit encryption (requires Mac OS X 10.5).
- You can now type tag names directly into an Anywhere search.
- You can now view messages in Microsoft Entourage instead of Apple Mail (requires Mac OS X 10.5). To do this, Get Info on a .eml file in the Finder, choose Entourage from the Open with pop-up menu, and click Change All.
- The Copy Record Link command now creates links using persistent IDs so that they will still work if you delete EagleFiler’s database and import the files into a new library.
- Added How can I put my library on my iPhone? section to the manual.
- Added Shortcuts section to the manual.
- Added an esoteric preference to clear the search field when you select a different source.
- You can now double-click a smart folder to open it in a new window.
- EagleFiler now indexes a file’s Spotlight keywords for searching.
- Improved auto-generated titles.
- Improved the display of improperly encoded message headers.
- Worked around a bug in Mac OS X 10.4 when highlighting matching search terms in the records list.
- Removes stray index files when opening the library.
- If there’s an error getting the downloads folder for a software update, EagleFiler now defaults to Downloads rather than Desktop.
- No longer shows the __deleted__ tag in the records list.
- The Untagged source now shows records that only have the “note” tag.
- Improved parsing of invalid mbox files.
- Improved error reporting when downloading Web pages.
- Rewrote filesystem code to improve performance and error reporting.
- Made various changes to improve interface responsiveness.
- Note files now include a relative URL to the file that they’re attached to, so that you can easily find the file if EagleFiler isn’t installed.
- Added placeholder text to the Purchase… window.
- No longer lets Web pages steal focus from the records list.
- You can now bring up the Find panel when the source list or records list has focus.
- EagleFiler now saves damaged index files for possible future analysis of why Search Kit couldn’t open them. It also tries multiple times to open indexes, since Search Kit sometimes changes its mind about which indexes are valid.
- Bug Fixes
- If an unexpected error occurs while EagleFiler is emptying the trash, it no longer leaves the library in an inconsistent state. Also, EagleFiler will now detect and repair this sort of damage when opening a library.
- Fixed a bug where a duplicate “From ” line could be inserted when generating an mbox file from an Apple Mail mailbox. This was harmless but unsightly.
- Fixed a bug where, in rare cases, two messages imported from Apple Mail could be joined into one, so that it looked like some had been skipped.
- Fixed a bug where EagleFiler changed the selection if you tried to delete a source and then canceled.
- Fixed a bug where Reveal in Finder didn’t work when KeePassX was running.
- Fixed a bug where you could, via the contextual menu, open a different page when viewing a Web archive.
- Fixed a bug where EagleFiler could freeze when revealing a non-existent file in the Finder.
- Fixed a bug where EagleFiler’s Web fonts would not be consistent with Safari’s if you’d never changed the fonts in Safari’s preferences.
- Fixed a bug where, when capturing multiple items with notes, some records without notes would be assigned the notes from one of the other records.
- Fixed a bug where certain errors when creating a new library were not correctly reported.
- Fixed a bug where the PDF viewer state wasn’t always preserved.
- Fixed a bug where the title of text records wasn’t linked to the filename by default.
- Fixed a bug where newly added tags weren’t selected if you had been renaming another tag.
- Fixed a bug where EagleFiler could crash when closing a browser window.
- 1.3.8—July 23, 2008
- Fixed a regression where capturing from Firefox didn’t work.
- 1.3.7—July 22, 2008
- Fixed a regression where editing a keyboard shortcut could cause EagleFiler to crash.
- 1.3.6—July 22, 2008
- Opening the Capture With Options window is faster and uses much less memory.
- When capturing a headline from NetNewsWire, EagleFiler now preserves the flagged status.
- Improved the error message when capturing from Firefox 3 fails due to a bug in Firefox.
- Fixed some small memory leaks.
- Fixed bug where .eml files converted to mbox format weren’t From-escaped.
- Moved .nib files that don’t need localization out of the English.lproj folder. This should make it easier to run EagleFiler in a language other than English without changing the default language on your Mac.
- Fixed bug truncating filenames containing decomposed characters.
- Improved the French localization.
- 1.3.5—July 2, 2008
- Made various performance optimizations to the browser and activity windows.
- If you click on a mailbox in the source list whose table of contents has not yet been built, EagleFiler now reports this in the viewer so that it’s more clear why no messages are shown yet.
- Dropping between folders in the source list no longer targets the containing folder, since this made the subfolder drop targets too small.
- Improved the way EagleFiler handles special “merged” mailboxes when capturing from Apple Mail.
- Added EnableWebPlugIns to the esoteric preferences, so that you can prevent Web plug-ins (e.g. Flash) from loading in EagleFiler’s viewer.
- Capturing a mailbox in Apple Mail no longer captures its submailboxes, unless they’re also selected.
- Fixed bug extracting the metadata from files during import.
- Fixed a bug where, in rare cases, EagleFiler would end up with two internal database records for the same file. This could happen with Web archives in the To Import folder.
- Fixed the title of the Copy Image command when Control-clicking on an image in the viewer.
- Fixed bug where EagleFiler would clear the display of the selected Web archive when using Capture With Options.
- Fixed regression where AppleScripting a browser window didn’t work.
- Reduced the delay before showing the Capture With Options window.
- The font-chooser text fields now draw the text centered.
- Single-click editing in table and outline views now requires Mac OS X 10.5, since it now relies on the standard OS functionality.
- In certain circumstances, auto-updating no longer requires authentication.
- Fixed bug where some operations in the Activity window would hang if the OS hung while setting a Spotlight comment.
- Worked around suspected OS bug, which sometimes caused a file’s creation date to change when you changed the modification date.
- Fixed bug where the Capture With Options window would be shown even if there were no items to capture.
- Fixed bug editing filenames with no extension in the records list.
- 1.3.4—June 3, 2008
- Fixed regression where parts of the Drop Pad didn’t accept dropped files.
- Fixed regression where source list titles sometimes would be truncated prematurely.
- Fixed regression where the top of the viewer was cut off in the German localization.
- Fixed regression where changes to the tags weren’t saved if you closed the window before pressing Return/Tab or clicking elsewhere.
- The default search scope is now Anywhere.
- The divider in the Info inspector now remembers its position.
- The Tags field in the Info inspector can now be made shorter.
- Improved launching speed.
- Added Importing Mail section to the manual.
- Added FolderMailboxTitleSeparateFromFilename to the esoteric preferences.
- Improved error reporting when capturing from Microsoft Word.
- Fixed bug importing Apple Mail messages when running under certain non-English locales.
- Worked around a framework bug that could cause errors when closing a library.
- Removed logging of invalid URLs.
- Updated the German localization.
- 1.3.3—May 20, 2008
- Improved the speed of displaying large numbers of files or messages for the first time.
- Can now capture from Opera.
- Added New Rich Text File command to the Dock menu.
- The Drop Pad is now resizable.
- Worked around Mac OS X bug that prevented EagleFiler from indexing certain documents for searching.
- The Capture With Options window no longer suggests the title from the previous capture, since that wasn’t very useful.
- If a mailbox’s messages are not yet ready for display (because EagleFiler is rebuilding the table of contents), the mailbox name is now shown in gray in the source list.
- Added placeholder text to the tags bar so that it’s more clear that it’s editable.
- Expanded the documentation for the Verify command.
- On Mac OS X 10.4, the viewer pane now shows custom rather than generic icons for files that it doesn’t know how to display. (On Mac OS X 10.5, it continues to use Quick Look.)
- When searching, EagleFiler now ignores trailing meta characters in the query string, rather than returning no results.
- The Drop Pad menu command now hides the Drop Pad if it was already visible.
- Reorganized the Dock menu so that the fixed commands are easier to find with the mouse.
- Improved error reporting when capturing from a “merged” mailbox in Mail.
- Adjusted spacing in source list.
- Added “raised” background style to the label in the tags bar.
- Skips importing .git folders.
- Improved error logging.
- Fixed bug where the Tags palette sometimes showed the tags for the wrong library.
- Fixed bug where the Tags field in the Batch Change… window didn’t become checked when you started typing tags in it.
- Fixed bug with text color of non-highlighted text in selected rows of the records list, when it didn’t have keyboard focus.
- Fixed error resizing the browser window.
- Fixed importing of Word documents with blank titles.
- Fixed bug where the command in the Window menu said Activity Viewer instead of Activity.
- 1.3.2—April 24, 2008
- Faster indexed searches when lots of results are found.
- Faster at displaying large text files when running on Mac OS X 10.5.
- The Title and From fields in the Capture With Options window will now try to clean up any text that you paste in, e.g. removing linebreaks and coalescing multiple spaces into one.
- Enlarged the Title field in the Capture With Options window.
- Some errors now have a tooltip that shows which library they pertain to.
- Preserves more file metadata when editing documents within EagleFiler.
- EagleFiler can now import URLs that contain the | character.
- Adjusted mail-related icons when running on Mac OS X 10.5.
- Added MaxEditableTextFileSizeInMB esoteric preference, which lets you set EagleFiler to only show the first few megabytes of large text files, so that they display more quickly.
- Disabled undo in the Title and From fields in the Capture With Options window to work around a bug in Cocoa.
- Fixed bug where the viewer could lose keyboard focus when using Previous/Next Record.
- Fixed bug where mailbox names were not indexed for Anywhere searches.
- Fixed bug editing text or RTF documents that were stored on non-HFS volumes.
- Fixed bug where indeterminate progress bars didn’t animate when running on Mac OS X 10.5.
- Fixed bug importing messages from Apple Mail that claimed to be sent in the year 2038 or later.
- Fixed mbox separator-line dates for imported IMAP messages.
- Fixed regression where files and messages didn’t sort together properly by modification date.
- Updated the .sdef file to the latest format.
- Updated to Python 2.5.2.
- Renamed the Activity Viewer window to Activity for consistency with Mail and Safari.
- Fixed color of non-highlighted text in selected rows of the records list.
- 1.3.1—April 9, 2008
- When searching the Tags scope (or using tag:<name> with another search scope), EagleFiler now lets you type incomplete tag names if Match Partial Words is checked.
- The @ character is now allowed in tag names.
- When using Capture With Options, any tags or notes that you set are now used in addition to rather than instead of any tags or notes suggested by the capture script.
- Changes to notes are now undoable.
- Improved responsiveness by limiting the number of simultaneous file copy operations.
- Fixed regression where Copy tags to Spotlight comments didn’t work.
- Fixed regression editing files in the viewer whose path contained non-ASCII characters.
- Fixed regression deleting notes.
- When you delete the selected sources, EagleFiler now selects the next source in the list and maintains the scroll position.
- Canceling a Capture With Options now brings you back to the application that you were in.
- The tag abbreviation column now sorts by the actual tag names, rather than by the abbreviation symbols.
- Worked around a Web Kit bug saving certain pages as Web archives.
- Worked around OS bug that could cause a crash when resizing a browser window.
- Tried to work around OS bug revealing files in the Finder.
- After revealing a file in Path Finder, brings Path Finder to the front.
- Re-positioned Format menu for consistency with Mail.
- Fixed a rare crash when searching a PDF.
- Fixed bug where dragging records in the list sometimes required an extra click.
- Fixed sorting of sources, records, and tags whose names contain combining marks.
- Fixed bug where the contextual menu sometimes had duplicate Highlight commands.
- Fixed bug where sometimes the original title of a document (stored in the file) wasn’t indexed if you’d set a custom title in EagleFiler.
- Fixed bug where .plist files were sometimes imported as text.
- Fixed bug where a displayed Web archive could auto-open a window in the user’s Web browser.
- Fixed bug remembering the PDF zoom level.
- Updated German localization.
- 1.3—March 11, 2008
- Highlights
- Added Capture with options command (Option-F1 by default), which lets you set the library, destination folder, tags, and other metadata right when you press the capture key.
- Added Batch Change… menu command and button in the tags bar. This lets you set the title, from name, label, tags, and notes of the selected records all at once.
- Now uses Quick Look to display file types that EagleFiler doesn’t natively understand (e.g. Pages, Keynote, OmniGraffle, fonts). This feature requires Mac OS X 10.5.
- Added Untagged smart folder to the source list.
- Added Date Created and Tag Names columns to the records list.
- Added Set Label submenu and contextual menu.
- Added specialized viewing and indexing support for iCalendar (.ics) and vCard (.vcf) files.
- Now indexes Skim notes attached to PDF and PDFD files so that you can search for them within EagleFiler.
- Revised the icons and layout throughout the user interface.
- Made various optimizations so that EagleFiler is faster and more responsive.
- Browser Windows
- When creating new rich text files or notes, EagleFiler now creates RTF files instead of RTFD ones when possible. RTF files are more compatible and faster. Additionally, when editing files in the viewer, EagleFiler automatically converts between RTF and RTFD depending on whether RTFD is required.
- When using the Record ‣ Tag command to jump to the tags bar, EagleFiler now moves the insertion point to the end of the tags, rather than selecting all of them.
- When you create a New Rich Text File within EagleFiler, it’s no longer marked as unread.
- The Open With External Viewer toolbar button now shows which application will be used to open the file.
- Added Update Checksum toolbar button.
- Now shows tag colors in the source list.
- You can now tab from editing the File column in the records list into the record viewer, which makes creating new RTF files smoother. (Requires Mac OS X 10.5.)
- When you open a library on a smaller screen than it was previously opened on, EagleFiler now overrides the OS and shrinks the window so that it fits on the screen.
- Added Select Source to the contextual menu.
- Added a custom drag image for the records lists.
- Added ellipsis-truncation to column headers in the records list.
- Increased the maximum width of the date columns.
- Holding down Option to skip the confirmation when emptying the trash now works from the contextual menu.
- When displaying Usenet messages from mbox files, EagleFiler now shows the name of the newsgroup in the To area of the viewer.
- You can now copy an image file that EagleFiler’s displaying to the clipboard.
- Now remembers between launches if you’ve set the PDF view to display continuous or facing pages.
- You can now press Command-Delete to delete the selected record(s) when the viewer has focus.
- You can now double-click the drag strip to collapse the source list.
- Increased the font size in the tags bar.
- Capture
- If no library is open when you press the capture key, instead of showing an error alert, EagleFiler now opens the Capture with options dialog, which lets you open or create a library to complete the capture.
- Can now capture from Address Book, Flock 1.0, iCab 4, Keynote, MindManager, Pages, OmniGraffle, and TextMate.
- Revised the user interface for setting the capture key.
- While EagleFiler is in the process of capturing (i.e. running the capture script or showing the capture options dialog), it now badges the Dock icon with a picture of a camera.
- Added |creationDate| and |modificationDate| options for capture scripts.
- Improved preservation of modification and creation dates when capturing from DEVONthink Pro, MarsEdit, Journler, and Yojimbo.
- Improved the reliability when capturing from WebnoteHappy, e.g. if it returns invalid tag, note, or title information.
- EagleFiler now creates the user Capture Scripts folder for you.
- Miscellaneous
- If EagleFiler is busy when you ask it to close a library, it now stops any existing operations (except when doing so would cause data loss), so you no longer have to wait and/or stop them yourself.
- When dealing with “Bad Checksum” errors in the Errors window, you can now update the checksums for multiple errors at a time, and after updating a checksum EagleFiler removes the error from the window.
- Reduced EagleFiler’s RAM use for large libraries.
- Importing
- Text dragged from a Web page is now imported as a Web archive instead of an RTFD file. (If you want an RTFD file, you can use the Convert For Editing command.)
- In addition to checking periodically, EagleFiler now checks the To Import folders when it becomes the active application. This should get new files imported sooner.
- Now shows a single Growl notification for each batch of files imported, rather than for each individual one.
- Now shows a progress spinner next to the action menu while EagleFiler is busy importing.
- Changed the Dock icon indicator that shows when EagleFiler is importing. Instead of a red circle, it now shows a downward pointing arrow.
- Improved EagleFiler’s recovery when WebKit runs into an internal error while saving a Web archive file.
- Info Inspector
- Added URL field.
- Enlarged the Title field and Notes text view.
- Now displays three dates—Created, Added, and Modified—and the creation and modification dates are editable.
- Fields that are unavailable are now disabled rather than just marked as uneditable.
- Search
- Now shows the search scope beneath the search box so that it’s clear which parts of the records you’re searching.
- When searching, you can now use OR as a synonym for |, and you can use -word as a synonym for !word.
- EagleFiler is better at estimating how long indexing will take when some of the records in the library are already indexed.
- AppleScript
- The import command now returns a list of the imported records. This makes it easier to set the properties of the new records. Additionally, import now waits until the records have been imported before returning, so the script knows when the import has finished.
- The import command now supports a deleting afterwards option, which makes EagleFiler delete the source file after successfully importing it.
- You can now use the import command outside of a tell library document block; it will then target the frontmost library.
- The source URL property is now settable.
- Bug Fixes
- The order in the labels pop-up menu now matches the Finder.
- Now remembers the sorted column of the Tags inspector between launches.
- Fixed bug where the source URL wasn’t set if you imported a URL of a file that wasn’t a Web page.
- No longer shows the Rebuild dialog when opening a library if you hold down other modifier keys in addition to Command-Option.
- If EagleFiler was unable to capture due to a bug in the Finder, the error message now suggests using drag and drop, updating to Mac OS X 10.5, or disabling FileVault.
- Now preserves the creation date when editing files within EagleFiler and when saving notes.
- Fixed bug where the Import Files… command didn’t let you import items that were next to the library folder.
- Fixed bug where certain Apple Mail mailboxes (typically those imported from another mail program) weren’t imported as mailboxes.
- Fixed bug where the Reveal button in the Errors window didn’t work properly for duplicate files that came from the To Import folder.
- Fixed bug where the Highlight command didn’t work properly when no text was selected.
- Fixed bug where the Highlight toolbar button in the main browser window would be enabled when editing a note.
- Fixed bug where EagleFiler would add a uniquing number if you renamed a file/folder to a name that differed only by case (and you were using a case-insensitive filesystem).
- Worked around a Cocoa bug that could, in rare cases, lead to an infinite loop when saving the library.
- Fixed bug where some Format ‣ Font menu commands were enabled even though they couldn’t be used because Allow Editing in Record Viewer was unchecked.
- Fixed bug where toggling Allow Editing In Record Viewer didn’t take effect immediately.
- Fixed crash involving the tags bar.
- Fixed bug where capturing just messages from an Apple Mail mailbox with submailboxes would import empty folders for the submailboxes.
- Fixed bug where newly imported records sometimes didn’t sort properly by modification date.
- Fixed bug where the Info inspector sometimes didn’t show the correct record.
- Fixed bug where custom icons on the To Import folder were not preserved.
- The software updater is better at handling invalid downloads folders.
- Fixed crash involving the Info inspector.
- Fixed bug where Edit ‣ Find ‣ Library Search… didn’t bring the window to the front.
- Fixed bug hiding and showing the source list when running on Mac OS X 10.5.2.
- Fixed bug checksumming packages containing symlinks.
- Fixed bug where JavaScript was disabled in the viewer.
- 1.2.7—November 14, 2007
- If you create a New Rich Text File while one or more tag sources are selected, EagleFiler now assigns those tags to it.
- Colored quote levels now work in HTML messages.
- You can now hold down the Option key to empty the trash without a warning.
- Now uses the proper Skim icon for PDFD files.
- Combined the three system services into one, which detects whether it was invoke with a file, text, or URL(s). The keyboard shortcut can now be configured using System Preferences rather than a separate utility.
- If you make EagleFiler a login item, set it to be hidden, and have it set to open a library when it’s launched, EagleFiler will now re-hide itself after opening that library.
- Drag-importing from MacJournal works now.
- The system service now works properly when EagleFiler wasn’t already running.
- Control-clicking on a source group no longer selects it.
- Improved scaling of the library document icon.
- Fixed bug where the Apple Help didn’t work on Mac OS X 10.5.
- Fixed regression where assigning/unassigning tags using the Spacebar in the Tags inspector didn’t always work.
- Fixed bug displaying some encoded message subjects.
- Fixed regression where the top couple pixels of the viewer could be cut off.
- Fixed bug where the icons of some types of sounds, movies, or images showed the wrong file type.
- Fixed bug where the source list sometimes had the wrong background color.
- Fixed ellipsis truncation of selected source names.
- Updated German localization.
- Added Korean localization.
- 1.2.6—October 24, 2007
- Modernized the source list and buttons.
- Capturing the selected mailboxes/messages from Apple Mail now works when an IMAP path prefix is set.
- Can now capture from MarsEdit (based on work by Eric Blair).
- Added support for Skim .pdfd bundles.
- Tags in the tag bar and inspectors now have contextual menus that let you reveal them in the source list, to see all the records with that tag.
- Added French and German localizations.
- There are new AppleScripts for importing from LaunchBar and Quicksilver.
- You can now modify capture scripts while EagleFiler is open without having to relaunch for it to notice the changes.
- Improved import speed, particularly when the source volume is slow.
- You can now cancel an import in the middle of EagleFiler checksumming a file.
- Fixed bug where capturing from Apple Mail didn’t work on pre-release versions of Mac OS X 10.5 Leopard.
- Capturing now works with pre-release builds of Camino 1.6.
- Select Source now preserves the selection in the records list after selecting the container sources.
- Using the spacebar to toggle tags in the Tags inspector now interacts better with type-selection.
- The search field now expands and contracts based on the available space in the toolbar.
- Convert For Editing now preserves the title and allows duplicates.
- After deleting a record or tag, EagleFiler will now select the next item in the list.
- Clicking a link to open another EagleFiler record now gives it keyboard focus.
- Now clears Web views that aren’t in use, saving memory and silencing sounds.
- Capturing PDF files from Safari now works when the Schubert|it PDF Browser Plugin is installed.
- Renamed the Library source to Records.
- Improved capture script error reporting.
- Metadata files are now invisible by default, and you can prevent them from being created automatically. There are esoteric preferences to control this. Also, EagleFiler avoids writing metadata files to disk if they haven’t changed.
- After opening a library with EagleFiler 1.2.6, it will no longer be openable in previous versions of EagleFiler. Of course, the files and metadata are still accessible in the Finder.
- Fixed color of selected tags in inspector.
- Fixed memory leak with the Activity Viewer window.
- Fixed progress bar inaccuracy when importing a folder of files.
- Fixed bug importing .eml files exported from Thunderbird.
- Fixed bug where certain types of sound files were imported as text.
- Fixed bug displaying attachment names that used the Big5 character set.
- Choosing colors is more robust and defaults to the spectrum view.
- 1.2.5—August 21, 2007
- Can now capture from Cyndicate.
- Fix bug where Flash was disabled in Web views.
- Fixed bug where the insertion point would sometimes move if you edited in the record viewer and then manipulated the window before it had saved.
- Improved the robustness of the startup code to prevent some rare problems when launching EagleFiler.
- Improved handling of FDF files.
- Fixed rare errors importing lots of files at once.
- Verifying checksums is faster.
- 1.2.4—August 2, 2007
- The records list uses gentler background colors to indicate the files’ labels.
- Now shows labels in the source list.
- Added keyboard shortcuts for going to the next or previous PDF page.
- Now shows tooltips in the source list.
- The records list now has an alternating background color, like the Leopard Finder.
- Improved the responsiveness of the user interface when highlighting search matches in PDFs.
- Fixed incorrect outline/table row heights when using certain fonts.
- Now preserves extended attributes when copying files into the library.
- When using Copy Record Link and pasting into a rich text view, the pasted text’s font will now match that of the surrounding text.
- Improved the Next/Previous toolbar buttons.
- Dragging from EagleFiler to a burn folder now creates a link instead of copying the file.
- If the File column is hidden, both Enter and Option-Enter will bring the Title column into edit mode.
- After you drop a file onto a spring-loaded folder in the source list, EagleFiler will collapse the temporarily expanded folders.
- EagleFiler no longer tries to import SketchUp files as text, and therefore it won’t try to display them, which led to long freezes as the data overloaded Cocoa’s text system.
- Improved capture error messages.
- Fixed bug parsing tags from strings containing non-ASCII alphabetic characters.
- Fixed bug where labels were lost when editing RTF or RTFD files within EagleFiler.
- Now preserves modification dates when capturing from Yojimbo.
- If the records list is empty because nothing matched the search, this is now reported in the viewer so that you don’t wonder why the list is empty.
- If Allow Editing in Record Viewer is off, New Rich Text File will now always bring down a sheet for setting the text of the new file.
- Choosing Edit ‣ Find ‣ Library Search… now works when the toolbar is in Text Only mode.
- Fixed help book icon.
- 1.2.3—July 2, 2007
- Calculates folder sizes and shows them in the records list.
- Added import plain text AppleScript command for when you want to import a string as a text file rather than an RTF one.
- When you view a file, EagleFiler now makes sure that it’s up-to-date in the index, in case you modified it outside of EagleFiler.
- When you edit a filename in the records list, EagleFiler no longer pre-selects the extension.
- The Errors window no longer auto-selects errors when they are added.
- Added progress bars when creating or opening a library.
- Rotates the log file to prevent it from growing too large.
- Changed the verification icon.
- Improved error handling when creating or opening a library.
- Fixed bug where folder labels weren’t preserved when importing.
- Worked around OS bug that caused an internal error when pressing Option-Tab in an empty text view.
- Errors reported from EagleFiler’s lower level frameworks are now reported in the log file rather than on the system console.
- Fixed bug where EagleFiler would let you import the library into itself.
- Fixed regression where canceling an import sometimes didn’t work.
- Worked around suspected QuickTime bug that caused EagleFiler to not import the proper ID3 tags from some MP3 files.
- Improved reporting of duplicate file errors.
- No longer tries to import .localized files.
- Fixed bug handling locked files and folders.
- Fixed bug where an error could be reported if you emptied the trash when a record in it was selected.
- No longer tries to backup the metadata for missing folders.
- Fixed bug displaying e-mail messages when the chosen font was no longer available.
- 1.2.2—June 20, 2007
- Fixed bug where some menu commands were disabled when the record viewer had focus.
- When you view a PDF file, EagleFiler will now update the page count in the records list in case it has changed.
- Fixed bug where PDF page counts weren’t transferred when dragging from one library to another.
- Fixed bug importing text via drag and drop.
- Fixed PyObjC bugs that could cause various crashes and hangs.
- Fixed regression where Open in Delicious didn’t work.
- Fixed icon scaling in Activity viewer when merging mailboxes.
- Fixed regression where where changing Allow Editing in Record Viewer didn’t take effect immediately.
- Fixed bug where EagleFiler would re-open at launch even libraries that were in the trash.
- Worked around Cocoa bug that could cause the record viewer’s scroll bars to be hidden if you expanded the viewer when the ruler was hidden.
- Fixed bug where EagleFiler tried to import invisible metadata files.
- Fixed bug where the copy cursor was shown when dragging and dropping within the record viewer.
- Fixed bug where the spell-checking state wasn’t remembered.
- Fixed bug with the PDF zoom-to-fit state and the contextual menu.
- Worked around PDF Kit bug where the password field wouldn’t disappear.
- Fixed bug with To Import folders and locked files.
- Fixed bug where EagleFiler let you create a new library on top of an old one.
- Fixed bug indexing certain HTML and Microsoft Word files.
- Fixed bug with multiple backup metadata operations at once.
- 1.2.1—June 8, 2007
- You can now use the Export… command to export the selected messages in mbox format, so that they can be imported into any mail program.
- The names of To Import folders now include the library name, so that you can tell them apart in a Finder or open panel sidebar.
- Can now capture from Pukka and WebKit Nightly. When capturing from Yojimbo, now preserves the label as an EagleFiler tag. When capturing from Cocoalicious, Journler, Yojimbo, and WebnoteHappy now preserves the title rather than extracting it from the file.
- The label colors now more closely match those in the Finder, and the pop-up menu sorts alphabetically.
- The tooltip for the Tags column in the records list now shows the names of all the assigned tags.
- Allow duplicate files in library is now a full preference.
- When copying tags to Spotlight comments, EagleFiler now separates the tag names with a space instead of a comma-space, and there is an esoteric preference to set a tag prefix such as &.
- When copying files into the library, now copies the Spotlight comments, too.
- Added tooltips to help with setting tag abbreviations in the inspector.
- The Backup Metadata command can now be used to force EagleFiler to copy the tags to the Spotlight comments, if you don’t want to wait for this to happen automatically.
- Added esoteric preference to make EagleFiler display Web pages using their print stylesheets.
- When writing a capture script, if you obtain the tag names as a single string, you can pass it as |tagsString| to let EagleFiler parse it into individual tag names.
- You can now select more than one error at a time in the Errors window.
- Adjusted the word characters used for indexing to make it easier to find words containing $, @, %, and _. (This will only take effect after rebuilding the indexes.)
- Made some changes to the New Library… interface to make it more clear that the maximum library size only applies to encrypted libraries.
- Fixed regression where EagleFiler couldn’t open libraries inside folders with non-ASCII names.
- Fixed regression where the Info inspector sometimes displayed information for the wrong record(s).
- Fixed bug where .webloc files in the To Import folder were not deleted after importing.
- If EagleFiler encounters an error while importing a file in a To Import folder, it now moves the file to the Unable to Import folder so that it won’t encounter the same error again the next time it scans the To Import folder.
- Fixed bug importing WMA URLs.
- Worked around crash due to bug in Search Kit.
- Fixed bug where the records list lost focus when a search was active and you clicked on a Web archive.
- Fixed bug with the foreground color of highlighted text in the records list.
- Fixed bug where EagleFiler would be slow and could run into an OS error when capturing a large number of documents at once.
- Made various error reporting improvements.
- Improved undo in the inspectors.
- Fixed cosmetic bug with the Reveal In Library button.
- Fixed interface glitch where it looked as though EagleFiler would let you move the trash and smart folders around.
- EagleFiler will no longer crash when opening a library on pre-release versions of Mac OS X 10.5.
- 1.2—May 30, 2007
- Made a variety of changes to improve EagleFiler’s speed and responsiveness, especially for libraries with many files.
- You can now copy from one library to another via drag and drop. All of the EagleFiler metadata will be preserved.
- The New Library… command now offers the option to create an encrypted library.
- Highlights search matches in the items list and the record viewer.
- Each library now has a To Import folder in the Finder. Any files that you save into this folder will be imported when you open the library (or within the next minute or two if the library is already open).
- You can now delete (and undelete) individual e-mail messages.
- Uses the available Spotlight importers to index the content of many types of files that EagleFiler doesn’t natively understand.
- Added Match Partial Words option to the search pop-up. When this is checked, you can search for partial words without having to type wildcards (*) in the query.
- tag:<tagname> searches now work with Filename, From, To/Cc, and Title searches, rather than just Anywhere and Notes searches.
- Can now capture from Skim and Journler (preserving tags).
- When capturing from Cocoalicious, EagleFiler now preserves the tags and the description and extended description.
- Added Backup Metadata command. EagleFiler will automatically backup a library’s metadata when it’s opened (unless you have Shift held down) and also periodically after it’s been opened. You can manually backup the metadata by holding down the Option key and choosing Backup Metadata from the File menu. Metadata is backed up to EagleFiler Metadata.plist files inside the library folder. If you import a file that has backed-up metadata, EagleFiler will use the stored metadata to set the title, from name, checksum, source URL, tags, and notes.
- Added Copy tags to Spotlight comments preference. When this is enabled, you’ll be able to find files in your library by searching for their tag name using Spotlight.
- If you hold down the Command and Option keys when opening a library, you can access the new Rebuild Indexes dialog. This lets you optimize or repair EagleFiler’s search indexes, and you can choose whether it indexes for word searches or phrase searches. Previous versions of EagleFiler always indexed for phrase searches. Switching to word indexing will speed up EagleFiler’s indexing and substantially reduce the amount of disk space that the indexes consume.
- Added Update Checksum command, so that it’s easier to tell EagleFiler when you’ve modified a file using another application.
- When importing via AppleScript, you can now specify which folder to import into, e.g. import files {theFile} container theFolder.
- It’s now possible to change filenames via AppleScript.
- When using Previous/Next Record with the Info inspector in front or the tags bar focused, the text field will retain its focus as the selected record changes, making it possible to quickly edit multiple tags/titles/filenames in sequence.
- You can now press Option-Delete when viewing a tag source to move the selected records to the trash rather than unassigning the tag.
- Added Esoteric Preferences.
- When exporting messages in .emlx format, now includes the tags and notes.
- Now shows a determinant progress bar when importing a folder.
- No longer shows a progress window when opening a library.
- Improved the display of various kinds of multi-part e-mail messages.
- No longer shows the children of smart folders in the source list.
- Now shows the pointing hand cursor when you hover over a clickable link in a text view.
- From the AppleScript interface, it is now possible to access records by name, subject to the filename being unique.
- Added backup metadata AppleScript command.
- You can now change the case of a file’s extension.
- Updated to Python 2.5.1.
- Worked around OS bug that could cause crash when viewing PDFs.
- Fixed bug where the note tag could get out of sync.
- Fixed bug where creating a link when editing in a rich text view would sometimes insert the link after the selected text.
- Fixed crash when indexing certain QuickTime files.
- Fixed bug calculating checksums of certain document packages.
- Fixed memory leak with Activity Viewer window.
- Worked around Search Kit bug that could cause a crash when doing a phrase search.
- Fixed bug where if you drag-imported multiple folders into a folder, the second and subsequent folders would be imported at the top level.
- Fixed bug capturing from Yojimbo 1.4.2.
- Fixed bug where the URL colorer didn’t find certain valid URLs.
- Fixed bug where EagleFiler allowed duplicate files to be added to the library.
- Fixed threading bugs when importing multiple files at once.
- When viewing a Web page, if you click on a link to another part of the same page, EagleFiler now scrolls the window rather than opening the location in a new window.
- Modernized the crash reporter code.
- Fixed bug where EagleFiler would sometimes keep files open after a library had been closed.
- Fixed bug where the Info inspector showed “()” for the size of a folder.
- Fixed bug in reporting library save errors.
- Fixed bug where application-level menu commands could get permanently disabled.
- 1.1.6—March 5, 2007
- Now supports searching by filename.
- Can now capture from Flock.
- The interface is a bit more responsive, due to threading improvements when importing, indexing, and merging.
- No longer hangs when indexing a movie with unresolved file references.
- No longer uses any CPU time when idle.
- Can now import malformed mbox files generated by MailSteward.
- Fixed bug where fields in the inspector could lose their focus when a background operation completed.
- Fixed bug dropping onto an item inside the Trash source.
- Fixed regression displaying contents of multiple folder sources.
- Fixed regression where new rich text records weren’t auto-selected.
- Improved error handing during menu/toolbar validation.
- 1.1.5—February 20, 2007
- Worked around a Cocoa bug that could cause a crash when closing a window or open/save panel.
- The Date column is now called Date Modified.
- Fixed bug where a record’s cached modified date could get stale.
- Fixed bug where closing a window or pulling down the File menu could be slow if there were messages selected.
- Fixed regression where the same mailbox could be indexed by duplicate threads.
- Fixed bug remembering the open libraries when quitting.
- Fixed display of library names containing slashes.
- 1.1.4—February 16, 2007
- Added Show ‣ Messages in Records Source option. This makes it possible to view and search everything in the library by selecting the Records source. Previously, to search e-mail messages you had to select one or more mailboxes; you can still do that, if you want to restrict the search to just those mailboxes.
- The Tags inspector now sorts the assigned tags to the top.
- Added Bigger/Smaller commands for adjusting the text size for rich text documents and Web archives.
- You can now omit the Shift key when pressing the keyboard shortcut to zoom in, i.e. Command-= is now equivalent to Command-+.
- Improved URL coloring in messages.
- Made various performance improvements, particularly to file indexing, display in the browser window, and emptying the trash.
- Now shows custom file icons (rather than a generic text icon) for files such as OmniGraffle documents that are in XML format but are not strictly text documents.
- Added New Folder button to the Export… dialog.
- The Import Files… and Export… dialogs are now sheets.
- Worked around Search Kit bug that caused crashes when doing phrase searches.
- Worked around suspected Cocoa bug that could cause a crash if you pressed Cancel when creating or opening a library.
- Worked around Cocoa bug that could cause the source list not to properly scroll to show a new tag that had been created.
- Fixed bug importing MailTags projects.
- Fixed bug where the tags field in the Info inspector didn’t wrap when there were a lot of tags, or update when the record selection changed.
- Fixed bug where insertion point didn’t advance when pressing Space while editing a tag’s name in the Tags inspector.
- Fixed bug accessing tags via AppleScript.
- Fixed bug displaying Web archives.
- Fixed problem displaying messages in tag sources if an index file had been damaged.
- Improved compatibility with pre-release versions of Mac OS X 10.5.
- The Software Update auto-updater is now compatible with FileVault.
- No longer shows inaccurate size for folders.
- Made various improvements to the error reporting and error logging.
- 1.1.3—January 25, 2007
- Can now capture from DEVONagent, DEVONthink Pro (preserving comments), Nisus Writer Express, and Yojimbo (preserving comments and tags).
- Added Copy Source URL to the contextual menu.
- Better display of e-mail messages with embedded messages (such as digests and bounced messages).
- You can now use just plain Tab instead of Control-Tab to tab out of the viewer pane in the browser window when the viewer is a read-only text view.
- In the records list, you can now type Option-Enter to edit the title of the selected record.
- If a message attachment doesn’t have a name, EagleFiler will list the content subtype next to the paperclip instead of omitting that attachment.
- When capturing from Apple Mail with both messages and mailboxes selected, “Mailboxes” is now the default choice.
- Better error messages when you try to capture a smart mailbox in Apple Mail.
- EagleFiler cannot import mailboxes from Apple Mail on Mac OS X 10.3 and earlier. Rather than importing the mailboxes as folders, it now reports an error.
- Can now import more types of text clippings.
- Spaces in tag names are now converted to underscores instead of being deleted.
- Fixed error when pressing Enter in the records list.
- Fixed bug where capturing packages from the Finder didn’t work.
- Fixed bug where the scroll position and selection in the notes editor would be messed up when switching to another application.
- Worked around a Web Kit bug that caused it to needlessly fetch archived portions of a Web page over the network, or not display them at all if you were offline.
- Worked around a Web Kit bug when displaying a Web archive created from a local HTML file.
- Fixed bug where Reveal In Library sometimes looked in the wrong library.
- Fixed error undoing in the tags fields.
- Fixed error using the Highlight command with no selection.
- EagleFiler’s helper tools don’t use the URL cache, so now they tell Web Kit not to store one.
- 1.1.2—January 9, 2007
- Tabbing between the source list, records list, and viewer works much better, as EagleFiler now overrides the Cocoa keyboard loop.
- You can now press Enter in the records list to edit the filename or press Return to open the selected records.
- Can now capture from PDFView.
- AppleScript enhancements:
- Added import text command, which takes a string and creates a new rich text file in the library.
- You can now access the open browser windows along with their displayed records and selected records.
- Added note file and trashed properties to library record. Also, various formerly read-only library record properties are now writable.
- Added container property to tag.
- If you click the + button in the browser window with the Tags folder or a tag selected, EagleFiler will create a new tag instead of a new folder.
- EagleFiler is more responsive when emptying the trash, as the lengthy index updating now takes place in a background thread. Also, EagleFiler now compacts the search index when emptying the trash, which should reduce the disk space used and speed up future searches.
- Added a hidden preference to make EagleFiler not check for duplicate files during importing. Click the link to allow duplicate files or to forbid them.
- Worked around PDF kit bug that could cause repeated zooming out when viewing a PDF.
- Fixed bug where EagleFiler didn’t recognize document packages when importing a folder full of files.
- Fixed regression where EagleFiler could freeze when clicking an X button in the Activity Viewer.
- If the library changes while you’re in the middle of editing a table cell or text field, EagleFiler will no longer replace your in-progress changes with the value from the database, nor will it mess up the insertion point.
- When following an EagleFiler link, if the specified library can’t be found, but one with the same name is already open, EagleFiler will try to use that library to open the link.
- Made various changes to improve the responsiveness of the interface.
- Faster file deletions, with better threading, should improve the performance of all background operations that create temporary files.
- Fixed crash when logging indexing errors.
- Worked around some framework bugs that could cause a variety of different crashes.
- The indexer recovers better when a file is unexpectedly deleted.
- Worked around Cocoa bug that could cause some tags to be removed if you ended editing in a tags field by pressing Return when the insertion point wasn’t at the end of the field.
- Fixed regression where changes to the tags weren’t saved when closing the Info inspector.
- Text filenames are now allowed to have no text before the extension, so you can now store and rename “dotfiles” in EagleFiler.
- It is now possible to edit the extensions of text files.
- If you launch EagleFiler by dropping a file onto it, it will now open the default library before importing the file rather than complaining that no library is open.
- Added blank line before the source URL in the records list tooltip.
- No longer brings the Errors window to the front (which was undesirable if you were in the middle of typing something) when an error occurs—instead, it just makes sure the window is visible.
- The mailbox importer now handles messages that start with “>From ” instead of a header.
- Better handling of encrypted PDFs.
- Better error reporting in Endo capture script.
- Better error message when can’t capture from Mail.
- Fixed bug logging errors during mailbox rebuild jobs.
- Fixed bug where browser windows didn’t remember whether the trash source was expanded between launches.
- Fixed bug where Command-Right Arrow and Command-Left Arrow didn’t work in text views.
- Fixed bug where Reveal In Library didn’t work for records that were in the trash.
- Simplified the Purchase window.
- 1.1.1—December 18, 2006
- When capturing a selection of files from the Finder, Spotlight comments may now be imported as tags or notes.
- Can now capture from Microsoft Excel.
- The keyboard shortcut for Import Text is now Command-% instead of Command-<, as the latter conflicted with a system-wide shortcut when using certain keyboard layouts.
- When creating a rich text record using text dragged from Safari (or, generally, any WebView), EagleFiler will now set the source URL and add it to the bottom of the text.
- You can now create records by dragging text selections from within EagleFiler to its source list or records list.
- After you choose Convert For Editing, EagleFiler will now select the newly created RTFD files rather than leaving the original Web archives selected.
- When pasting the results of Copy Source URL into a rich text view, the clickable text is now the URL itself, rather than the title, and no trailing newline is added.
- Added source URL to tooltip in records list.
- Generates better titles from dragged text.
- If you change the PDF view away from Zoom To Fit, it now remembers the current scale factor.
- Improved the speed of the initial index check when opening the library.
- Improved parsing of mbox files.
- Fixed bug where capturing some URLs didn’t work.
- Fixed bug where, when opening a new window to display a record, the record wasn’t always selected.
- Fixed bug where EagleFiler could hang if you tried to edit the title or filename of a record while it was doing something else.
- Fixed regression where importing via drag and drop from another application sometimes didn’t work.
- Fixed bug and reduced RAM usage when importing a large number of files/folders at once.
- Fixed bug where the source list or records list would go into edit mode when you clicked on it and it didn’t already have focus.
- Fixed bug where a PDF or Web archive would needlessly be scrolled to the first page.
- Stopping indexing operations by clicking the X button works better now.
- Indexing no longer hangs if there’s a problem loading a Web archive or if it’s corrupt.
- Worked around OS bug that prevented some Word documents from being indexed.
- Fixed bug reporting errors while adding a file to the library.
- Better error reporting for damaged Web archive files.
- Fixed bug where tag sources showed messages for mailboxes that were in the trash.
- Fixed bug where child tags weren’t sorted in the source list.
- EagleFiler no longer lets you give a tag an empty name.
- Worked around issue when saving libraries on Leopard.
- Worked around OS issue that caused EagleFiler to be the default opener for Word files.
- Worked around some bugs in libraries that EagleFiler uses, which caused errors when importing text via drag and drop.
- Better error reporting when can’t write a temporary file or save the library.
- The contextual menu now says Delete instead of Move To Trash, since deleting from a tag source doesn’t move to the trash.
- 1.1—December 6, 2006
- Importing
- EagleFiler will now let you import any kind of document. If it doesn’t know how to display the document, it will simply show the file’s icon, which you can click to open it in another application.
- When importing via drag and drop, you can now drop onto folders or tags in the source list or into the records list in order to put the imported records into that folder or assign them that tag.
- Now recognizes many more kinds of text files and text clippings.
- Can now import individual messages from Entourage via drag and drop.
- Added Command-< keyboard shortcut for the Import Text service.
- You can now import by control-clicking on a file in the Finder and choosing Open With ‣ EagleFiler.
- Added Import Clipboard command to the Dock menu.
- It is now possible to specify tag names and note text when importing via AppleScript.
- Capture
- Can now capture IMAP mailboxes and individual selected messages from Apple Mail.
- Can now capture from Endo, Firefox, and WebnoteHappy.
- If you press the capture key when there is no library open or while in an unsupported application, EagleFiler will now try to help you open a library or import the data in another way.
- Capture scripts can now import tags and notes.
- Text and Rich Text Files
- It’s now possible to edit text, RTF, and RTFD files directly in the record viewer. EagleFiler will automatically save any changes that you make and update the files’ checksums.
- Creating new rich text files is much smoother. The keyboard shortcut is now Command-N instead of Command-Control-N. If the File column is visible, EagleFiler will bypass the sheet, select the new file in the records list, and bring the File cell into edit mode so that you can set the filename and title. You can then tab into the record viewer to begin typing the contents of the file.
- You can drag records into the record viewer (or the notes text view) to create links to them.
- Searching
- You can now search by tag. You can also add tag criteria when doing an Anywhere or Notes search (e.g. tag:apple steve).
- Now remembers the last-used search scope (globally and per-window).
- You can now access the search syntax help page from the toolbar search field menu.
- Tags
- Added auto-completion when typing tag names.
- Added tags field to the bottom of the browser window, so that you can edit the tags of the selected record without having to open another window. You can quickly give the tags field keyboard focus by pressing Command-Shift-T.
- Tag sources now show all the e-mails with that tag (rather than just the files).
- Tag sources now behave more like iTunes playlists and iPhoto albums. If you delete a record from a tag source, EagleFiler unassigns the tag, but the record remains in the library.
- You can now arrange tags into a hierarchy in the source list, to organize them or to hide the ones you don’t want to see at the moment.
- Added New Tag menu command. If records are selected it changes to New Tag From Selection and the selected records are assigned the new tag.
- Browser Windows
- You can now single-click to edit the Title, From, or File directly, instead of having to open the Inspector window.
- Added Convert For Editing command, which lets you convert Web archives to RTFD files that can be edited.
- If you hold down Option when double-clicking a Web archive (or a RTFD file converted from a Web archive), EagleFiler opens the current version of the page rather than the archive.
- EagleFiler now shows custom icons for folders. You can set a custom icon using the Finder’s Get Info window.
- Added Show ‣ Source List and Show ‣ Record Viewer commands for people who want to use the menu or keyboard instead of double-clicking the divider.
- Added Actual Size and Zoom to Fit commands. The PDF viewer now remembers its zoom state, so that it won’t keep resetting to Zoom to Fit if you’ve zoomed in.
- Remembers the selected sources between launches.
- Arrow-keying through the records list is faster now.
- Libraries
- Added Remember open libraries between launches preference and Startup Items folder.
- The Drop Pad now has commands for creating a new library, opening a library, and opening recent libraries.
- The Dock menu now shows recent libraries.
- Other Enhancements
- If you ask EagleFiler to import a URL and the URL can’t be saved as a Web archive (e.g. because it’s an image or PDF), EagleFiler will download the file and import it as-is, rather than reporting an error about not being able to save a Web archive.
- Now imports MailTags projects as tags.
- The Zoom In and Zoom Out commands now work with Web archives, where they change the font size.
- The Copy URL command is now called Copy Record Link.
- Added Highlight command, which changes the background of the selected text to yellow.
- Added Outline and Styles… to the Format menu.
- Dragging a library file onto the Drop Pad now opens the library rather than complaining that the library can’t be imported.
- Improved the way EagleFiler auto-generates file names when creating a file from dragged text or a Web page’s title.
- Now skips importing Apple Mail messages that are marked as deleted.
- Capture scripts are now allowed to use the compiled script format, with the .scpt extension.
- Folders and mailboxes no longer have a title attribute that’s separate from the file name.
- When creating a new rich text file inside a sub-folder, it’s now revealed there instead of in the Records source.
- Indexing is now somewhat faster and uses less memory.
- Double-clicking a folder now opens it in EagleFiler instead of in the Finder.
- In the source list, single-clicking now enters edit mode and double-clicking now opens the source.
- Improved secondary sorting of records list.
- Increased maximum width of the Kind column.
- Added keyboard shortcuts for Select Source and Hide Others.
- Rich text copied using Copy Record Link now includes the title of the record, rather than just the URL.
- Now displays the proper background color for RTF documents.
- Added Open Source URL, Copy Record Link, and Verify to the contextual menu.
- The underscore and hyphen characters are now allowed in tag names.
- You can now drag into the records list of a tag source to assign that tag.
- Shortened toolbar button labels.
- The menu commands for Show Inspector and Show Tags now toggle the visibility of the windows rather than showing them.
- The Software Update… checker now works behind an HTTP proxy.
- The Import Files menu command no longer allows you to import individual files inside an Apple Mail mailbox, as this is usually an error.
- Moved Open in External Viewer command to the Record menu.
- Added keyboard shortcut for Open Source URL.
- Reordered Record menu.
- Reduced number of threads used on single-core Macs.
- You can now delete tags from the source list.
- Bug Fixes
- Periods in the names of folders are now treated as part of the name, rather than as the beginning of a path extension.
- Worked around OS bug that prevented phrase searching from working. Because of this, EagleFiler will automatically rebuild the indexes of any opened libraries.
- Fixed bug that could cause a crash when importing large folder hierarchies.
- When importing a folder, EagleFiler will now ignore any invisible Find By Content index files.
- Fixed bug importing and moving files with very long names.
- Fixed bug in .emlx exporter.
- Fixed bug where EagleFiler couldn’t import a Web page if WebKit crashed while trying to extract its text.
- Fixed bug with using Capture command in Dock menu.
- Fixed bug where EagleFiler didn’t let you capture if you launched it by opening a library from the Finder and then switched to another application so that it finished launching in the background.
- The capture key is now ignored if EagleFiler is frontmost.
- Fixed spelling and resizing of “Title” label in the New Rich Text File sheet.
- Fixed crash that could occur when indexing.
- Fixed bug where an indexing operation could stall indefinitely.
- If a document or message can’t be indexed, EagleFiler is better at continuing on and indexing the rest of the documents or messages.
- Better logging of index problems.
- Fixed bug where indexed searching didn’t work in tag sources.
- Fixed bug where undo didn’t work after renaming in source list.
- Fixed bug where the user could use drag and drop to change the page that the Web view was displaying to one other than that of the selected Web archive.
- Better display of messages with no text parts.
- Fixed bug where the Recent smart folders didn’t show records that were inside folders.
- Fixed bug where Web archives couldn’t be displayed, depending on if you had certain preferences set in Safari.
- Fixed bug where the selection in the notes text view would be needlessly reset when the library changed.
- Fixed bug that could lead to error when undoing too far in the notes text view.
- No longer allows you to give a file an empty name (before the extension), as this confuses Cocoa.
- Fixed bug where the Show Inspector command opened the inspector but didn’t give it keyboard focus.
- Worked around OS bug that could cause crash when using NetNewsWire Lite.
- Fixed a few bugs that made it impossible to launch EagleFiler from a path containing non-ASCII characters.
- Fixed small memory leak when processing errors.
- Fixed bug where you couldn’t create a new folder with / in the name.
- Fixed bug where showed : instead of / when displaying file names.
- The file system encoding is no longer hard-coded to UTF-8.
- Improved thread-safety of record properties.
- When launching, no longer prints “CMSCreateDataProviderOrGetInfo : Invalid colorspace type” message to console.
- Fixed bug where changes to a file’s name or title weren’t always propagated to the index.
- Fixed bug where source URLs weren’t being cached properly.
- Fixed bug opening aliases of libraries.
- Fixed bug where you couldn’t create or open a library if its path contained non-ASCII characters.
- Worked around bug in SOHO Notes (and other applications) that prevented drag-and-drop importing of promised files from working.
- Fixed bug importing notes from MailTags.
- Fixed bug where the drag image for a selected source used white text.
- Fixed bug where displaying an HTML e-mail message would take too long to timeout.
- Fixed bug in reporting HTML rendering errors.
- Fixed internal error when closing a library right after opening it.
- Improved error recovery when an untrusted server certificate is encountered while creating a Web archive.
- 1.0.2—October 14, 2006
- Fixed bug capturing from Apple Mail.
- 1.0.1—October 14, 2006
- Fixed problem where EagleFiler would sometimes crash at launch if an input manager or haxie was installed.
- Worked around OS bug that caused jitter in the software update progress bar.
- The software update installer no longer says it failed if it succeeded.
- 1.0—October 13, 2006
- First public release.